Calibration: Selector
Which command you need depends entirely on your MMU's selector mechanism - see What Is an MMU? for the vendor table if you're not sure which one you have. Type-B designs (Box Turtle, 3MS, Angry Beaver, EMU, KMS, Night Owl, QuattroBox) have no moving selector at all - nothing on this page applies to them.
| Selector mechanism | Command(s) | Example vendors |
|---|---|---|
| Linear carriage + grip servo | MMU_CALIBRATE_SELECTOR + MMU_SERVO |
ERCF, Tradrack |
| Servo-driven cam | MMU_CALIBRATE_SERVO_SELECTOR |
MMX, Pico MMU |
| Rotary carriage | MMU_CALIBRATE_ROTARY_SELECTOR |
3D Chameleon, HTLF, Low Rider, MMX6 |
| Indexed (switch-per-gate) | MMU_CALIBRATE_SELECTOR_INDEXES |
BTT ViViD |
Linear selectors
MMU_CALIBRATE_SELECTOR finds and saves the carriage position for each
gate. There are four ways to run it, depending on your hardware and how
much you trust its mechanical repeatability:
Fully automatic - the simplest path, for designs with deterministic hard stops (e.g. ERCF):
MMU_CALIBRATE_SELECTOR AUTO=1
Have the first gate selected before running this. It sweeps the full range of travel and computes every gate's position, plus the bypass if fitted, in one pass.
Extrapolate from the first and last gate - more accurate for designs without deterministic stops or perfectly equal gate spacing (e.g. Tradrack, or ERCF v2 selector heads):
MMU_CALIBRATE_SELECTOR GATE=0
MMU_CALIBRATE_SELECTOR GATE=8 EXTRAPOLATE=1
Align and calibrate gate 0 first, then the last gate - EXTRAPOLATE=1
distributes any build variance evenly across the gates in between rather
than assuming they're perfectly spaced.
One gate at a time - for touching up a single position without disturbing the rest:
MMU_CALIBRATE_SELECTOR GATE=3 SAVE=0
SAVE=0 reports the result without persisting it, useful for a quick
check. Drop it once you're happy with the position.
The bypass gate, if fitted, is calibrated separately:
MMU_CALIBRATE_SELECTOR BYPASS=1
ERCF v1.1 users with a bypass block modification need BYPASS_BLOCK=
(1-3) to identify which leg it's mounted on.
RESET=1 clears all saved selector positions for the unit, back to
whatever the fully-automatic sweep or CAD defaults would give.
Tip
After calibrating, confirm every gate is reachable:
MMU_HOME
MMU_SELECT GATE=8
Servo grip positions
Linear-selector designs with a grip servo (ERCF, Tradrack) use MMU_SERVO
for three named positions:
- up - filament released, free to move through the gate (tool selected, normal printing).
- down - filament gripped (loading/unloading, or printing in synced mode).
- move - filament gripped tightly enough that the selector carriage can move without disturbing it. Defaults to the same angle as up if never set separately.
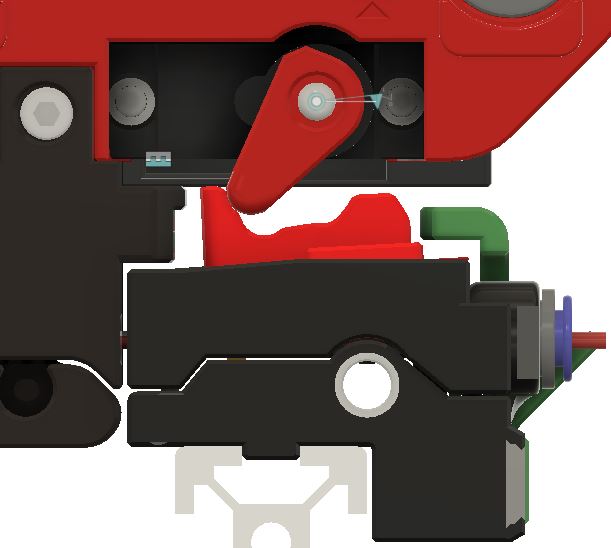
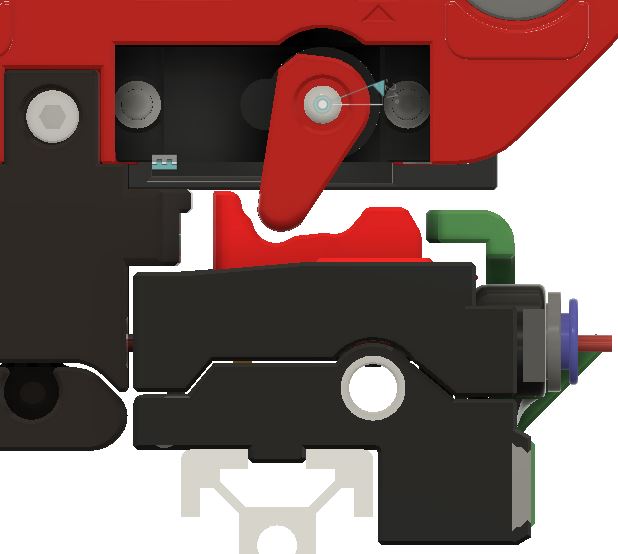
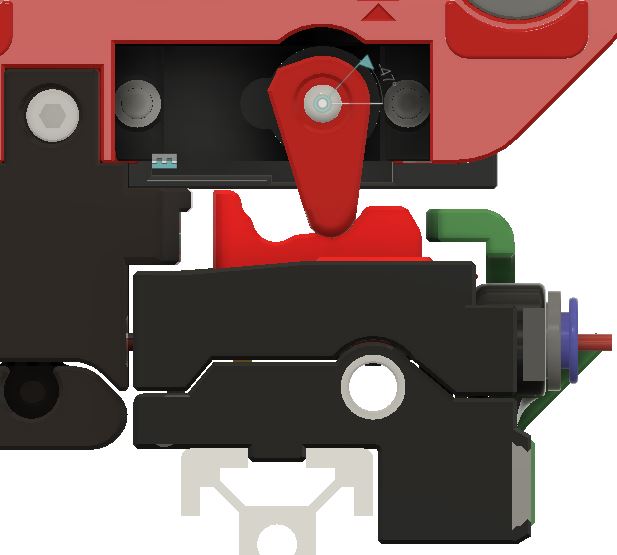
Tune one position at a time - move it, check by eye, then save:
MMU_SERVO POS=up
MMU_SERVO
Current servo angle: 125, Positions: {'down': 45, 'up': 125, 'move': 110}
MMU_SERVO ANGLE=128
MMU_SERVO POS=up SAVE=1
ANGLE= moves to an arbitrary angle for tuning; SAVE=1 combined with
POS= persists the servo's current angle as that named position.
RESET=1 clears all three back to mmu_hardware.cfg's configured
defaults.
Note
Position the arm so it doesn't strike anything (tophats, the selector
body) as the selector moves in move. If you can't reach a working
angle, you may need to change the servo horn/spline, or adjust its
mounting in mmu_hardware.cfg.
Servo-cam selectors
MMX and Pico MMU use a servo-driven cam instead of a linear carriage - one command both moves the servo and calibrates each gate's angle:
MMU_CALIBRATE_SERVO_SELECTOR
MMU_CALIBRATE_SERVO_SELECTOR ANGLE=83
MMU_CALIBRATE_SERVO_SELECTOR GATE=5 SINGLE=1
Running it with no parameters reports the current calibration. ANGLE=
moves to a specific angle for tuning; once it's right for a gate, save it
with GATE=/LGATE= (SINGLE=1 if you only want that one gate touched).
SPACING= sets every gate at once from one calibrated position plus a
fixed angle-per-gate interval - handy for an initial setup pass.
BYPASS=1 and RELEASE=1 calibrate those two special positions the same
way. RESET=1 clears everything back to configured starting values.
Rotary selectors
3D Chameleon, HTLF, Low Rider, and MMX6 use a rotating carriage:
MMU_CALIBRATE_ROTARY_SELECTOR
MMU_CALIBRATE_ROTARY_SELECTOR QUICK=1
MMU_CALIBRATE_ROTARY_SELECTOR GATE=2 SINGLE=1
With no parameters it calibrates every gate on the unit. QUICK=1
calibrates every offset from CAD geometry in one pass - a good starting
point for initial setup, refined later gate-by-gate with GATE=/
SINGLE=1 if any position needs a touch-up. SAVE=0 reports without
persisting.
Indexed selectors
BTT ViViD has one index switch per gate rather than a single home switch, so calibration is detection rather than measurement. It is highly unlikely that you would need to re-calibrate the ViViD, but this command will at least ensure that movement from one gate to another is as quick as possible and that selection provides maximal filament grip by centering the stopping point.
MMU_CALIBRATE_SELECTOR_INDEXES
This detects the gate order and each endstop's width automatically -
there's nothing to measure or align by hand first. SAVE=0 reports
without persisting; RESET=1 clears the saved calibration.
See also
- Calibration - overview, order, and which steps apply to your MMU
- What Is an MMU? - the Type-A/B/C taxonomy and vendor table
- Command Reference:
MMU_CALIBRATE_SELECTOR - Command Reference:
MMU_SERVO - Command Reference:
MMU_CALIBRATE_SERVO_SELECTOR - Command Reference:
MMU_CALIBRATE_ROTARY_SELECTOR - Command Reference:
MMU_CALIBRATE_SELECTOR_INDEXES - Feature: Filament Bypass - using the bypass position once calibrated