Slicer Setup
Printing with an MMU means augmenting the gcode your slicer generates: initializing the MMU, loading the initial tool, and optionally resetting/ejecting filament at the end. Happy Hare's recommended macros handle all of this - Enable MMU support in your slicer (Expert Options on, then the Printer Settings tab) and add the calls below to your slicer custom gcode boxes. It's worth splitting your existing start-print macro into two parts to do this properly - see Start G-Code below for why.
Start G-Code
Add this to your slicer's custom start gcode box, in place of a single call to your own start-print macro:
MMU_START_SETUP INITIAL_TOOL={initial_tool} TOTAL_TOOLCHANGES=!total_toolchanges! REFERENCED_TOOLS=!referenced_tools! TOOL_COLORS=!colors! TOOL_TEMPS=!temperatures! TOOL_MATERIALS=!materials! FILAMENT_NAMES=!filament_names! PURGE_VOLUMES=!purge_volumes!

MMU_START_CHECK

; Your existing start-print macro call here (without any nozzle-purge logic - filament may not be loaded yet)
MMU_START_LOAD_INITIAL_TOOL

; Optional: your purge/prime logic, now that the initial tool is loaded
SET_PRINT_STATS_INFO TOTAL_LAYER={total_layer_count} ; For pause-at-layer and better print stats
Note
Keeping these as separate macro calls, rather than folding everything into one big, uber start-print macro, matters for two reasons: a pause can only happen between macro calls, not mid-macro, so bundling everything into one long-running macro delays the first real chance to pause until it finishes (worse still with Klipper's pop-up dialogs, which can't be dismissed until the macro they came from completes); and any nozzle-purging logic your existing start macro needs to run after the initial tool is loaded, not before.
Sequence explained
-
MMU_START_SETUPinitializes the MMU and captures what the slicer expects for this print - passed either as literal slicer placeholders ({initial_tool}) or via!referenced_tools!-style placeholders that Happy Hare's Moonraker extension substitutes when the gcode file is uploaded, since slicers don't provide these natively (see G-code Preprocessing). The result is the "Slicer Tool Map," available for the rest of the print asprinter.mmu.slicer_tool_map:printer.mmu.slicer_tool_map: initial_tool: 0 # Initial tool number expected at print start tools.0.color: ff0000 # Color in RRGGBB for T0 tools.0.material: ABS tools.0.temp: 240 tools.0.in_use: 1 tools.3.color: 00e410 # Color in RRGGBB for T3 tools.3.material: ASA tools.3.temp: 245 tools.3.in_use: 1 purge_volumes: [[100, 100], [100, 100]] # NxN matrix, purge volume tool X -> tool YDisplay it any time with
MMU_SLICER_TOOL_MAP(PURGE_MAP=1orSPARSE_PURGE_MAP=1also shows the purge matrix, the latter limited to tools actually referenced in the print):MMU_SLICER_TOOL_MAP PURGE_MAP=1-------- Slicer MMU Tool Summary --------- 2 color print (Purge volume map loaded) T0 (Gate 0, ABS, ff0000, 240°C) T3 (Gate 3, ASA, 00e410, 245°C) Initial Tool: T0 ------------------------------------------- Purge Volume Map: To -> T0 T1 T2 T3 T4 T5 T6 T7 T8 T0 - 200 200 200 200 200 200 200 200 T1 200 - 200 200 200 200 200 200 200 T2 200 200 - 200 200 200 200 200 200 T3 200 200 200 - 200 200 200 200 200DETAIL=1also reports tools the slicer defined but aren't used in this particular print. -
MMU_START_CHECKconfirms filament is available in every tool the print actually needs, using the Slicer Tool Map from step 1 (skipped automatically for a single-tool print whose initial tool is already loaded). A failure here pauses the print without aborting the rest of the startup sequence - re-runMMU_START_CHECKby hand once fixed. -
Your own start-print macro - homing, bed leveling, setting temperatures. Shouldn't assume the extruder is loaded; separate any purging into step 5.
-
MMU_START_LOAD_INITIAL_TOOLloads the tool the Slicer Tool Map says the print starts with - no parameters needed. -
Optional purge/prime logic - the part of your original start macro that purges/cleans the nozzle, now safely after the initial tool is loaded.
Tip
Slicer-defined tool colors can also show up directly in Mainsail/Fluidd
next to the Tx buttons - see Mainsail/Fluidd.
End G-Code
Add this to your slicer's custom end gcode box:
MMU_END
; Place your existing print-end macro call here if you have one
MMU_END finalizes the MMU - can report print stats, reset the
Tool-to-Gate map, and unload/eject filament depending on
mmu_macro_vars.cfg settings (below). Run it before your own end macro,
since that one likely turns off heaters and motors.
After Layer Change G-Code
Needed for sequential printing - see Toolchange Movement. Add to your slicer's custom after layer change gcode:
MMU_UPDATE_HEIGHT

; If using the Happy Hare client macros, also add this for pause-at-layer support:
SET_PRINT_STATS_INFO CURRENT_LAYER={layer_num}
Tool Change G-Code
Usually already the slicer default, but worth confirming - as a minimum, custom slicer tool change gcode should be:
T[next_extruder]
Tn lines into
MMU_CHANGE_TOOL when it
pre-processes an uploaded gcode file.
Many slicers like OrcaSlicer, PrusaSlicer, and SuperSlicer also insert extra
retraction/un-retraction gcode around filament changes which can create small blobs
post toolchange depending on retraction settings if left unhandled when using Happy
Hare controlled purging. Additional slicer settings can now be passed to manage this,
or the retraction setting you use hardcoded to enable Happy Hare to compensate for
Slicer retractions post Blobifier/MMU_PURGE or your own custom purge macro from
layer 2 onwards.
If firmware retraction is enabled in your slicer but not in the printer, Slicer retraction compensation will be disabled.
When enabled, you will see an info message in the log indicating Happy Hare has adjusted
and reduced the un-retraction distance to compensate
e.g. park retraction:3.5mm - slicer retraction: 0.4mm:
// Adjusting un-retraction to 3.1mm to compensate for unhandled slicer 0.4mm retraction during toolchange
...
// Un-retracting 3.1mm
Refer to alternate slicer Tool Change Gcode examples below:
Example
T[next_extruder] SLICER_RETRACTION={old_retract_length} SLICER_FW_RETRACTION={use_firmware_retraction}
T[next_extruder] SLICER_RETRACTION=[retract_length] SLICER_FW_RETRACTION={use_firmware_retraction}
Note
Unlike Orca Slicer, PrusaSlicer doesn't have old_retract_length or a variable to pass
retraction settings per filament so uses the same setting for all filaments.
T[next_extruder] SLICER_RETRACTION=0.6 SLICER_FW_RETRACTION=false
T[next_extruder] SLICER_FW_RETRACTION=true
Customizing the Start/End Macros
The macros above are configured in mmu_macro_vars.cfg, under
_MMU_SOFTWARE_VARS:
[gcode_macro _MMU_SOFTWARE_VARS]
description: Happy Hare optional configuration for print start/end checks
gcode: # Leave empty

# Control MMU_START_SETUP / MMU_START_LOAD_INITIAL_TOOL
variable_user_pre_initialize_extension : "G28"   ; Run at the start of MMU_START_SETUP - commonly G28 to home
variable_home_mmu                      : False   ; Whether to home the MMU before print start
variable_check_gates                   : True    ; Whether to check filament is loaded in every gate used
variable_load_initial_tool             : True    ; Whether to automatically load the initial tool
variable_automap_strategy              : none    ; none|filament_name|material|color|closest_color - auto-adjust the TTG map to match the slicer's tool map

# Control MMU_END
variable_user_print_end_extension      : ""      ; Run at the start of MMU_END - a good place to move off the print
variable_unload_tool                   : True    ; Whether to unload the tool at print end
variable_reset_ttg                     : False   ; Whether to reset the Tool-to-Gate map at print end
variable_dump_stats                    : True    ; Whether to display print stats at print end
MMU Error Dialog
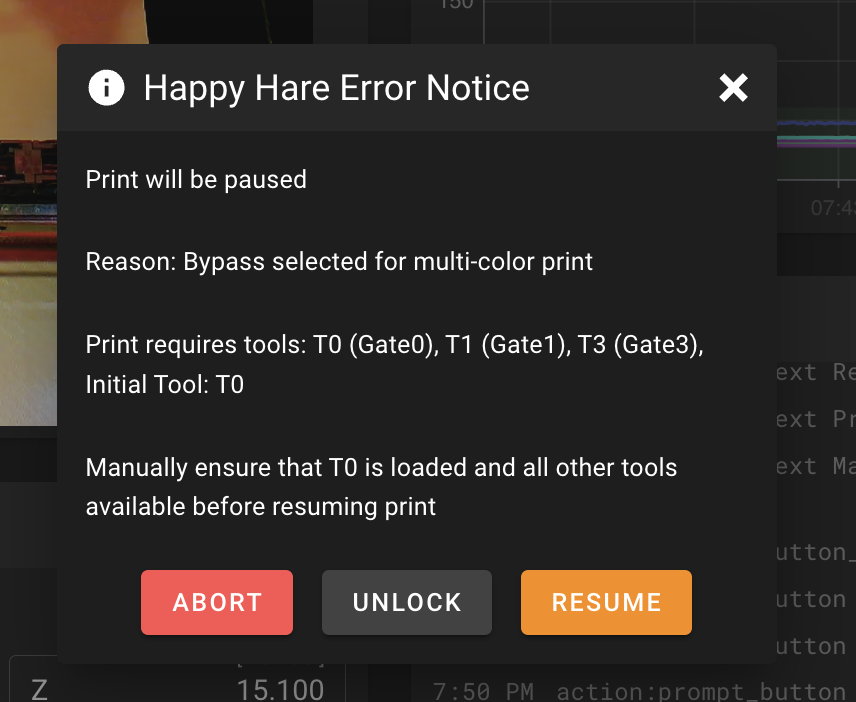
An MMU error - even during these startup macros - pauses the print and, if
show_error_dialog: 1 in mmu.cfg (the default), also shows a pop-up
dialog on Mainsail/Fluidd/KlipperScreen with recovery options. During
startup this includes an abort option, which disappears once the actual print
begins. Set show_error_dialog: 0 to disable the pop-up entirely and rely
on the console/log instead.
Important
If you write your own startup macros, remember a long-running one paired with the error dialog can make the printer look locked up until it finishes - the same reasoning behind splitting the start macro into separate calls above.
Slicer Tip Forming
Configuring "single extruder multi-material" mode is slicer-specific and outside this page's scope, but PrusaSlicer, SuperSlicer and OrcaSlicer share enough of an interface that the same settings apply to all three (shown here for PrusaSlicer).
Turning off slicer tip forming
The simplest, recommended setup is to let Happy Hare form tips entirely and disable the slicer's own tip-forming - Happy Hare has to do this while not actively printing anyway, so there's little point configuring it twice.
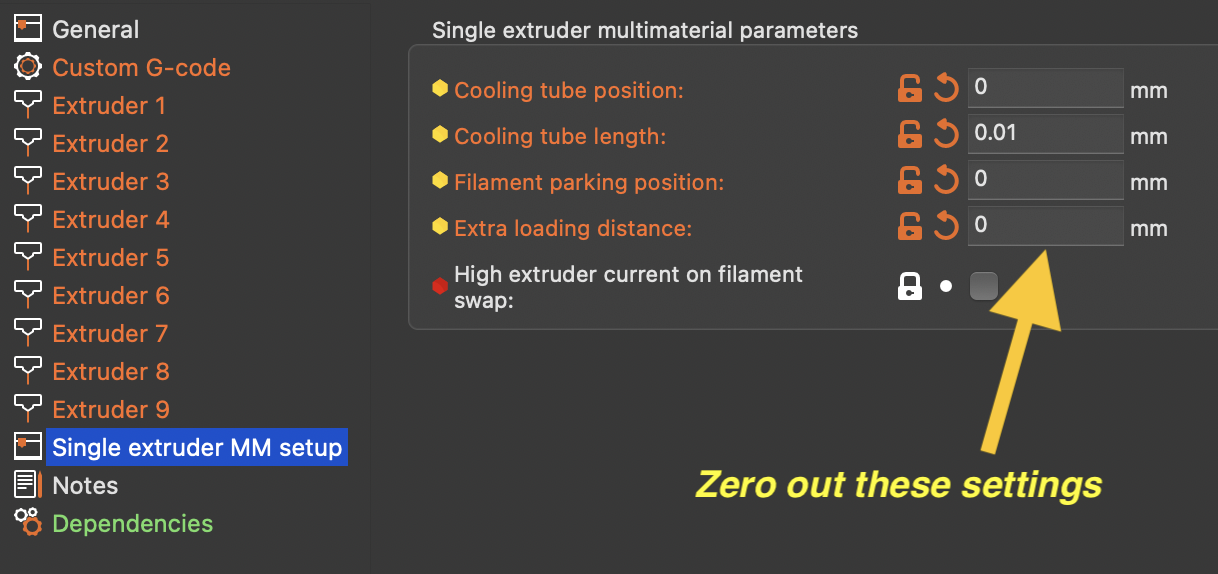
The primary retract/extrude oscillation that does most of the tip-forming and cooling movement is disabled on the Printer Settings tab:
Note
PrusaSlicer versions 2.5-2.7 have a bug that inserts an illegal G1 F0
command if every one of these fields is exactly 0 - use a tiny value
like 0.01 for the cooling tube length on those versions only.
PrusaSlicer 2.8 and later can use exactly 0.
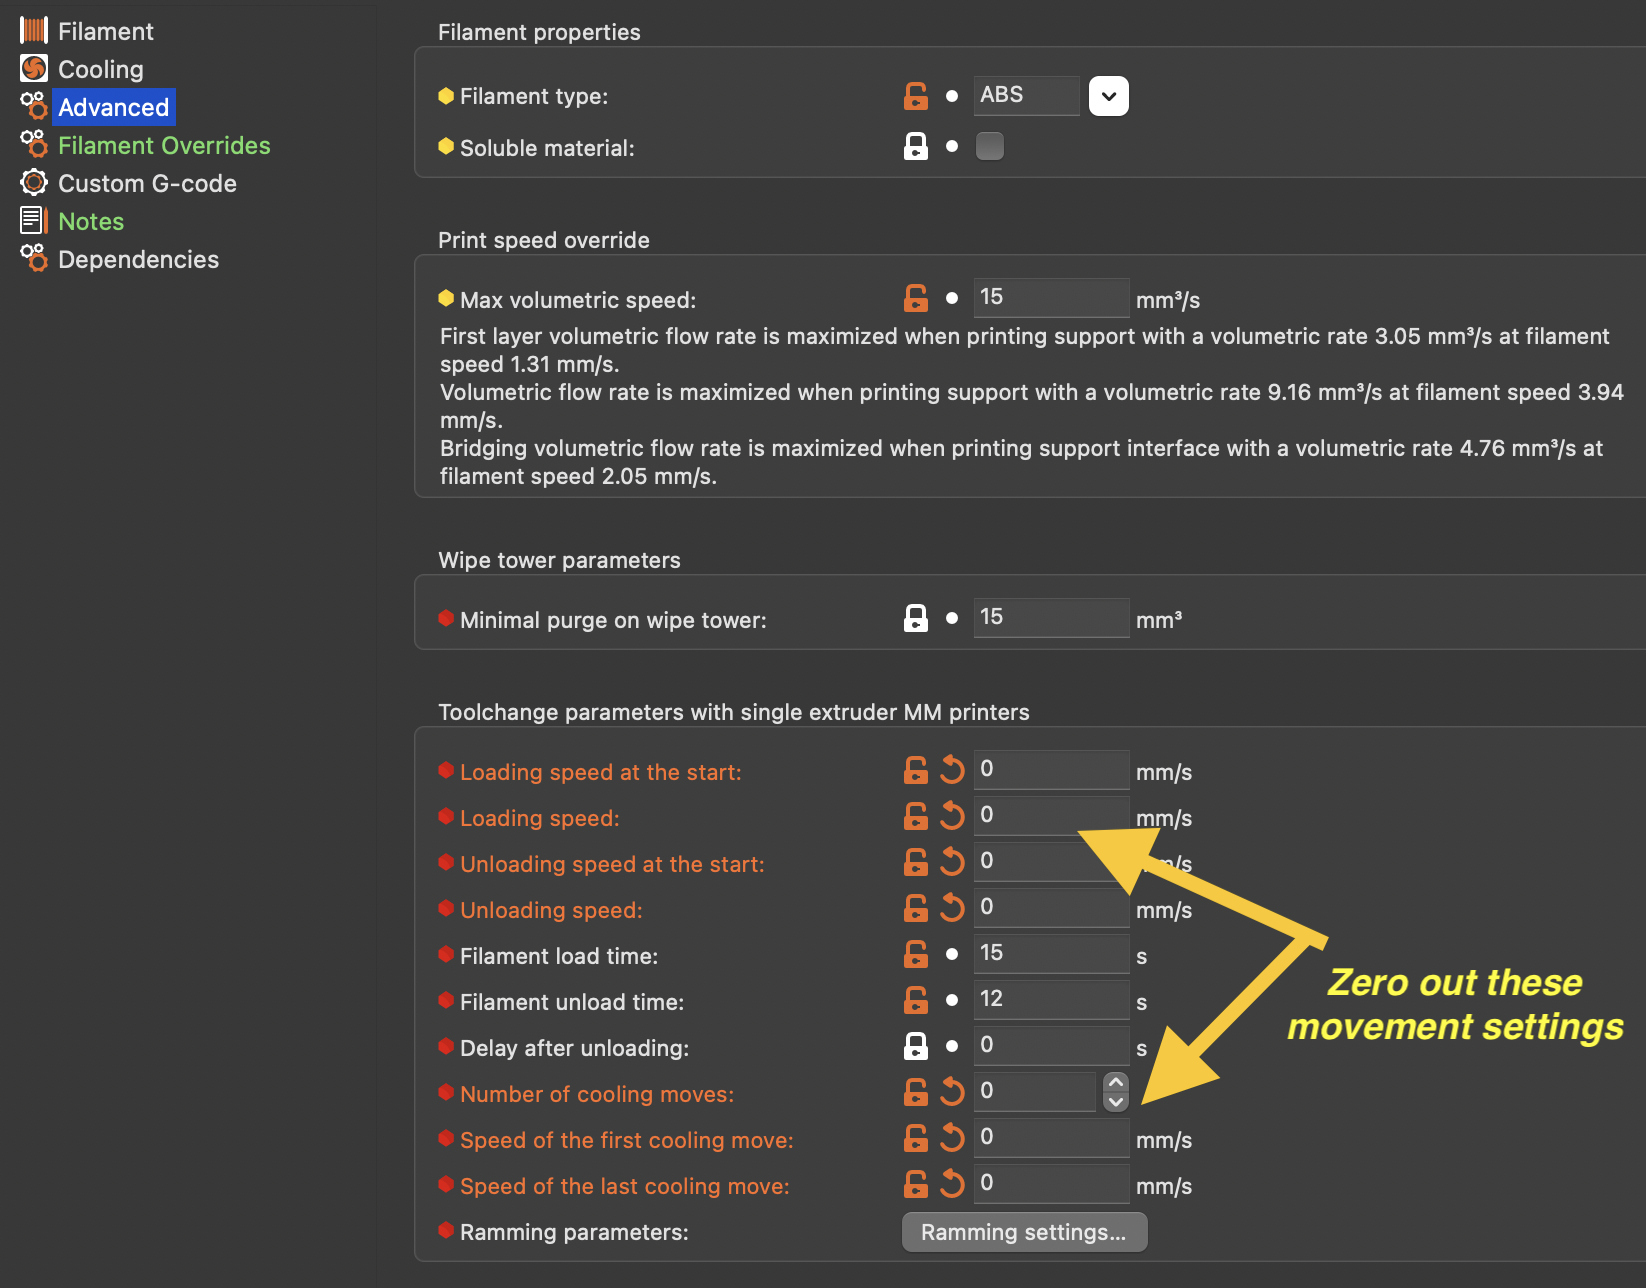
On the Filament Settings tab, zero out every movement speed/distance too, leaving only timing values (worth tuning once you know your MMU's typical load/unload time):
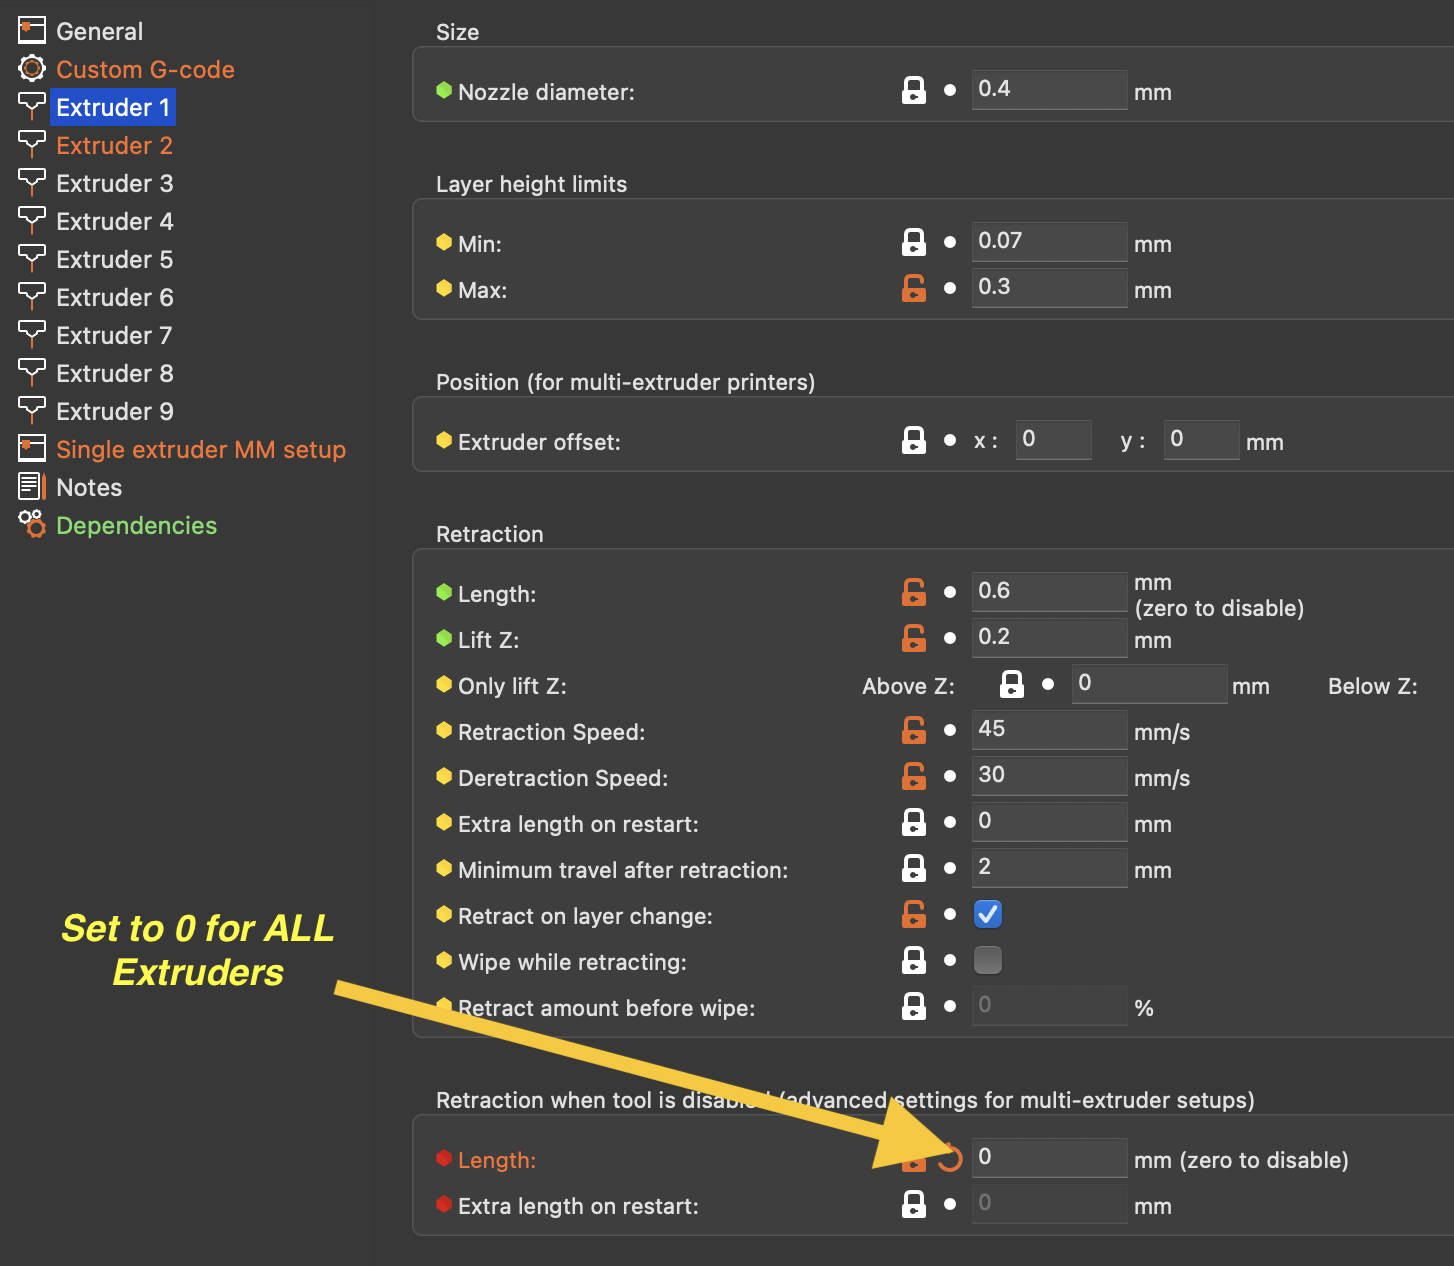
Per-extruder, disable the initial retraction/extrude that would otherwise leave a blob on the wipe tower - Happy Hare already loads filament exactly to the nozzle, so any extra extrusion here just blobs:
Unless using a dedicated purge system instead (see Feature: Tip Forming and Purging), leave the slicer's wipe tower enabled - it's usually on by default:
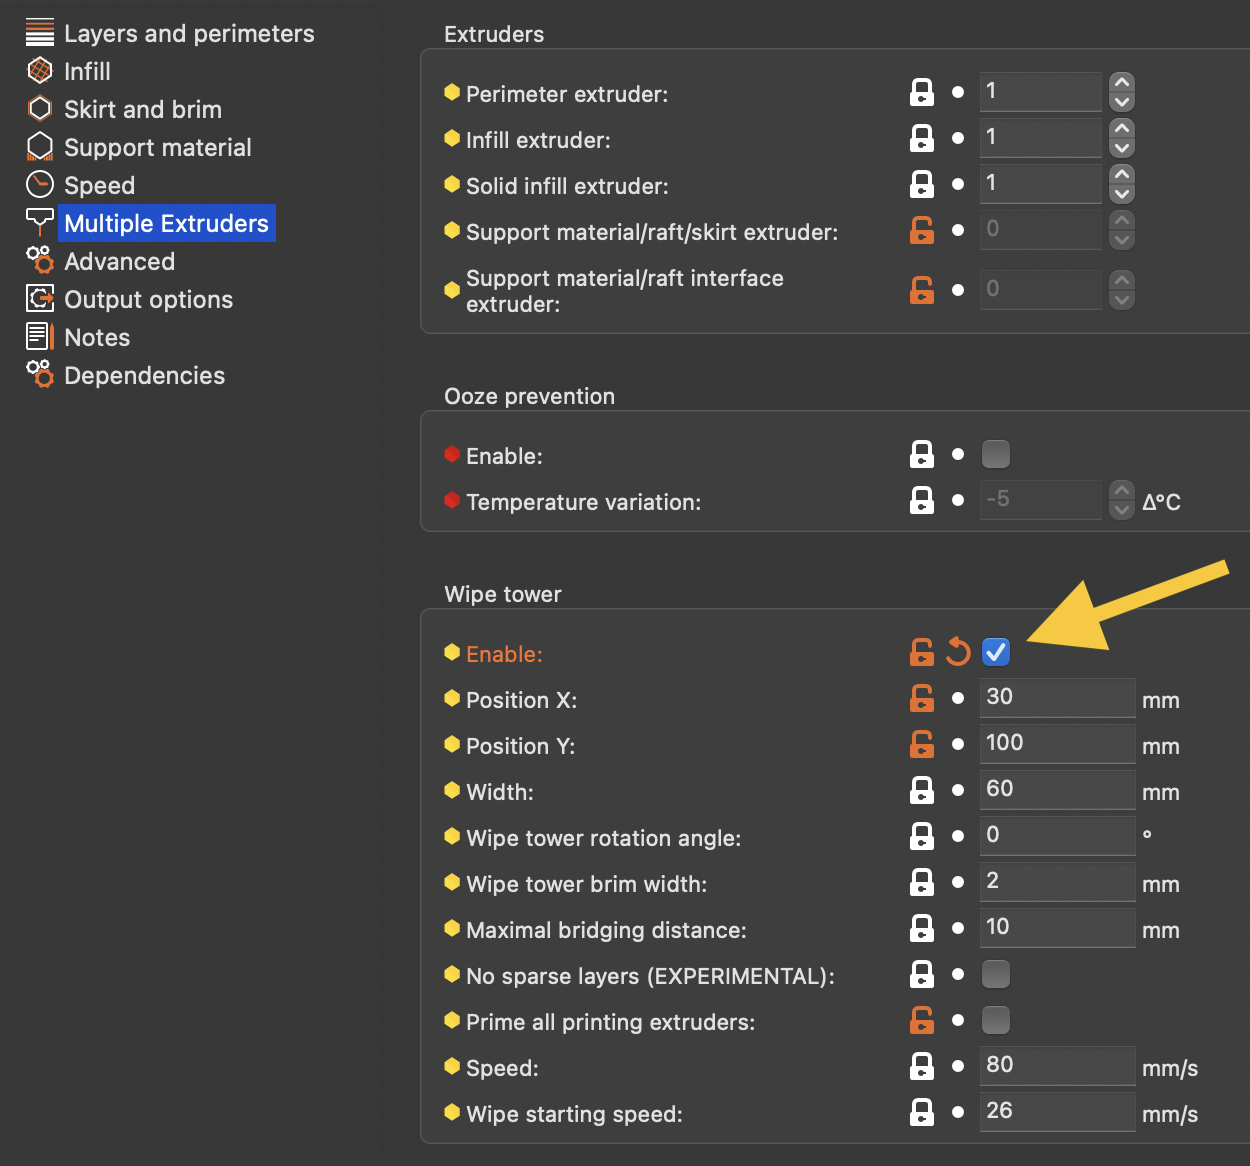
Note
SuperSlicer users: also turn off Skinnydip, and consider zeroing it's distances too - otherwise it can push out a blob before the tip is cut.
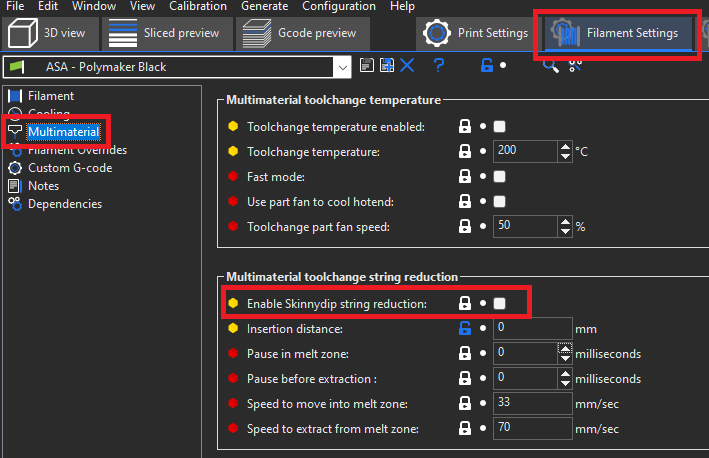
Turning off the slicer wipe tower
Switching to a custom purge system (see Feature: Tip Forming and Purging) just needs the enable wipe tower option un-toggled - every tip-forming setting above stays the same either way.
How to verify your configuration
Confirm the slicer isn't secretly still doing tip-shaping by examining the
gcode it produces around a toolchange (look for Tn lines, or
MMU_CHANGE_TOOL if viewing the file after Happy Hare's pre-processor has
run). It should look clean, with no retract/extrude moves before the tool
change itself:
;--------------------
; CP TOOLCHANGE START
; toolchange #1
; material : ASA -> ASA
;--------------------
; WIPE_TOWER_START
M220 S100
; CP TOOLCHANGE UNLOAD
;WIDTH:0.6
;WIDTH:0.5
M104 S260
; Cooling park
G4 S0
; filament end gcode
T0
M106 S255
SET_PRESSURE_ADVANCE ADVANCE=0.025 SMOOTH_TIME=0.001 EXTRUDER=extruder
Not like this - the extra retract/extrude lines are the slicer still doing it's own tip forming:
;--------------------
; CP TOOLCHANGE START
; toolchange #2
; material : ASA -> ASA
;--------------------
; WIPE_TOWER_START
M220 S100
; CP TOOLCHANGE UNLOAD
;WIDTH:0.6
;WIDTH:0.5
; Retract(unload)
G1  X204.504 Y102.283 E-15.0000
G1 E10.4965
G1 E2.9990
G1 E1.4995
; Cooling park
G1 E0.0050 F2000
G4 S0
; filament end gcode
T2
M106 S255
SET_PRESSURE_ADVANCE ADVANCE=0.025 SMOOTH_TIME=0.001 EXTRUDER=extruder
Slicers don't make this a simple toggle to verify visually, so checking a real generated file is the reliable way to confirm it.
See also
- Feature: Tip Forming and Purging
- Toolchange Movement
- Macro: Print Start/End - the
MMU_START_SETUP/MMU_START_LOAD_INITIAL_TOOL/MMU_ENDsettings this page's macros drive - Feature: G-code Preprocessing
- Command Reference:
MMU_SLICER_TOOL_MAP - Command Reference:
MMU_CHANGE_TOOL