MCU Reference
Reference material for some of the MCU/control boards Happy Hare's installer
knows about - pinouts, connection diagrams, and firmware-flashing notes for the
ones with images available, plus the complete current list of every board
menuconfig's Board type screen offers. Picking one there sets up the
default pin layout for your setup automatically; pins can still be
customized afterward in Advanced Settings if needed. See
Getting Started with Box Turtle
for what that screen actually looks like.
Popular MCUs
Standard EASY-BRD (SAMD21)
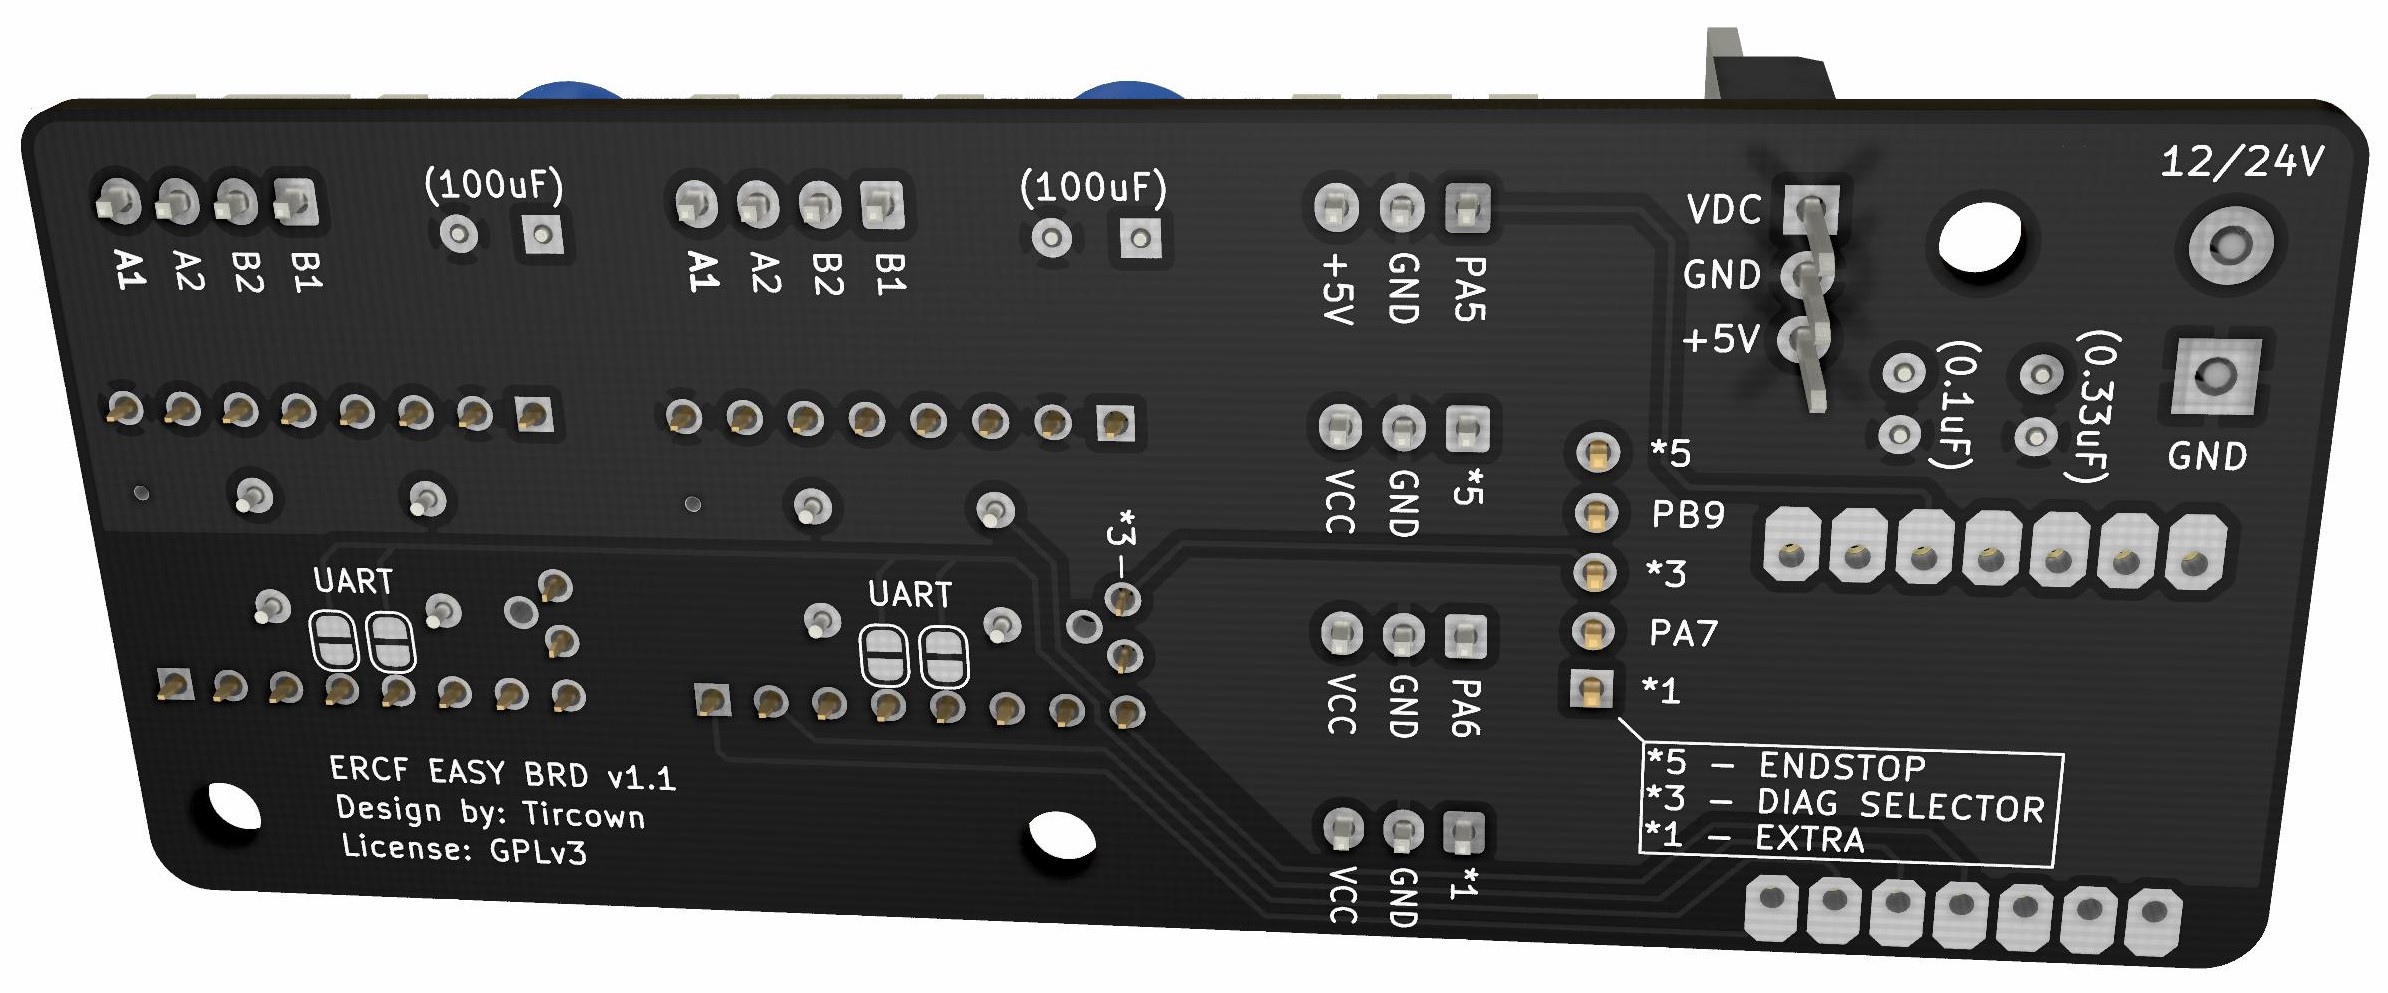
Firmware
Klipper make menuconfig settings for Easy Brd
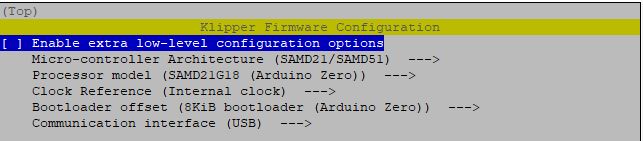
See Flashing Firmware below for the full procedure.
Fysetc Burrows ERB v2
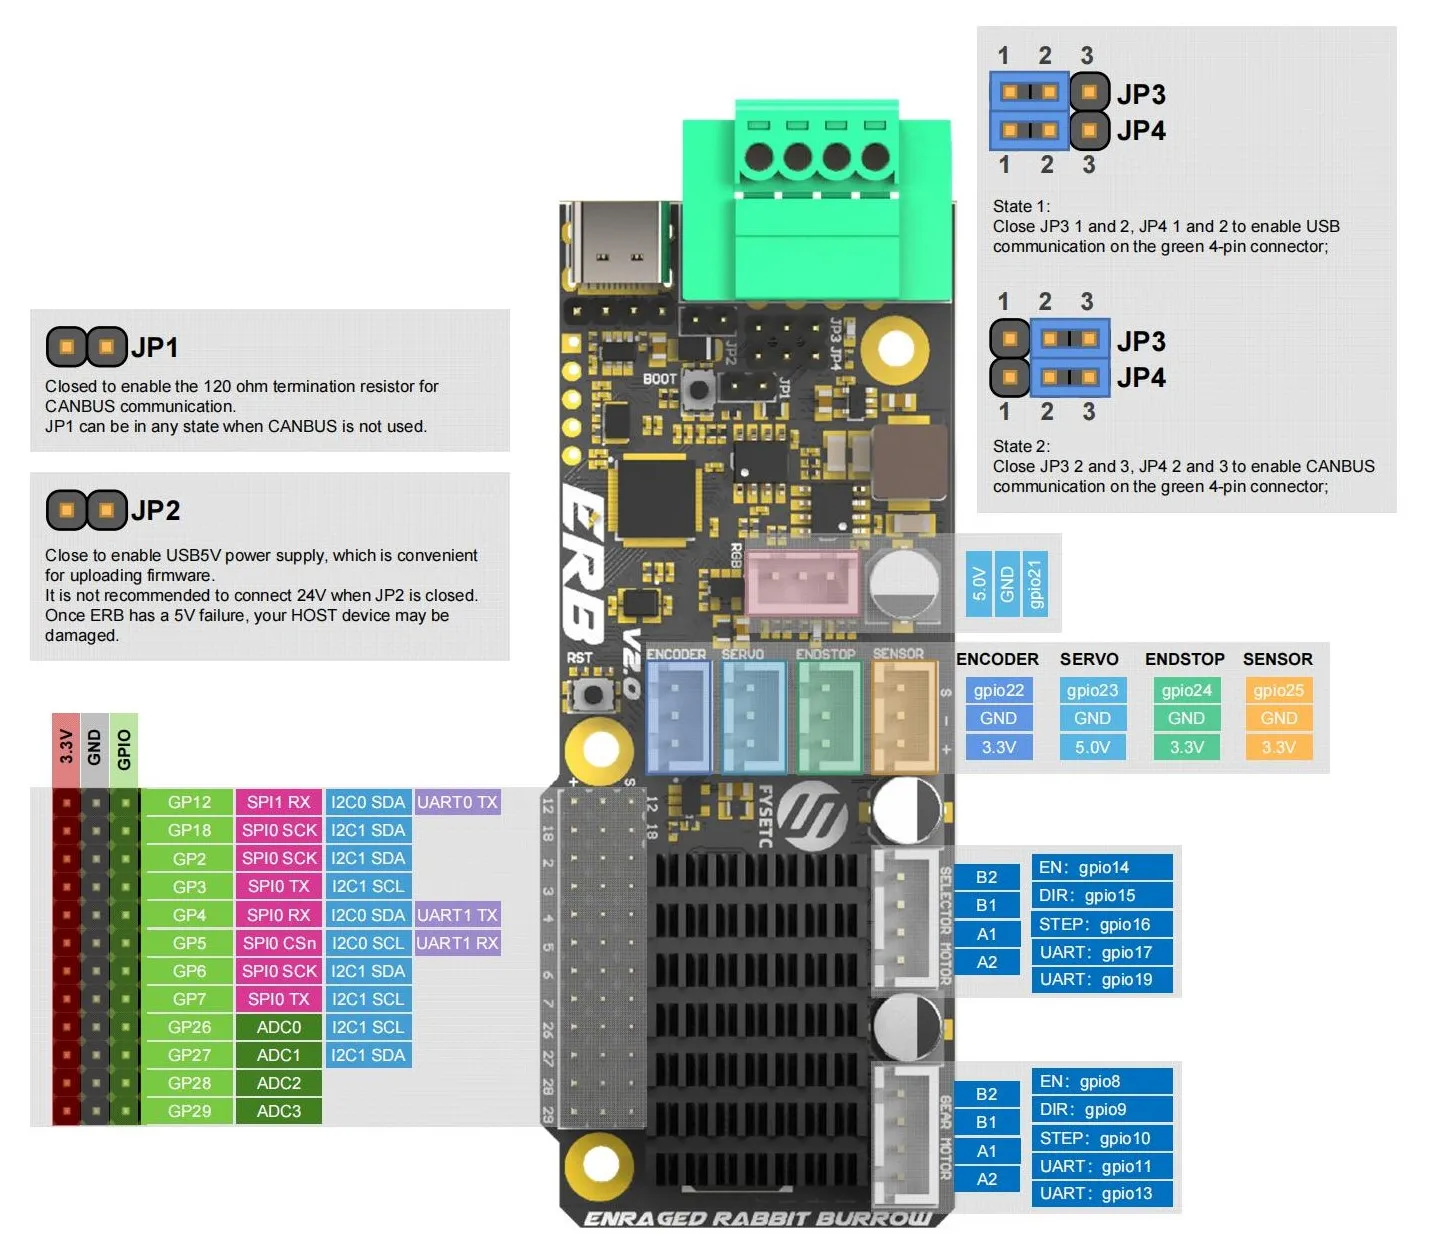
Wiring
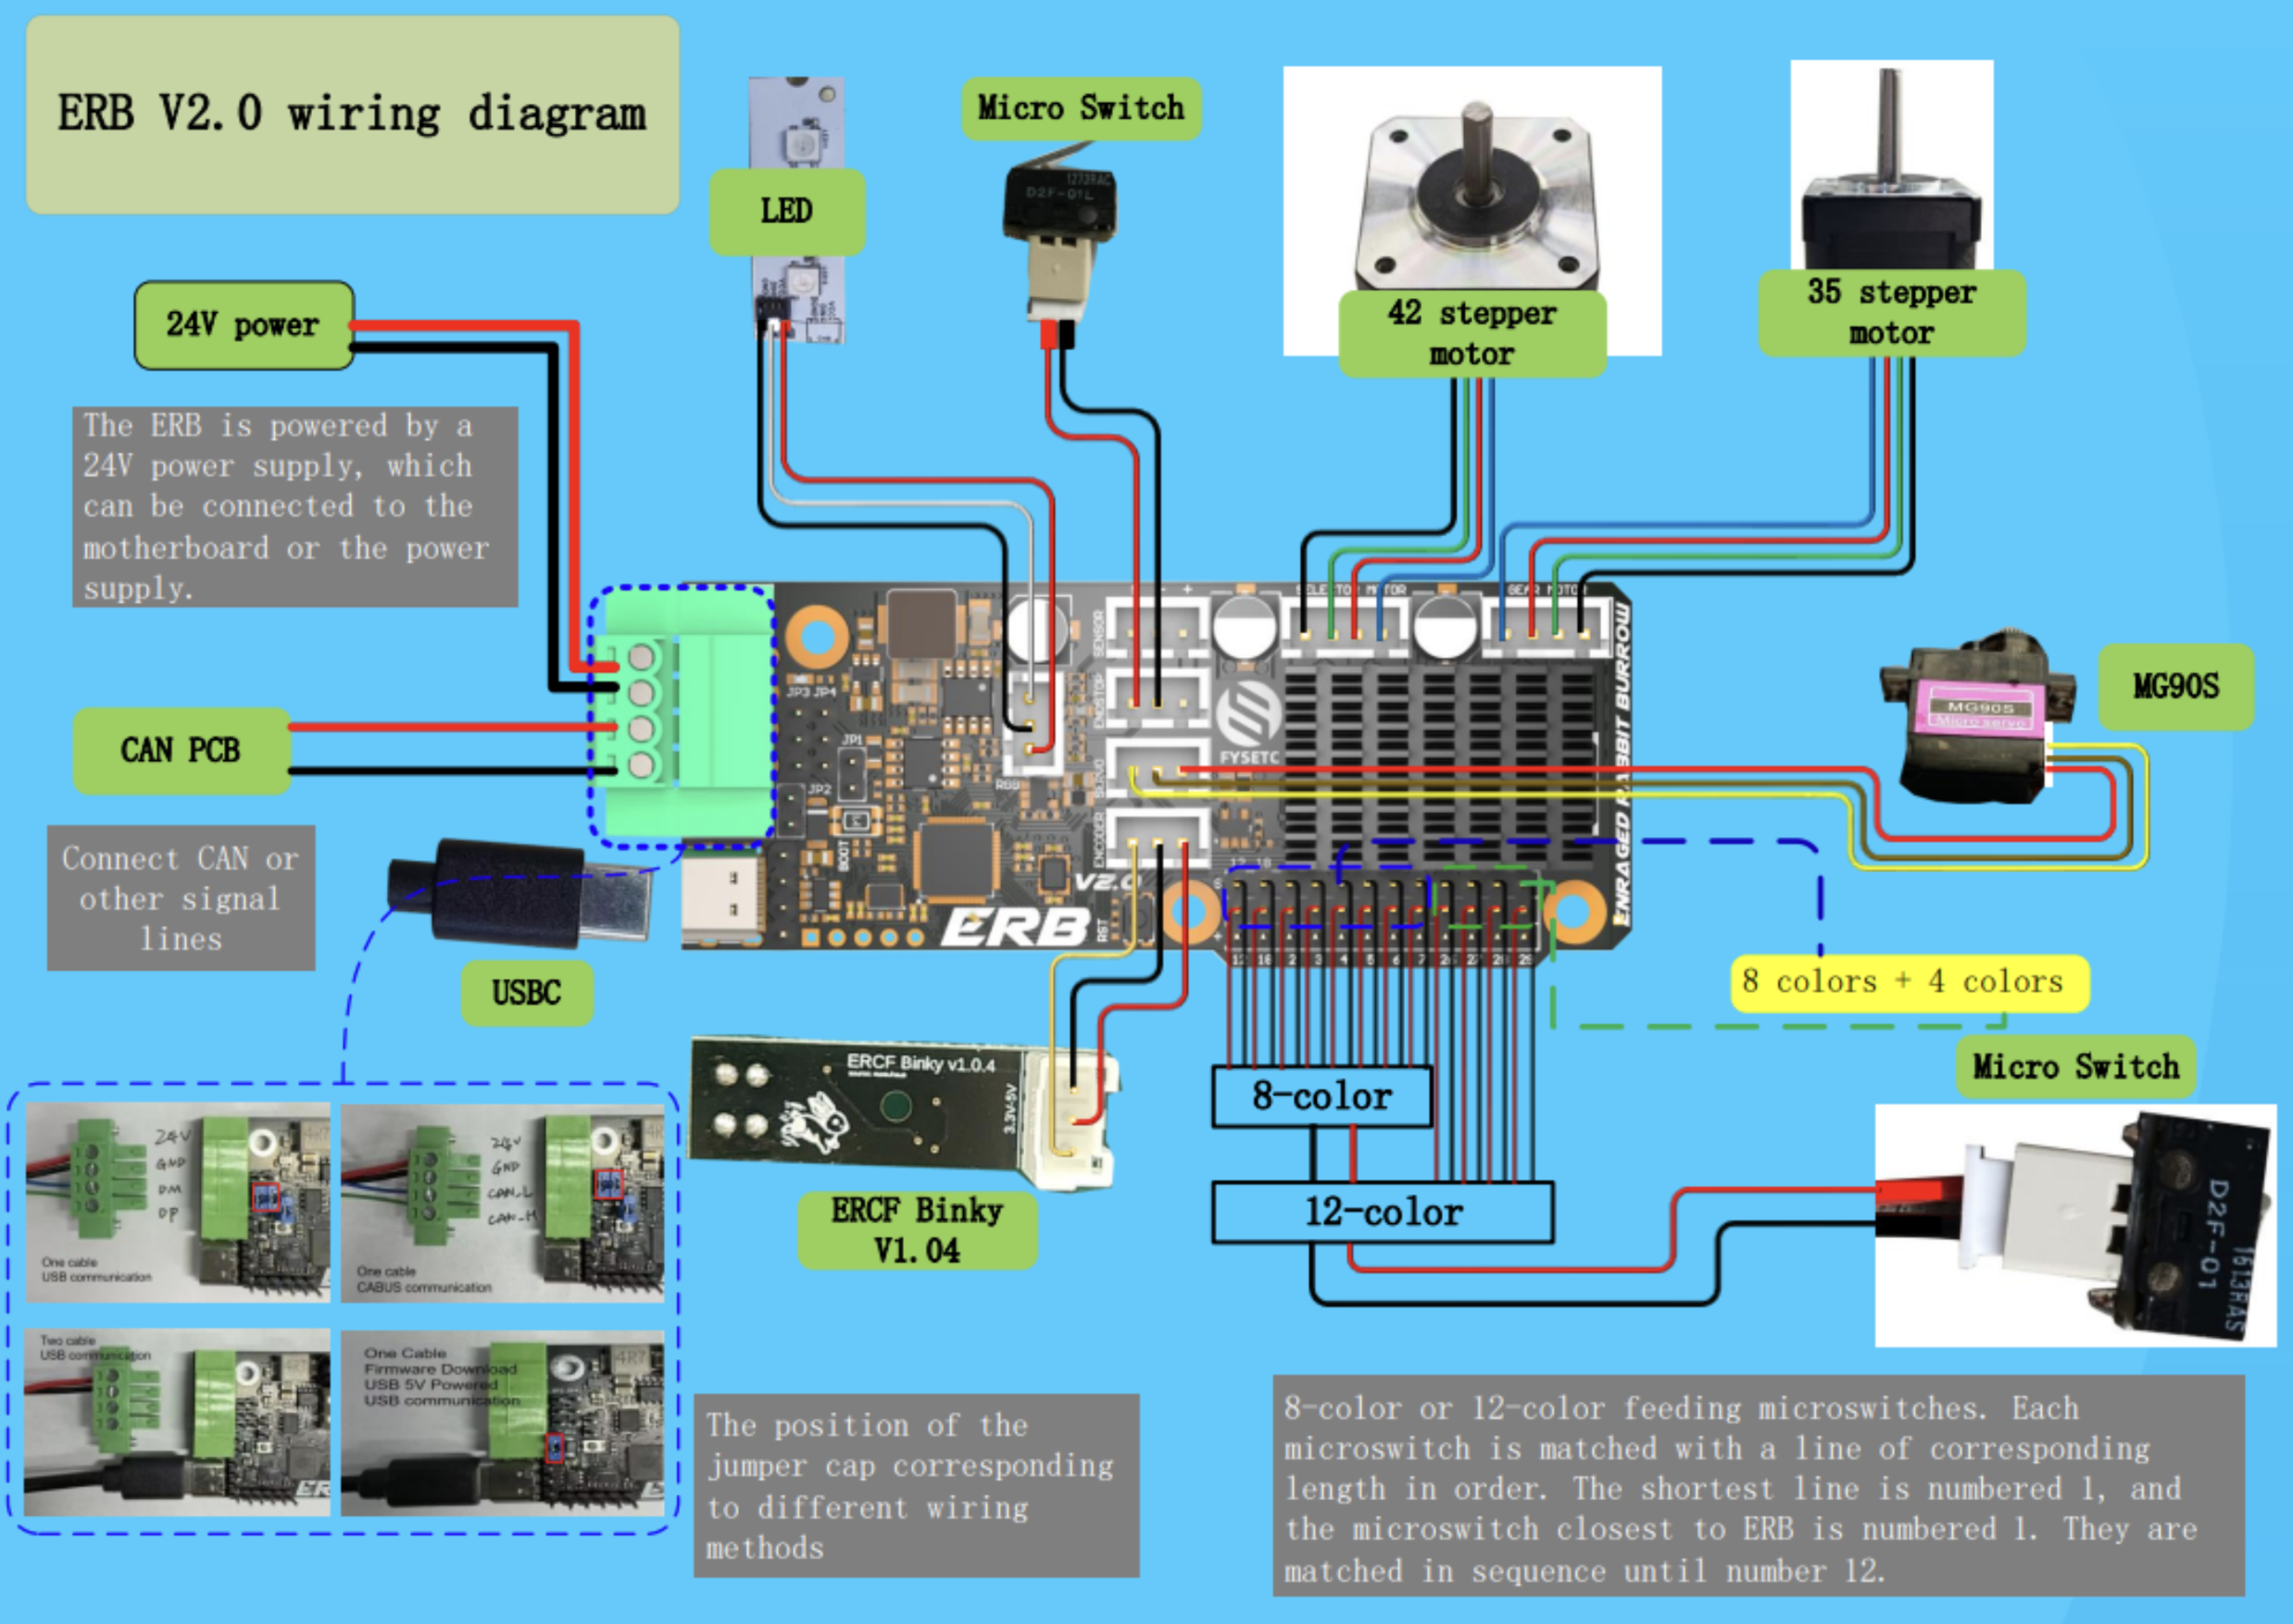
Fysetc Burrows ERB v2 wiring diagram:
Firmware
Klipper make menuconfig settings for Fysetc Burrows ERB v2
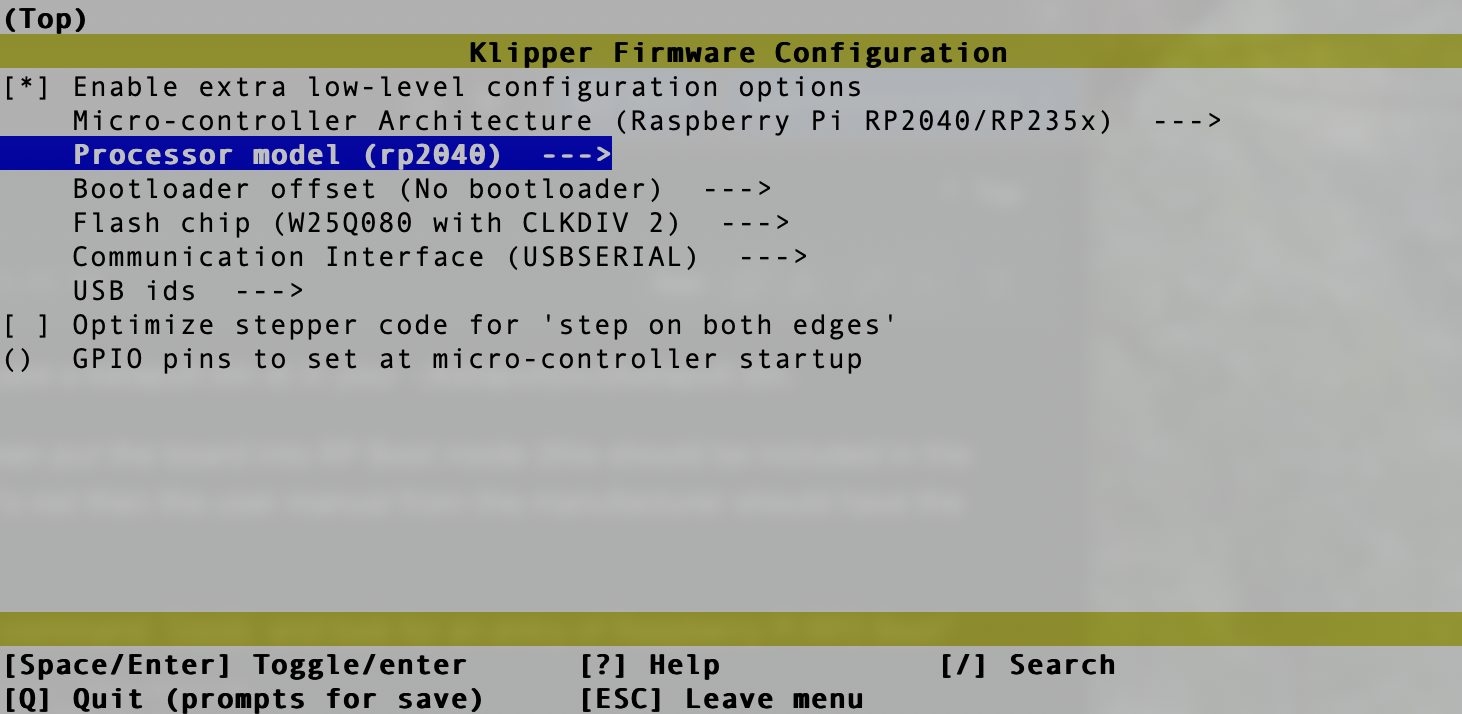
See Flashing Firmware below for the full procedure.
BTT MMB CAN v1.0
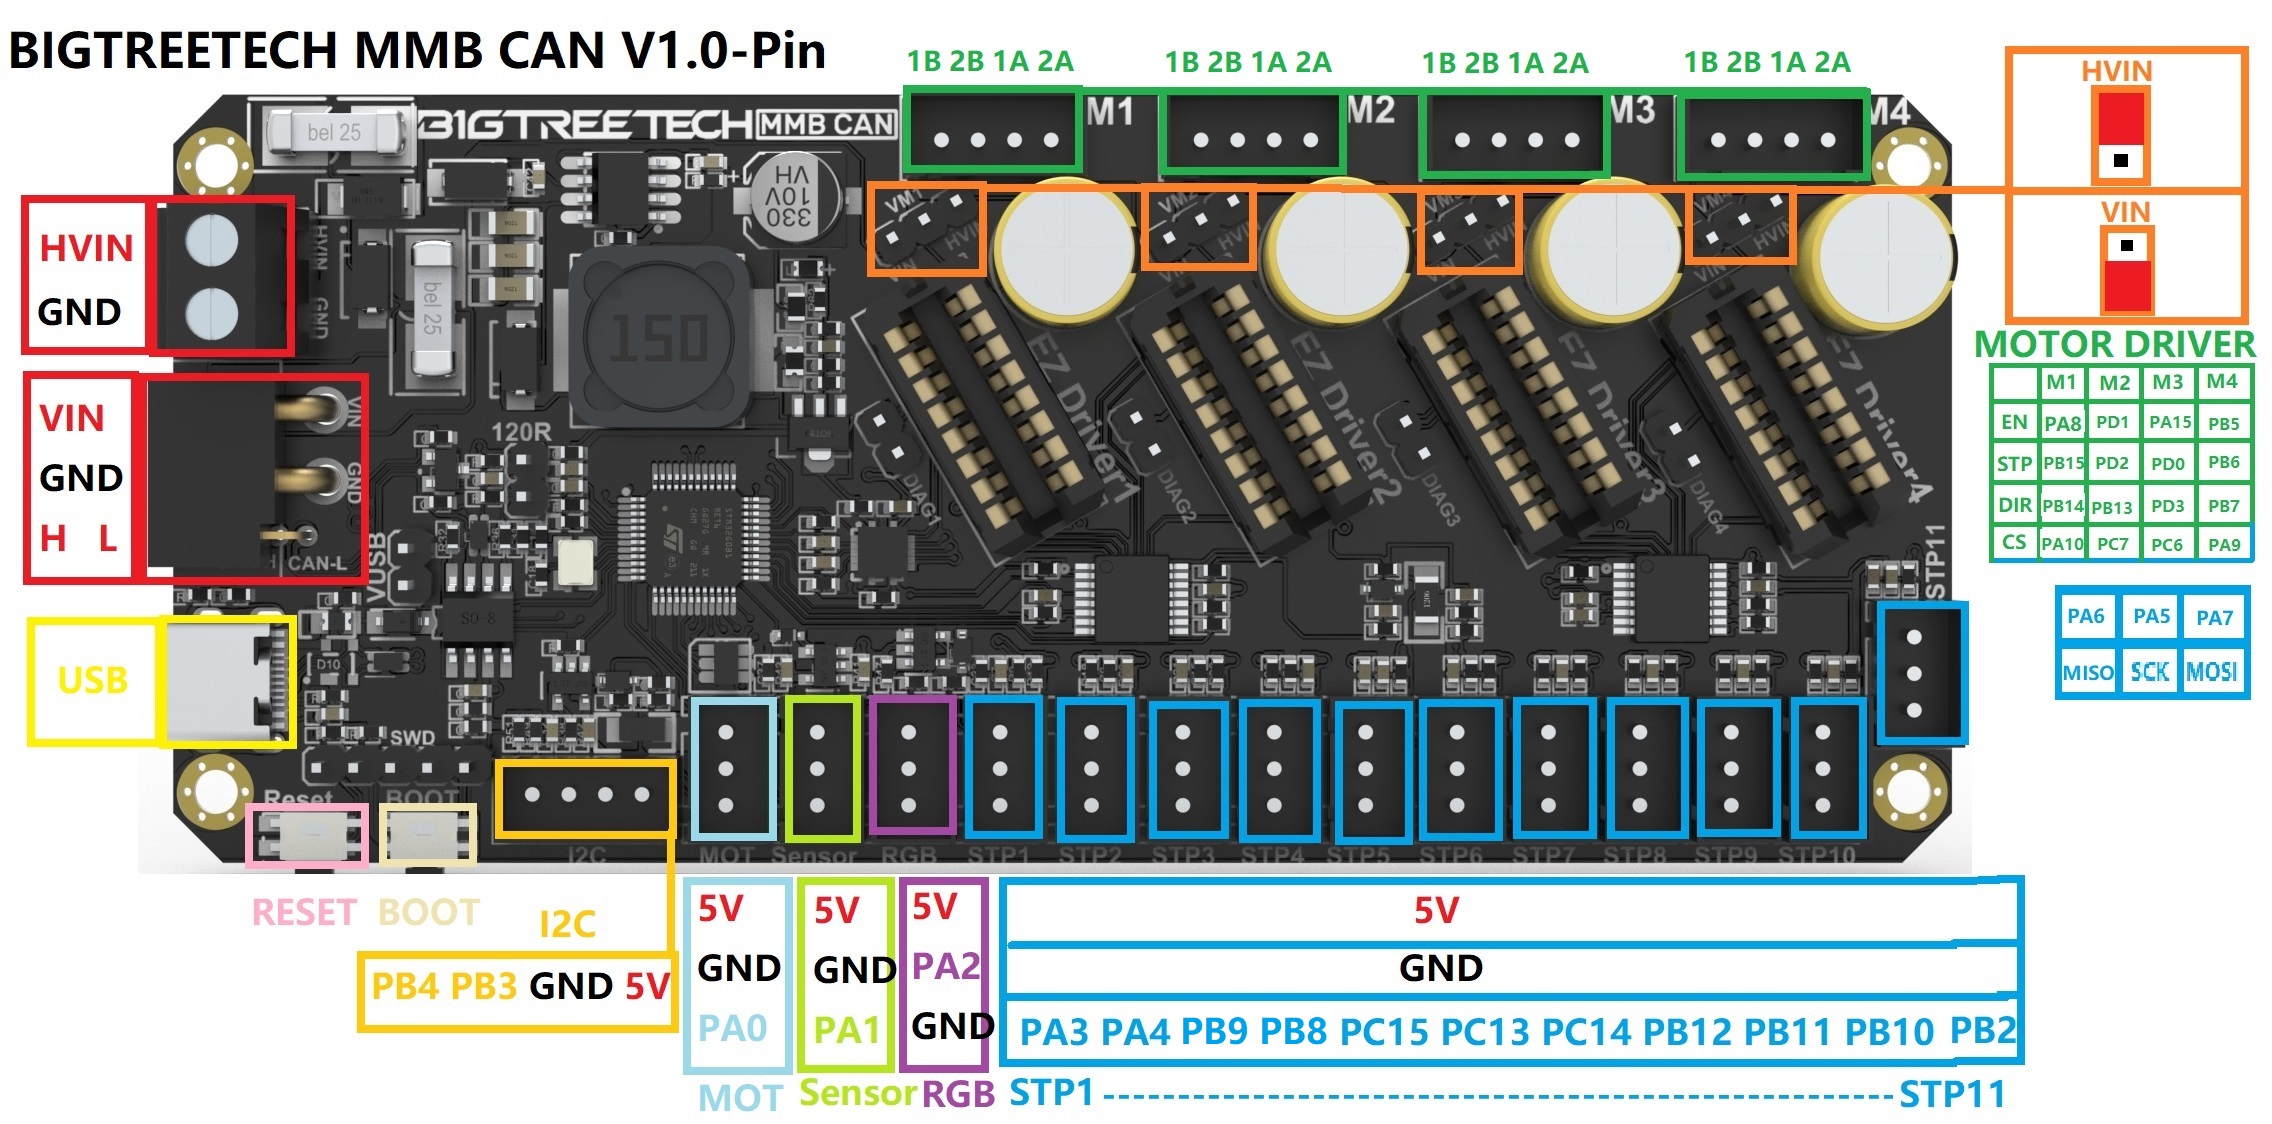
Firmware
CANbus firmware flashing is different enough from a plain USB/serial MCU that it's worth its own guide rather than the generic steps below - Esoterical's BTT MMB CAN V1.0 flashing guide is a solid one.
BTT MMB CAN v2.0
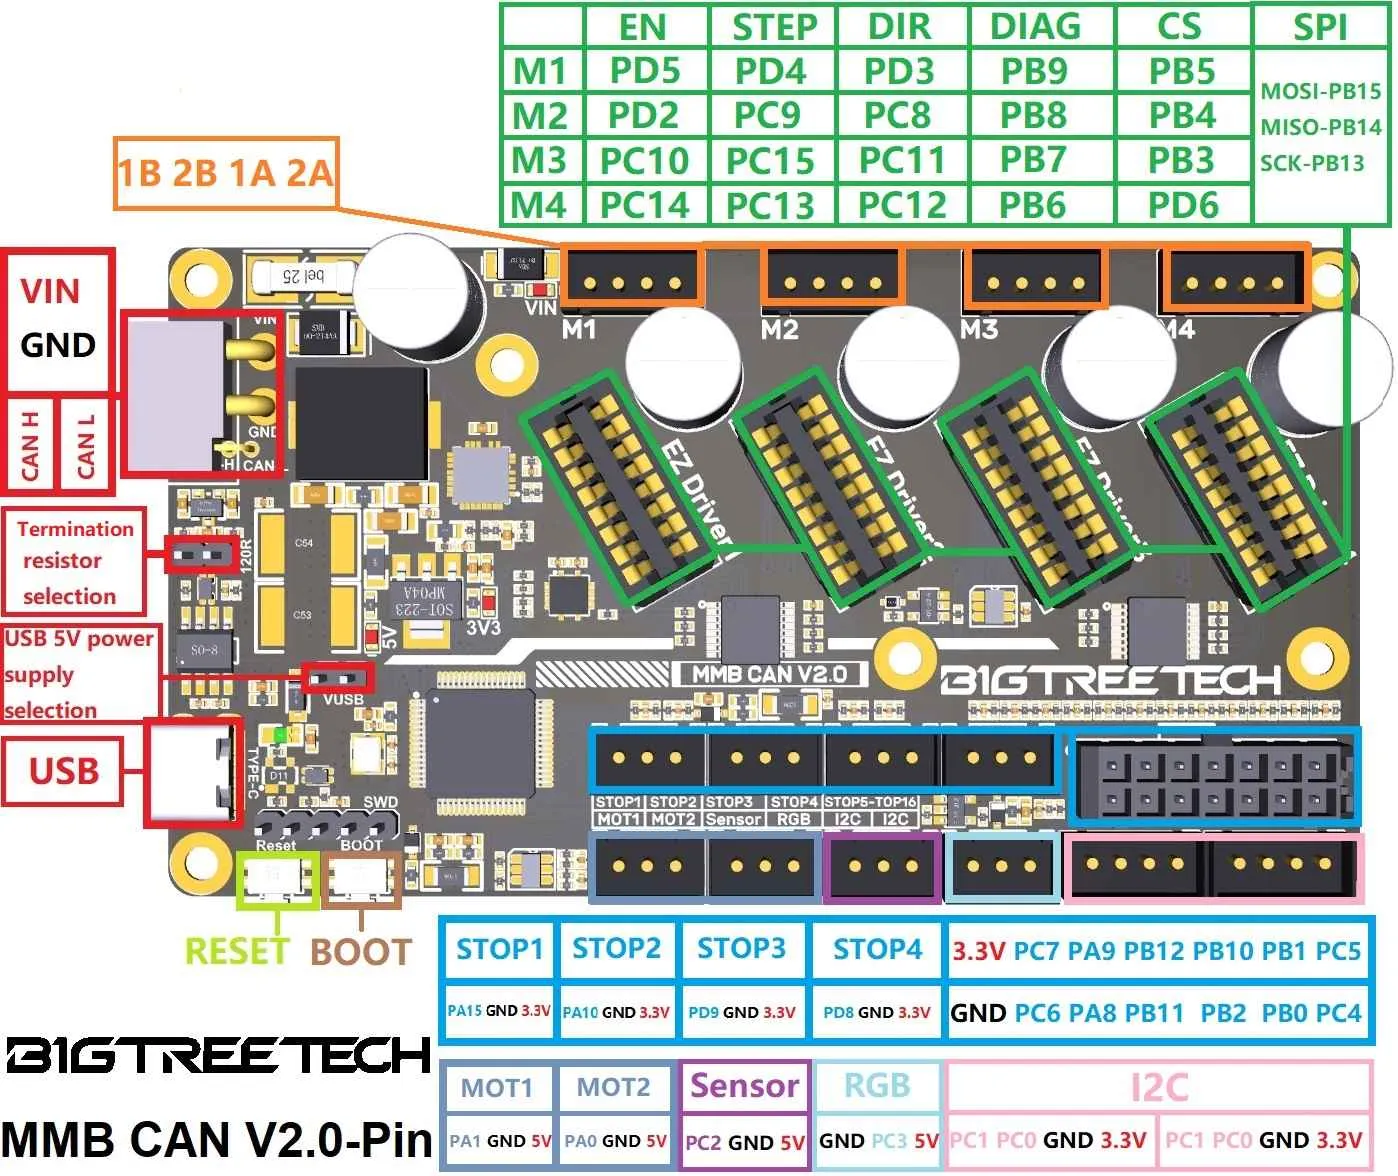
Firmware
See Esoterical's BTT MMB CAN V2.0 flashing guide for CANbus-specific flashing steps.
BTT EBB CAN (EBB42 / EBB36)
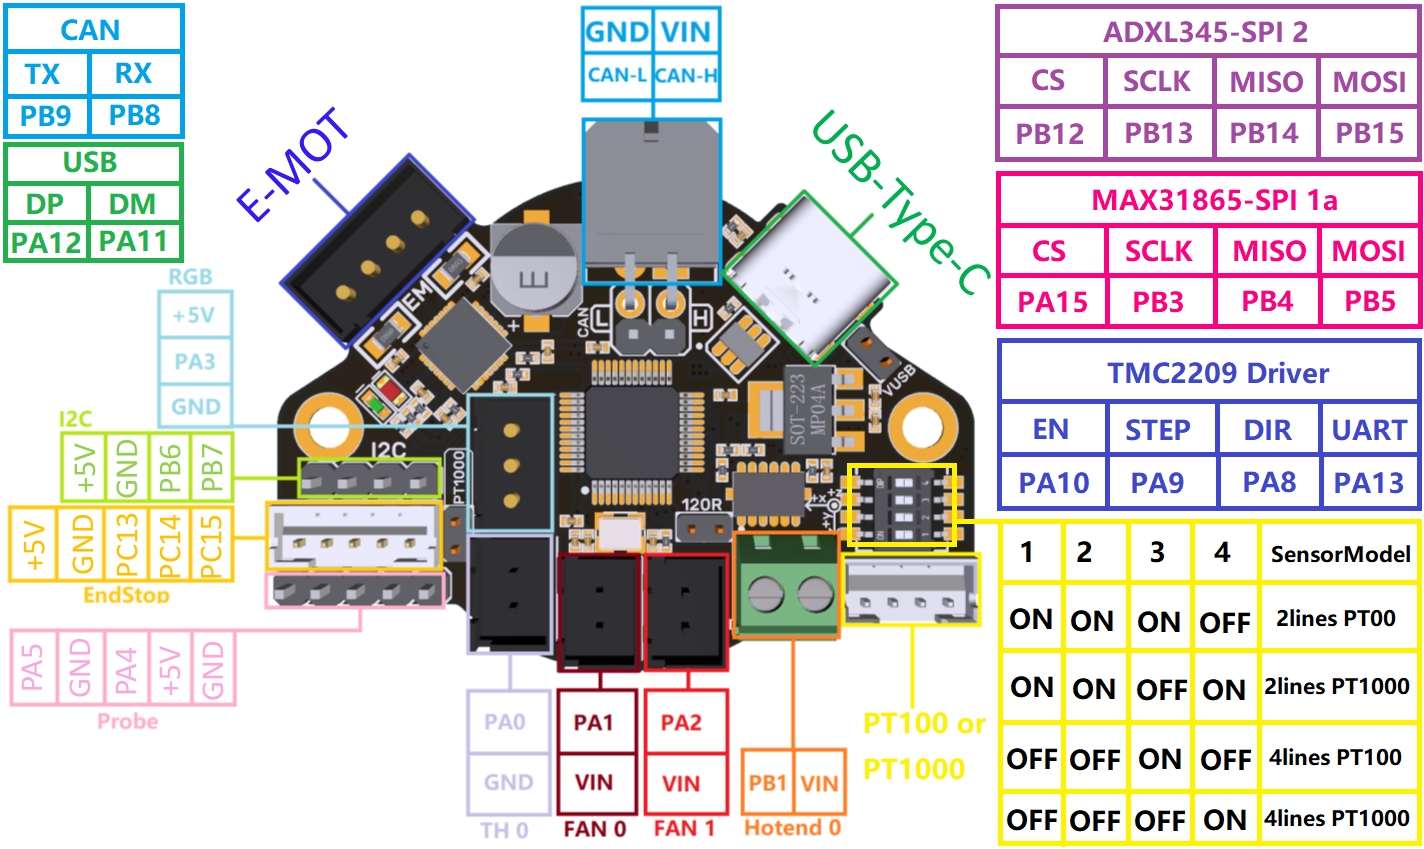
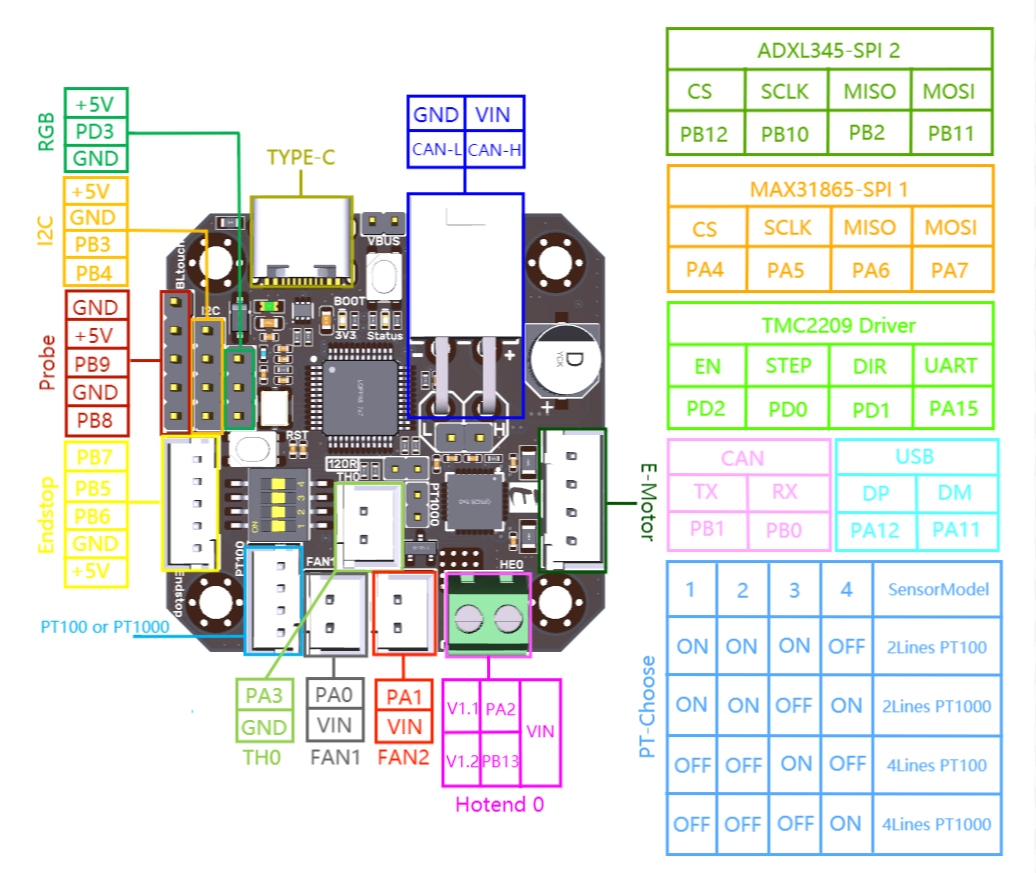
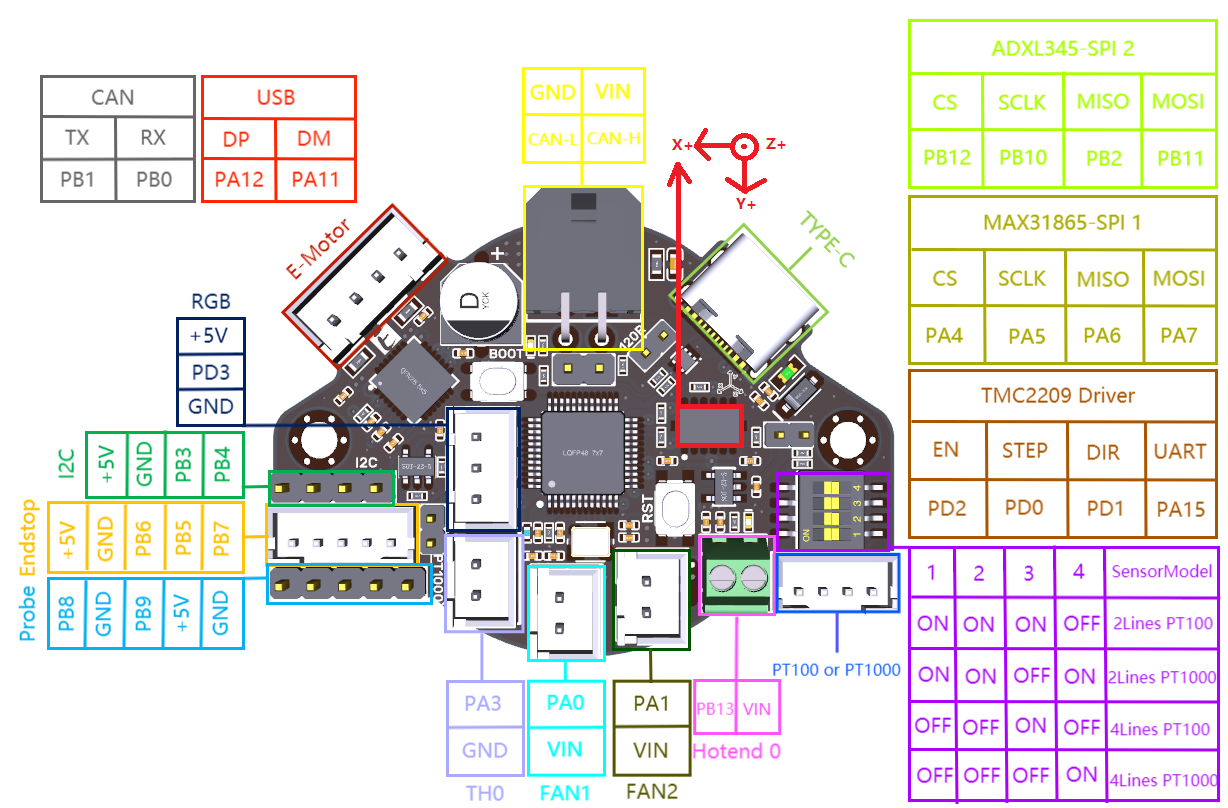
The BTT EBB CAN board has gone through three hardware revisions, each with a different pinout, offered in both an EBB42 and EBB36 size. The installer's BTT EBB 42 CANbus V1.2 board choice (and the per-gate EBB MCU choice used by EMU designs) targets the v1.1/v1.2 revision below - its default pin layout matches that hardware directly.
v1.0
BTT EBB42:
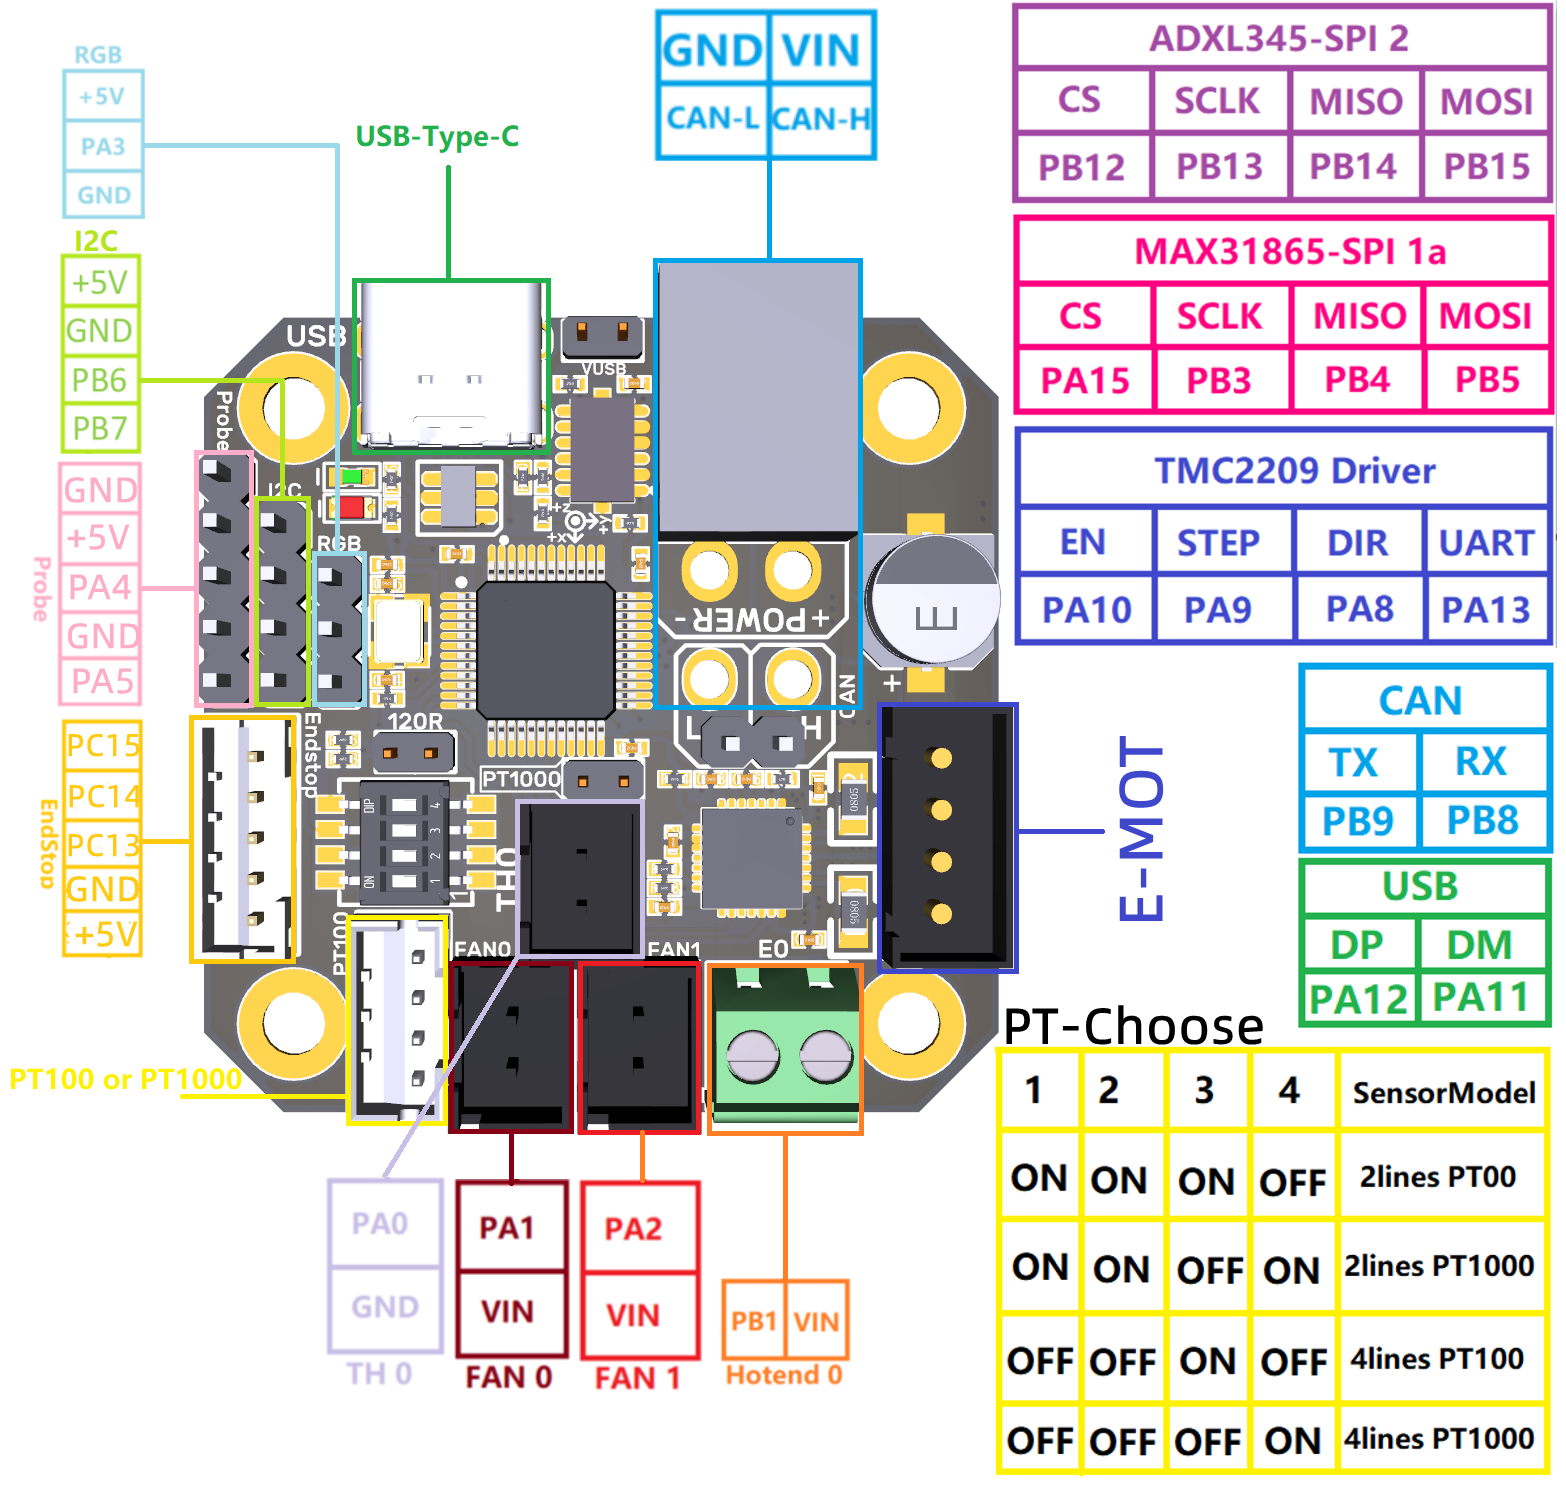
BTT EBB36:
Note
The installer's default pin layout doesn't match this revision - pins will need to be set manually in Advanced Settings.
Firmware
Klipper make menuconfig settings for BTT EBB CAN v1.0
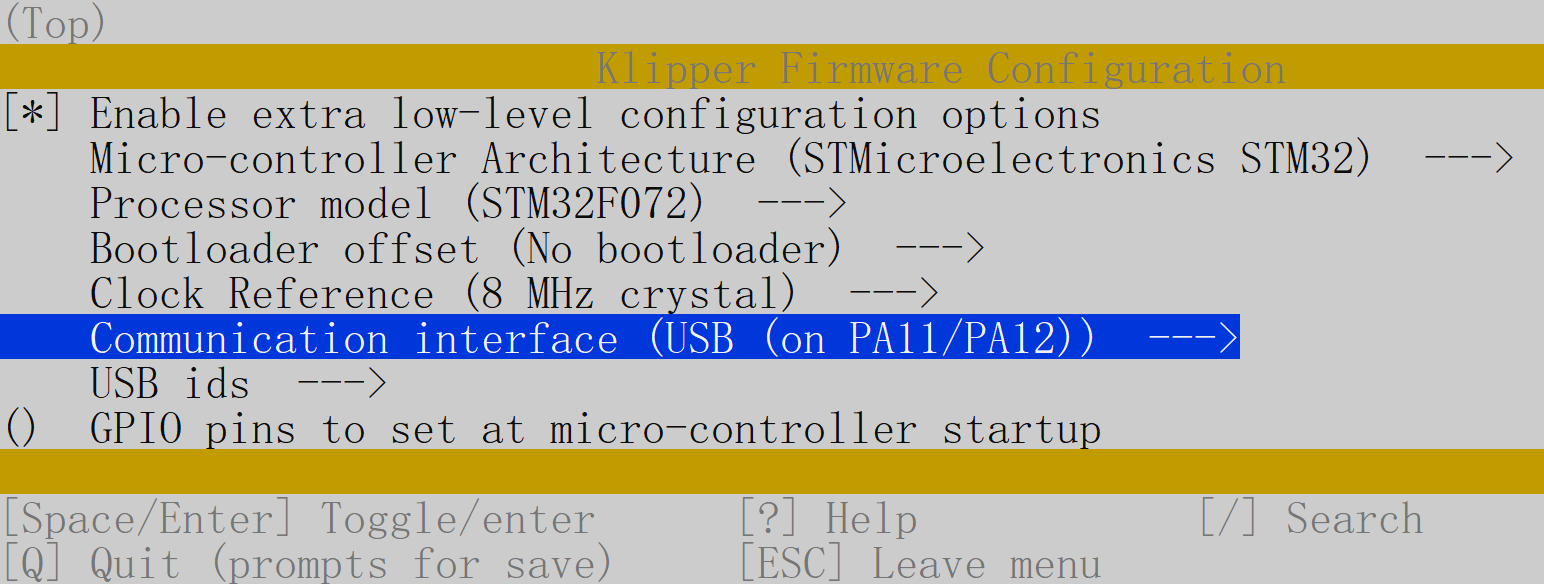
See Esoterical's CANbus flashing guide for CANbus-specific flashing steps.
v1.1 / v1.2
BTT EBB42:
BTT EBB36:
Firmware
Klipper make menuconfig settings for BTT EBB CAN v1.1/v1.2
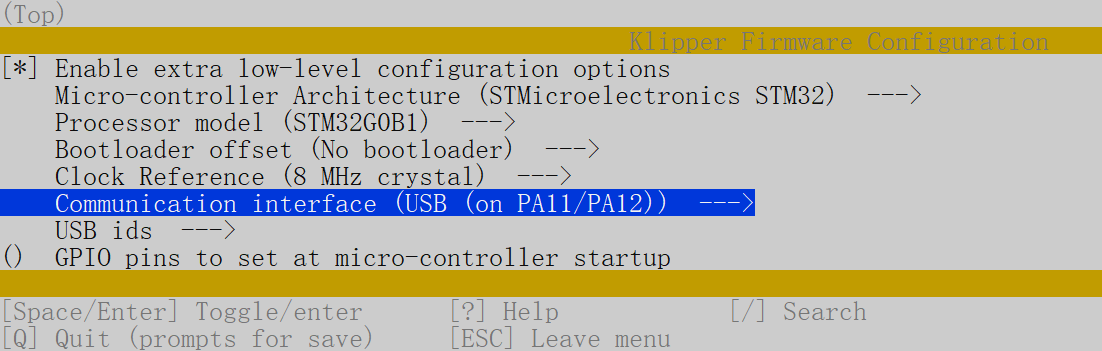
See Esoterical's CANbus flashing guide for CANbus-specific flashing steps.
Gen2
BTT EBB42:
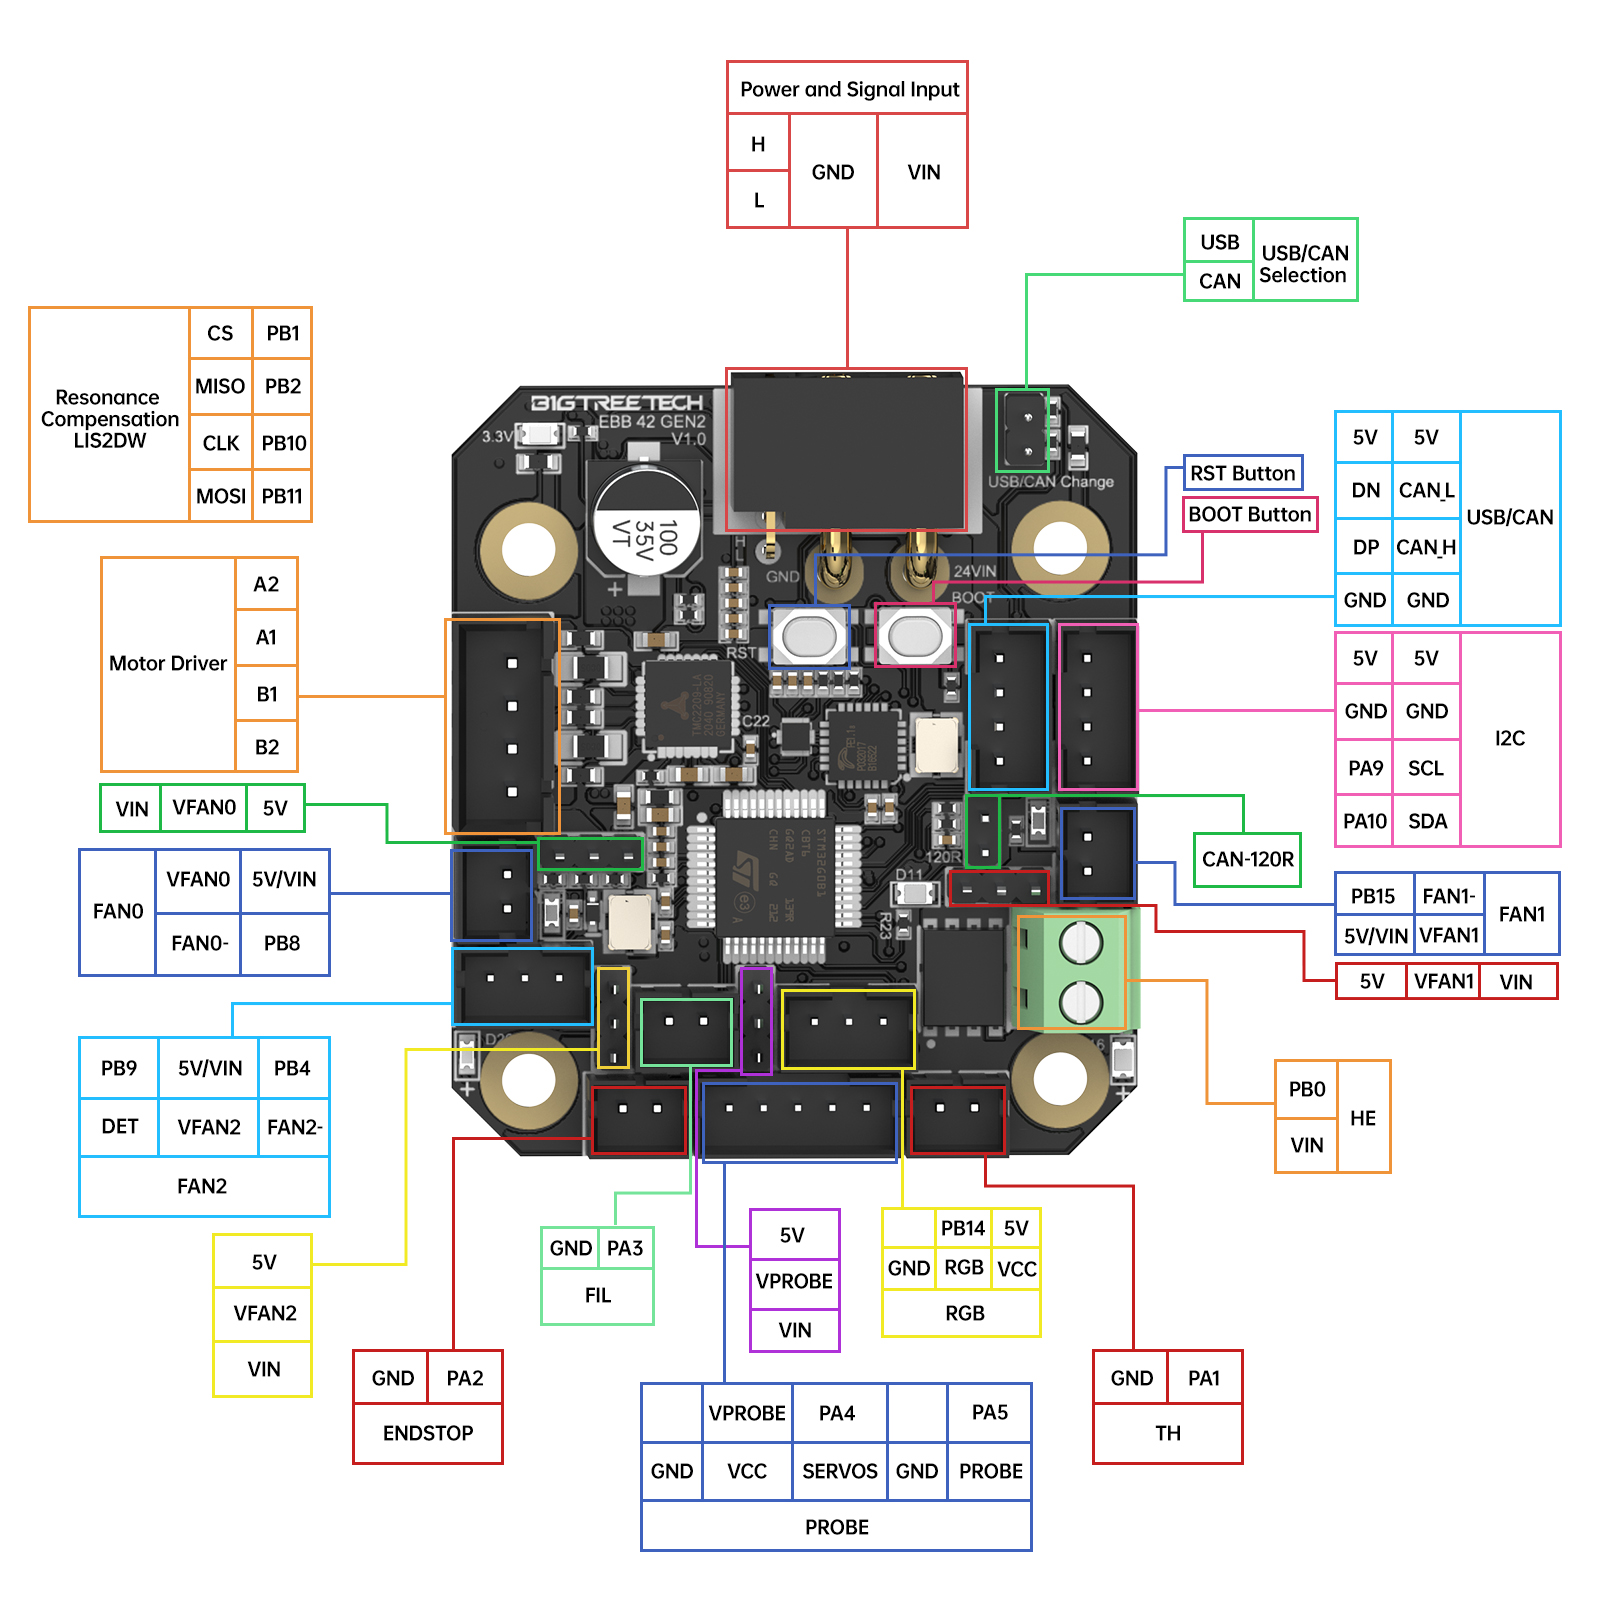
BTT EBB36:
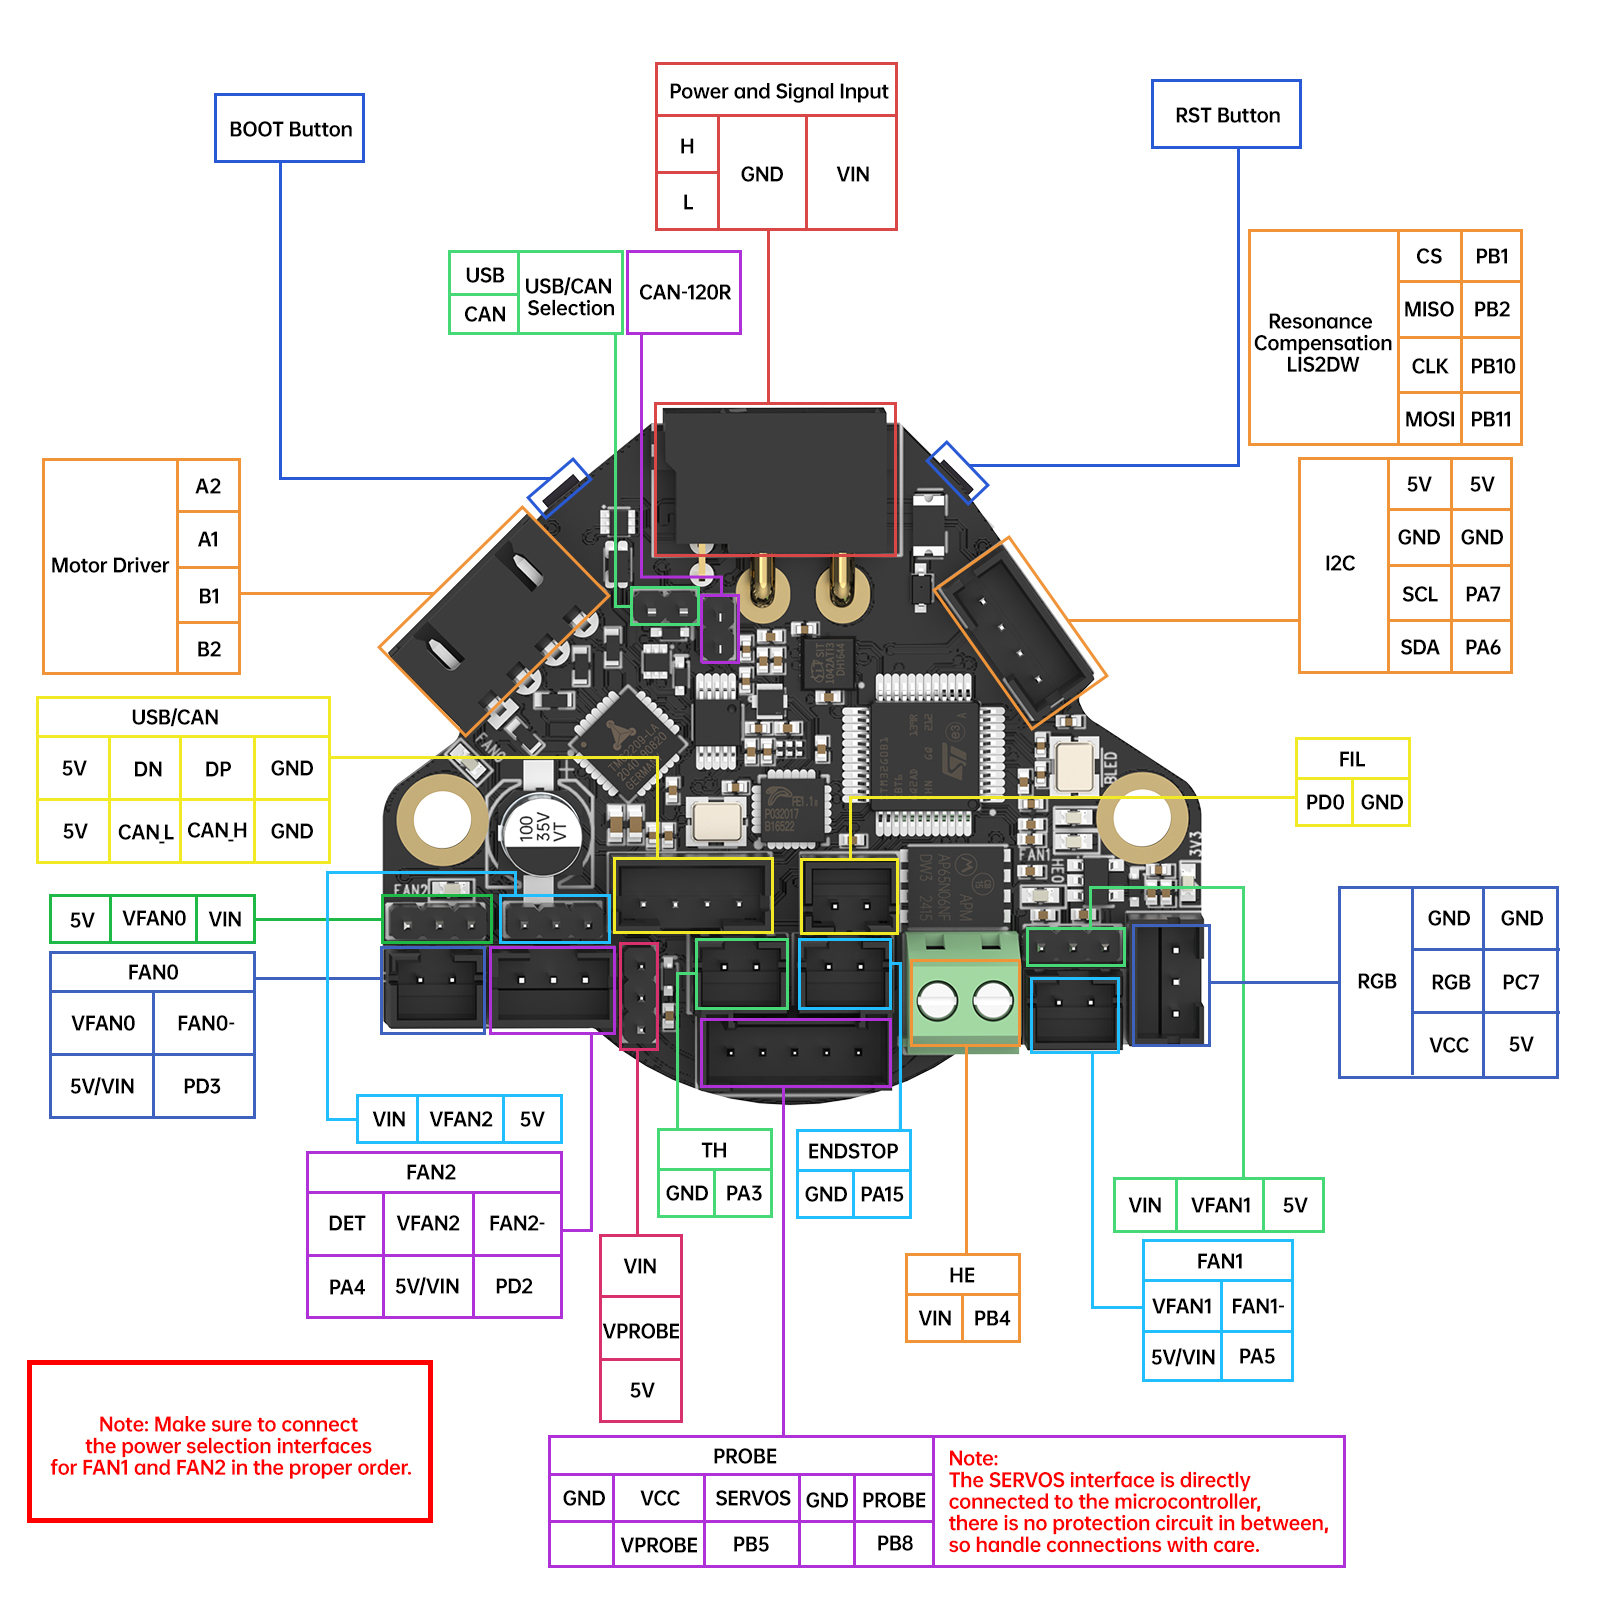
Note
The installer's default pin layout doesn't match this revision - pins will need to be set manually in Advanced Settings.
Firmware
Klipper make menuconfig settings for BTT EBB CAN Gen2
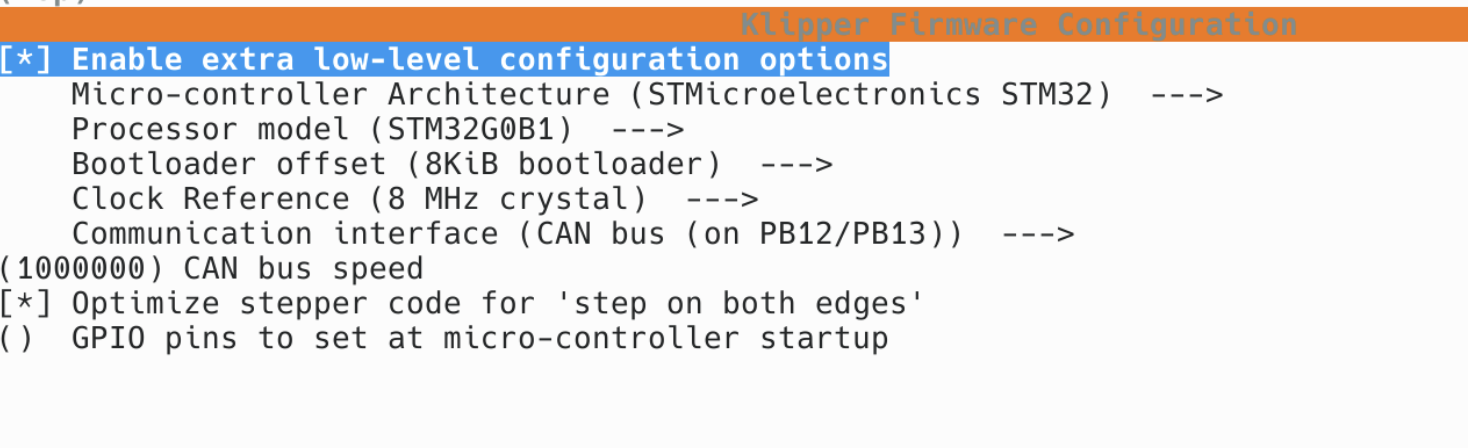
See Esoterical's CANbus flashing guide for CANbus-specific flashing steps.
Mellow EASY-BRD CAN v1
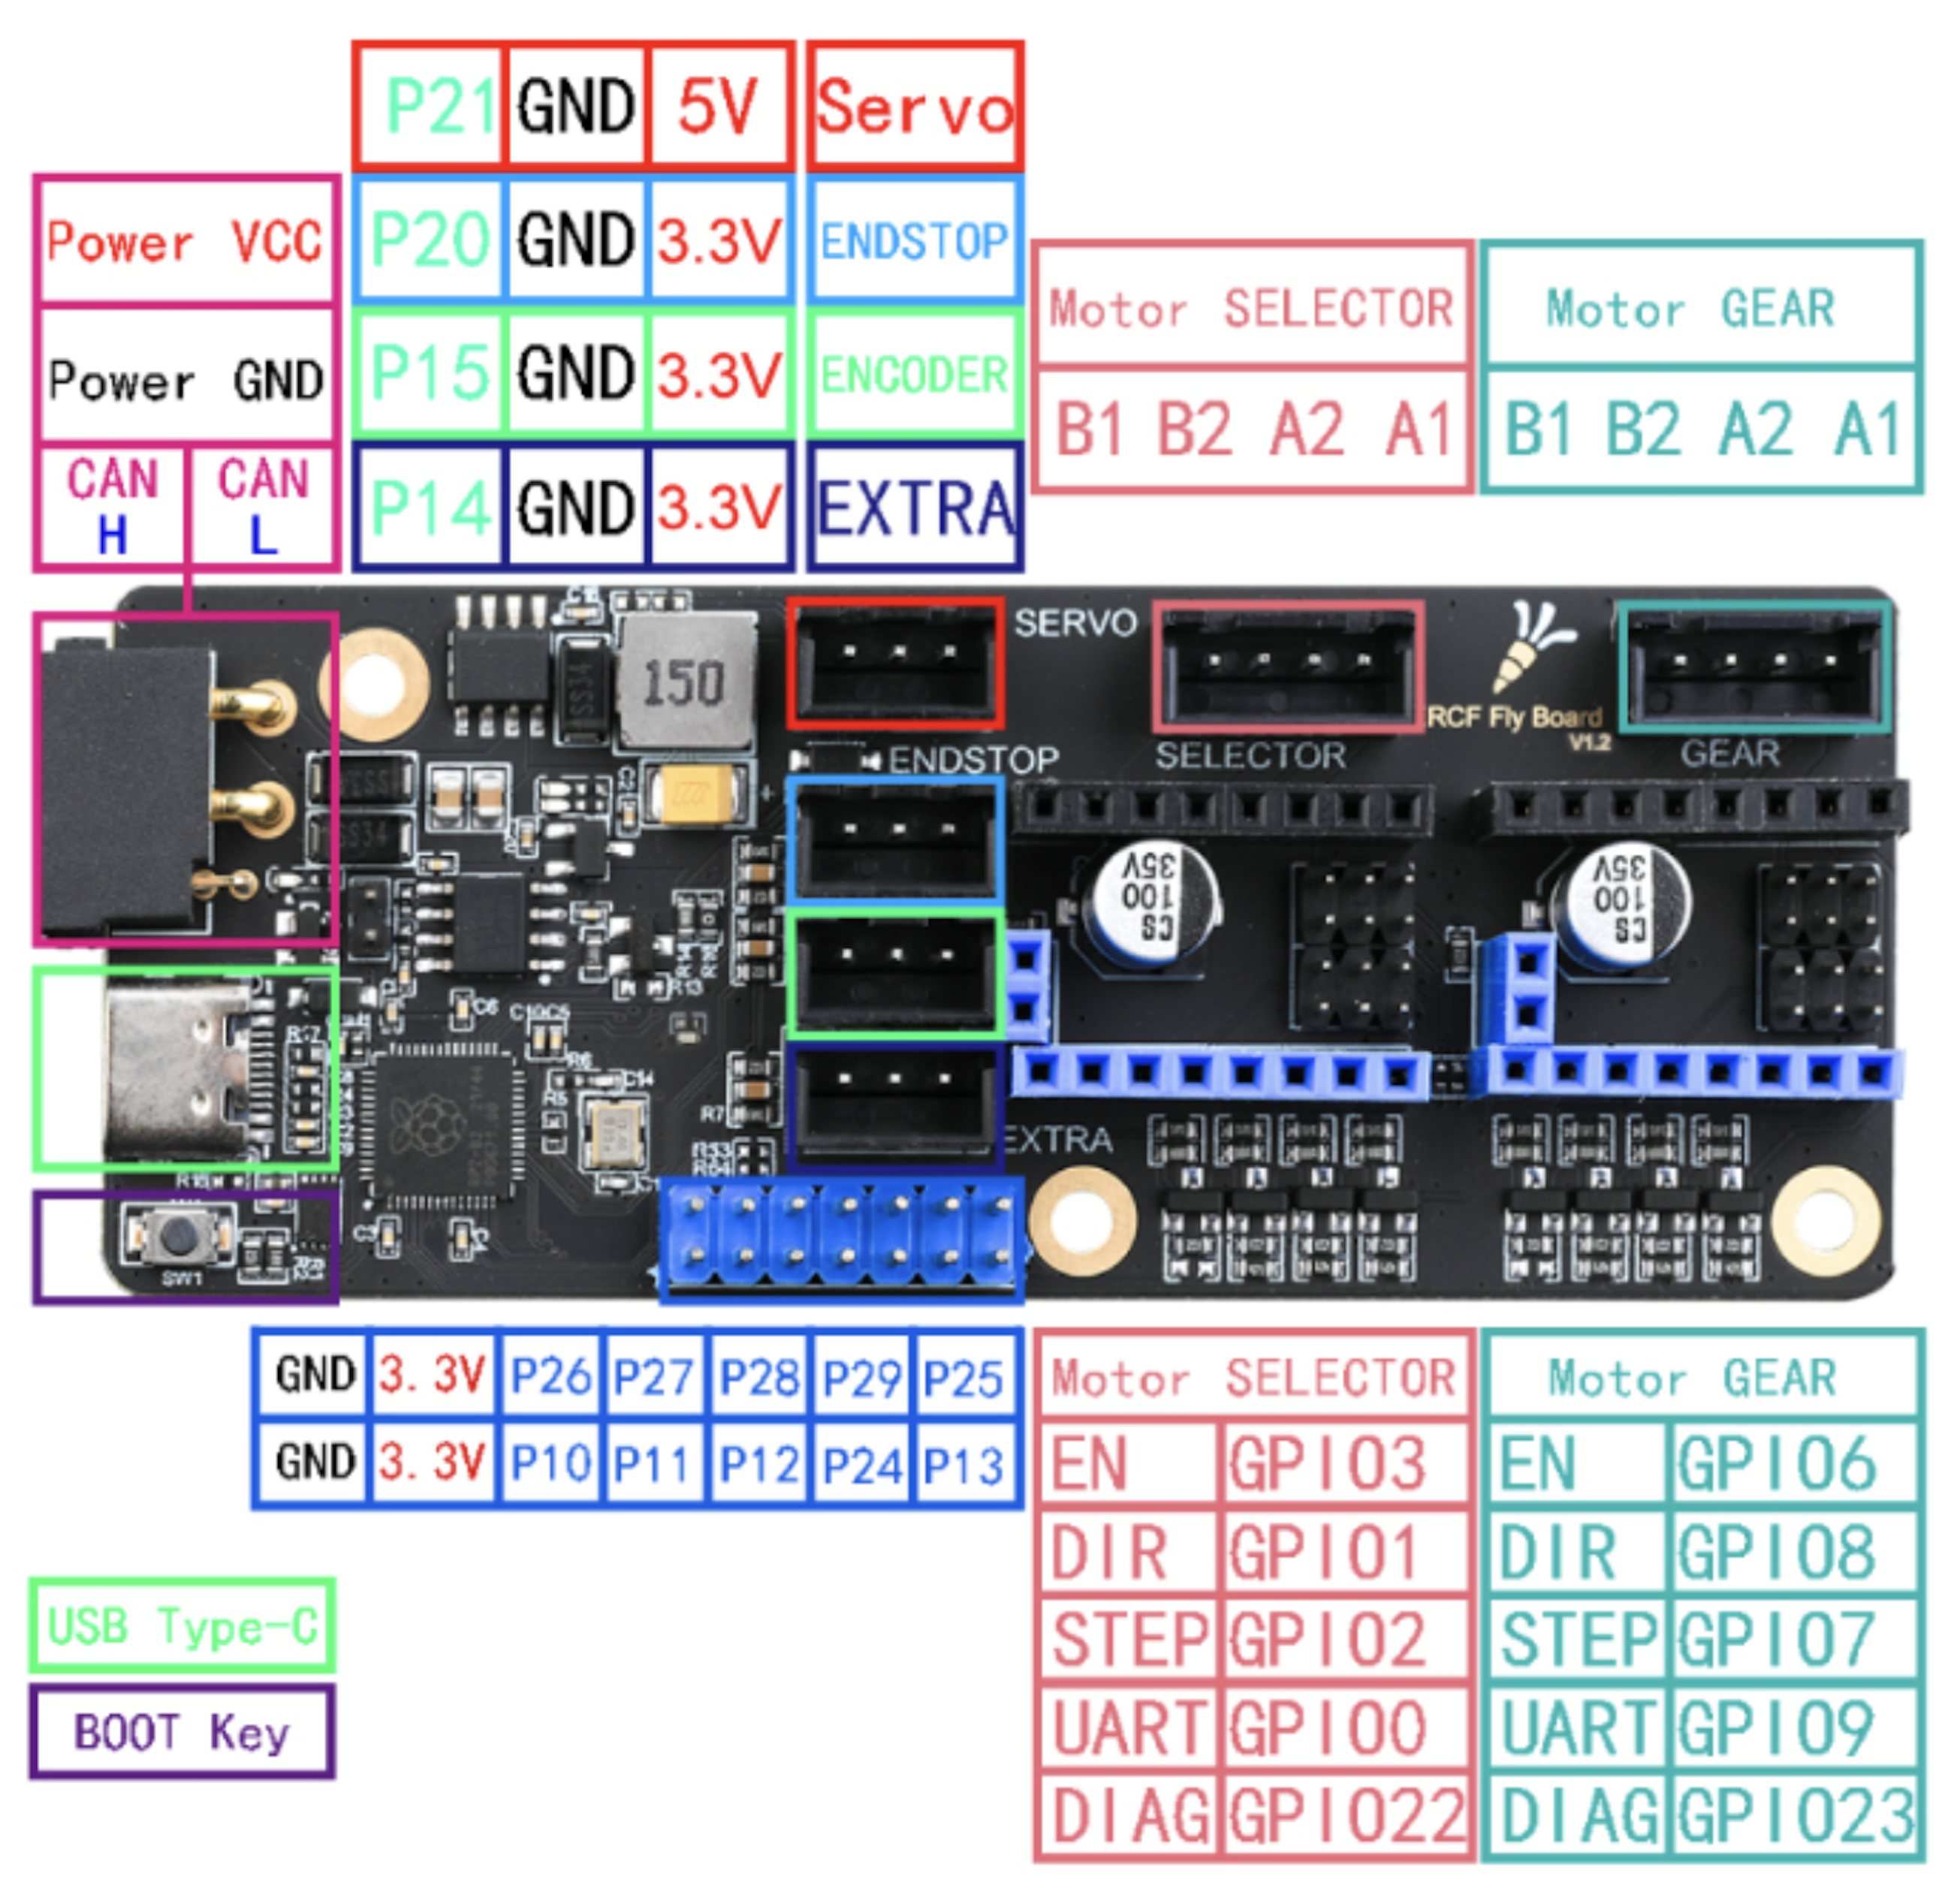
Firmware
See Esoterical's Mellow Fly ERCF flashing guide for CANbus-specific flashing steps.
Mellow EASY-BRD CAN v2
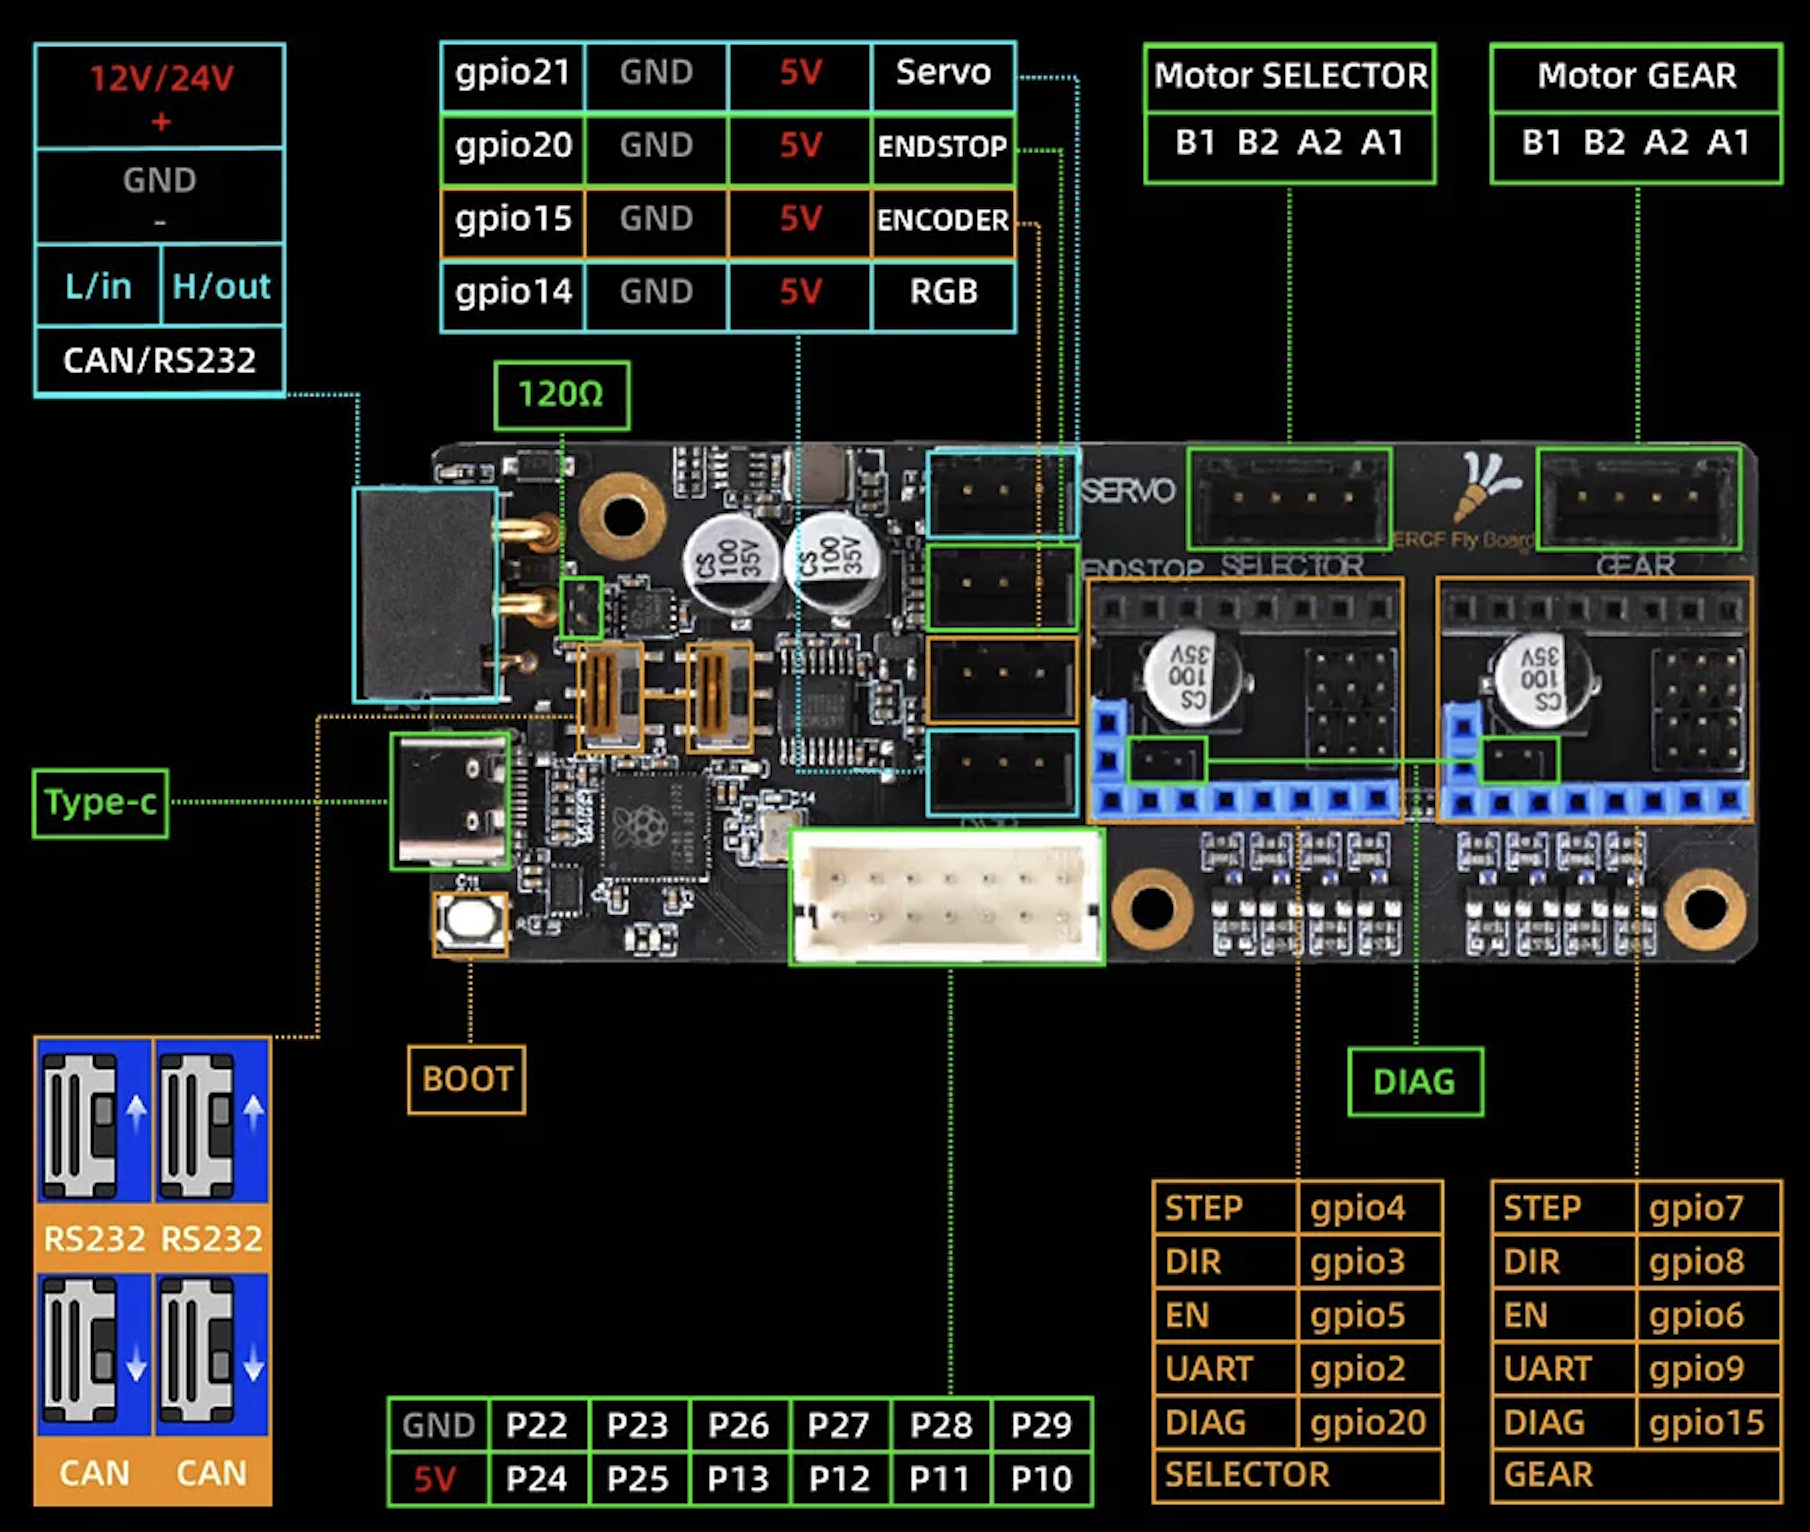
Firmware
See Esoterical's Mellow Fly SB2040 flashing guide for CANbus-specific flashing steps.
Solo Lane Board v1
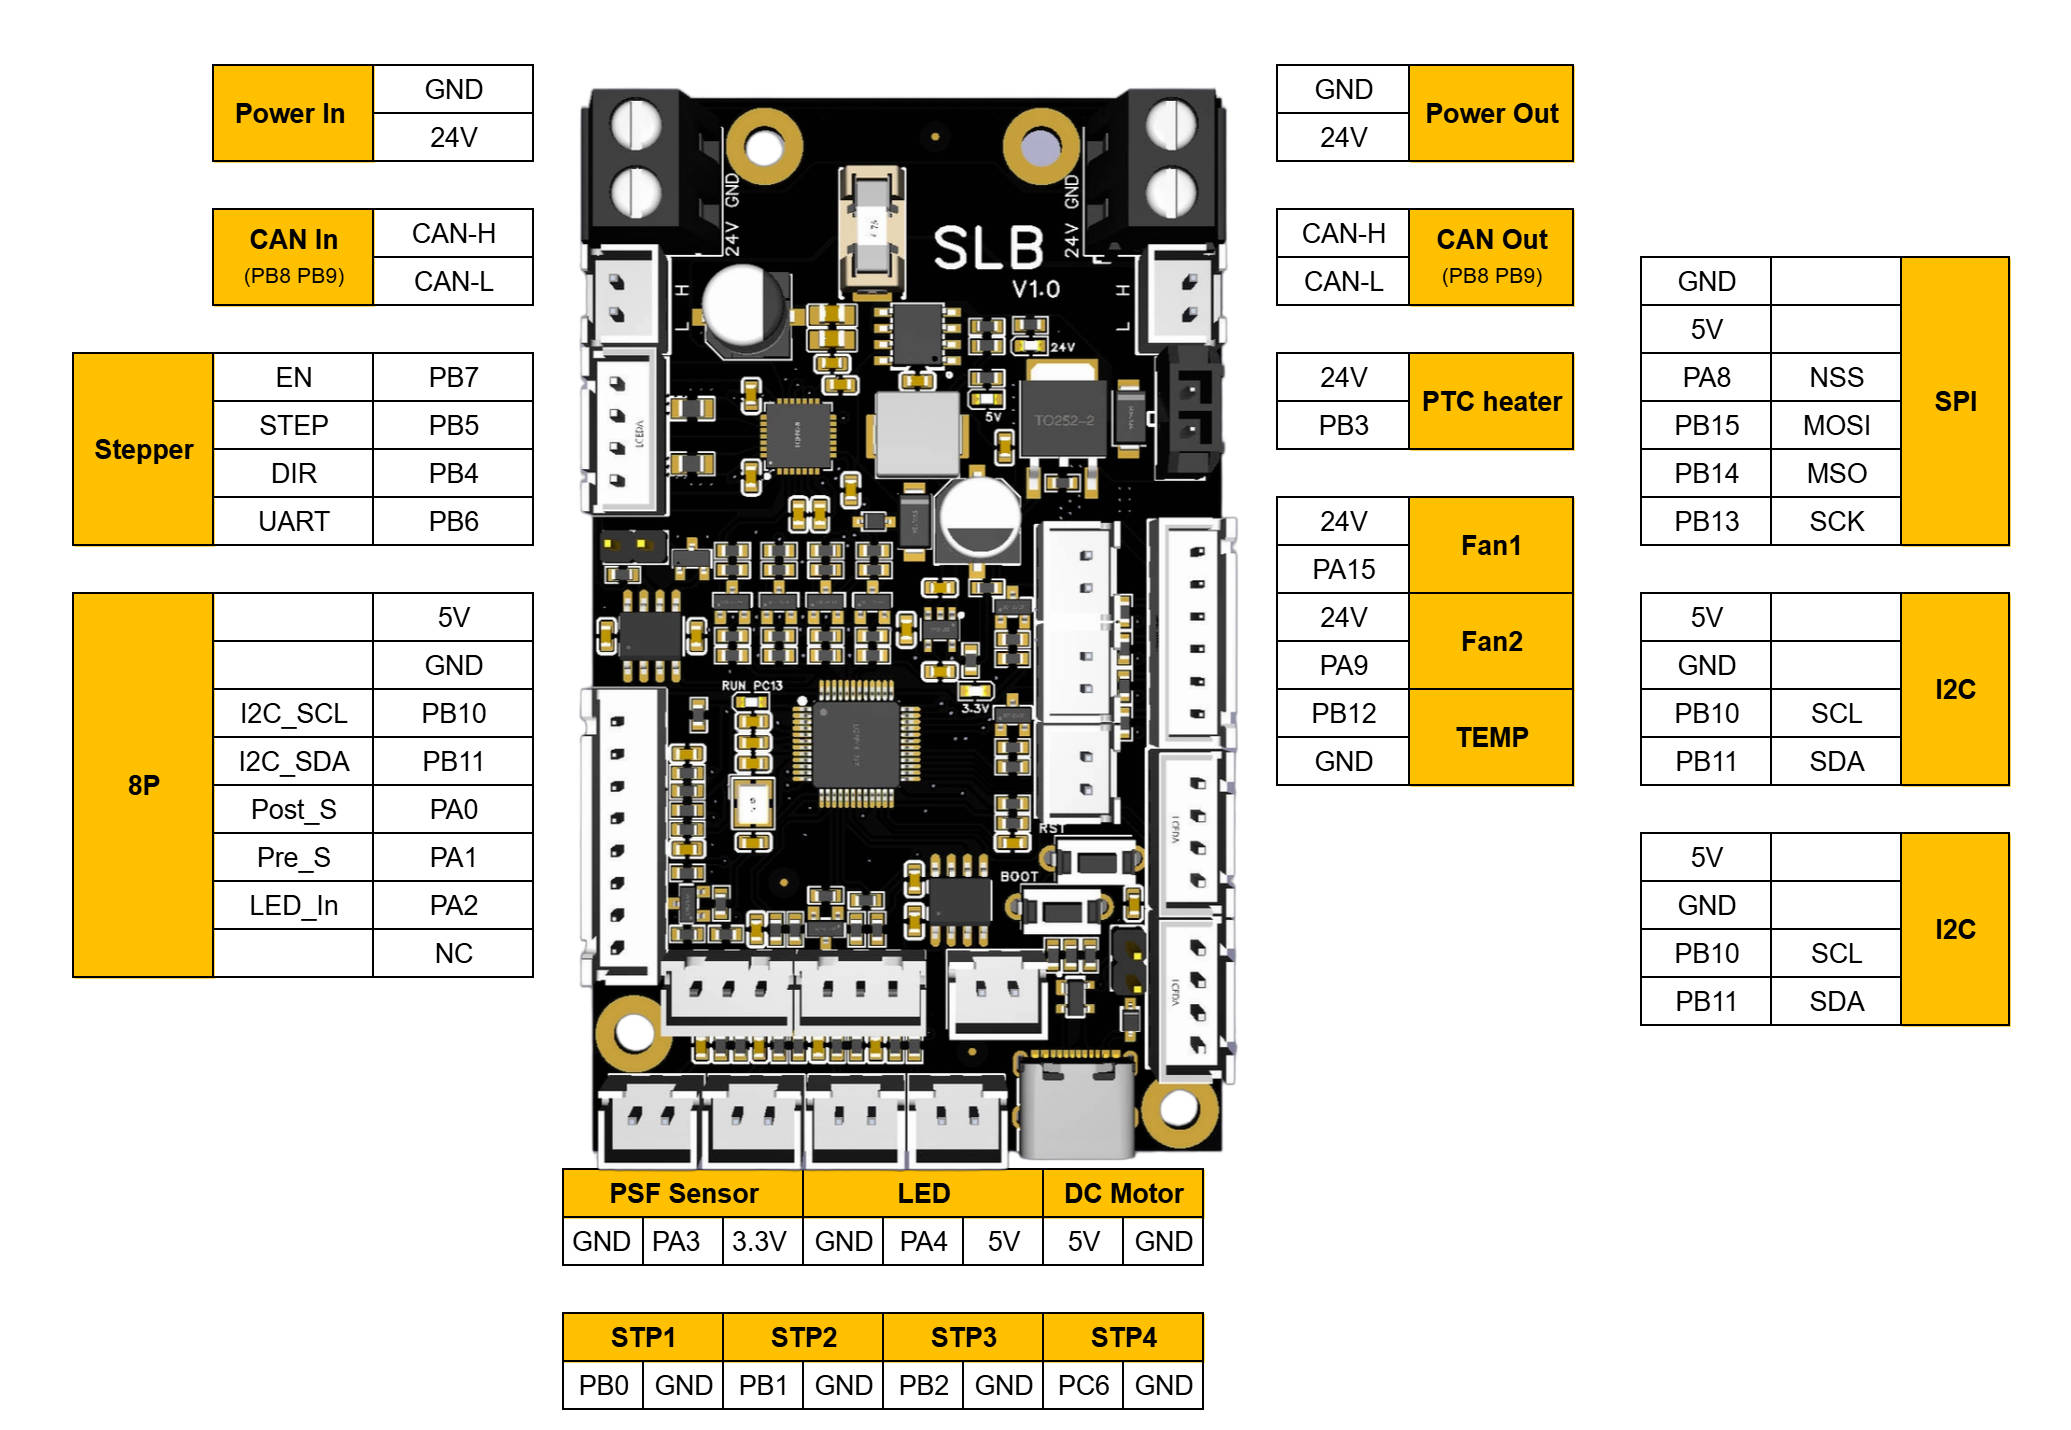
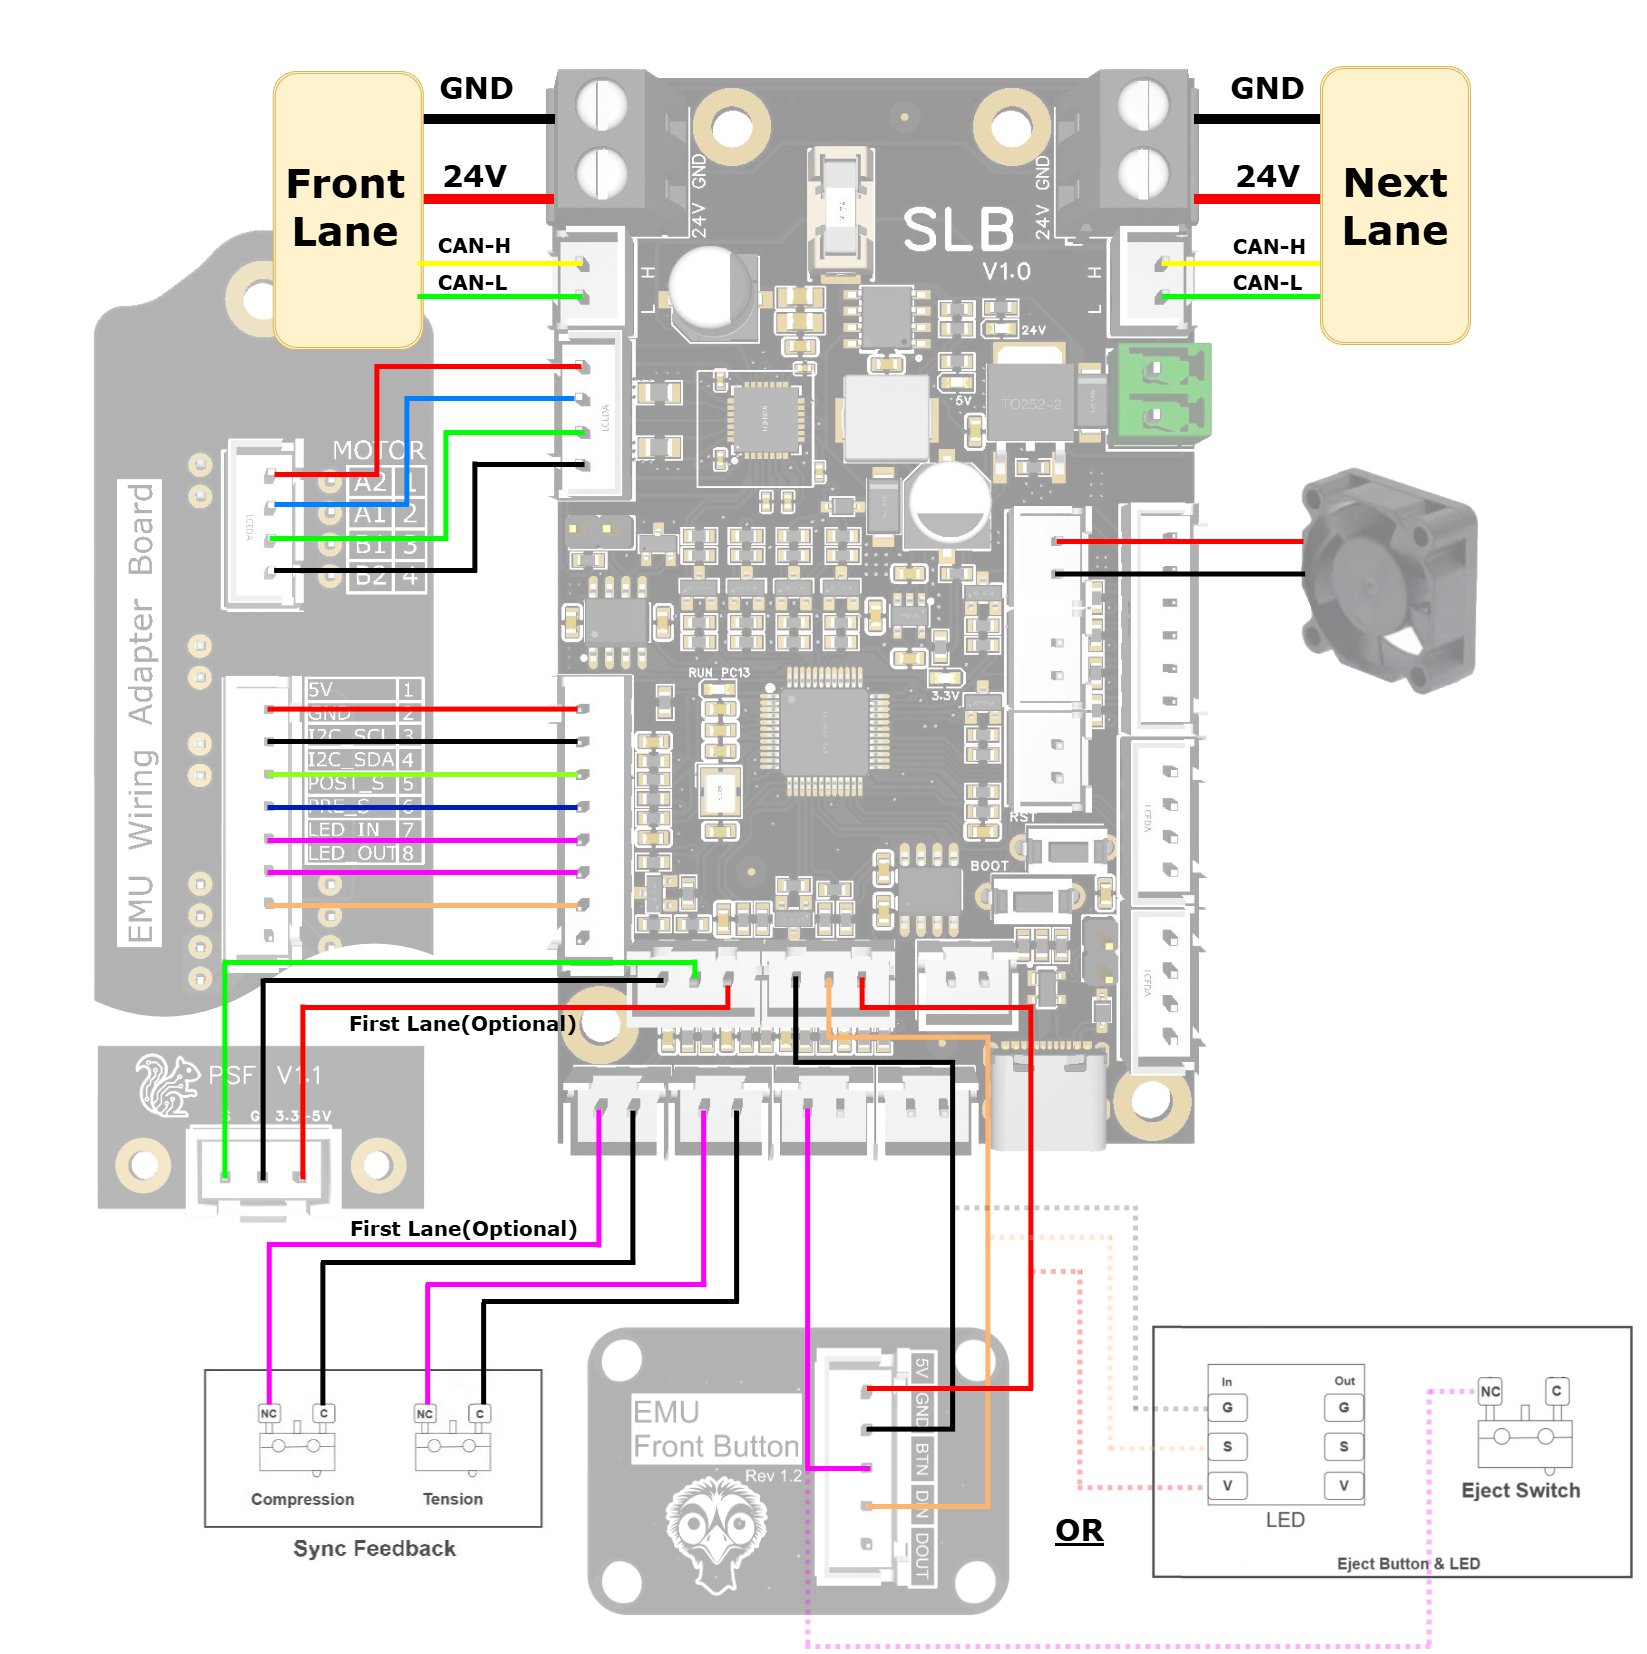
Wiring
Solo Lane Board v1.0 wiring diagram for EMU MMU
Firmware
Katapult make menuconfig settings for SLB v1.0
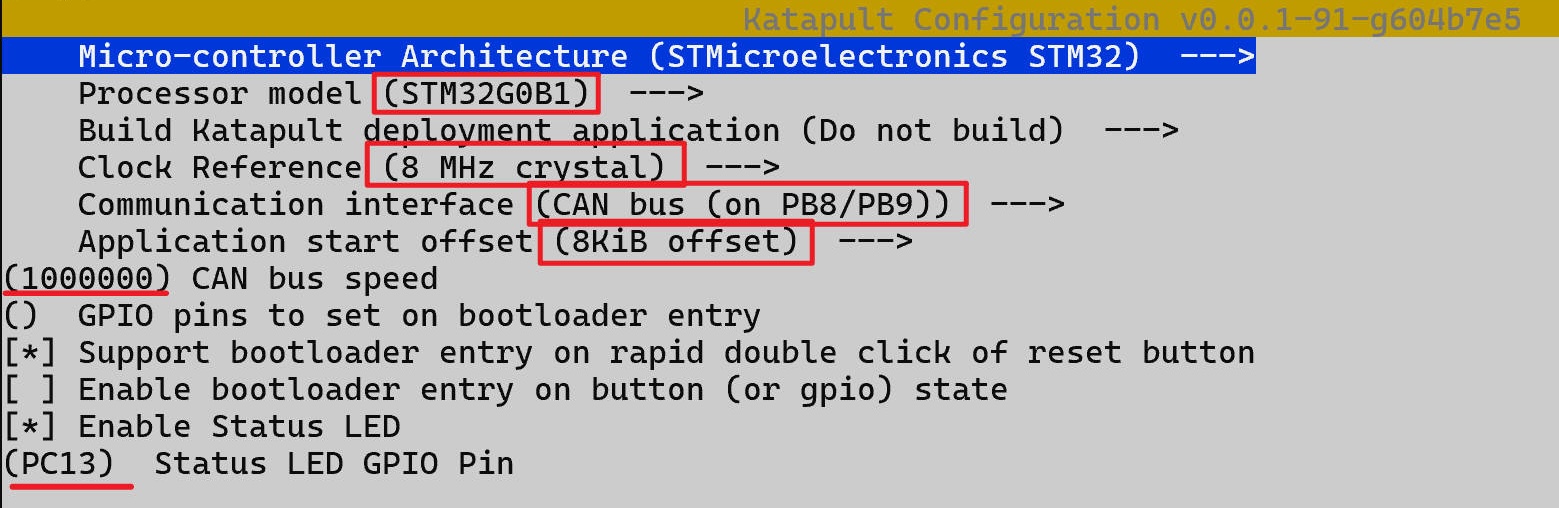
Klipper make menuconfig settings for SLB v1.0
<img src="Reference-Mcu/SLB_v1.0_Flashing_Klipper.jpg" alt="Klipper make menuconfig settings for SLB v1.0"">
See SLB v1.0 Flashing guide for CANbus-specific flashing steps.
AFC Pro v1.0
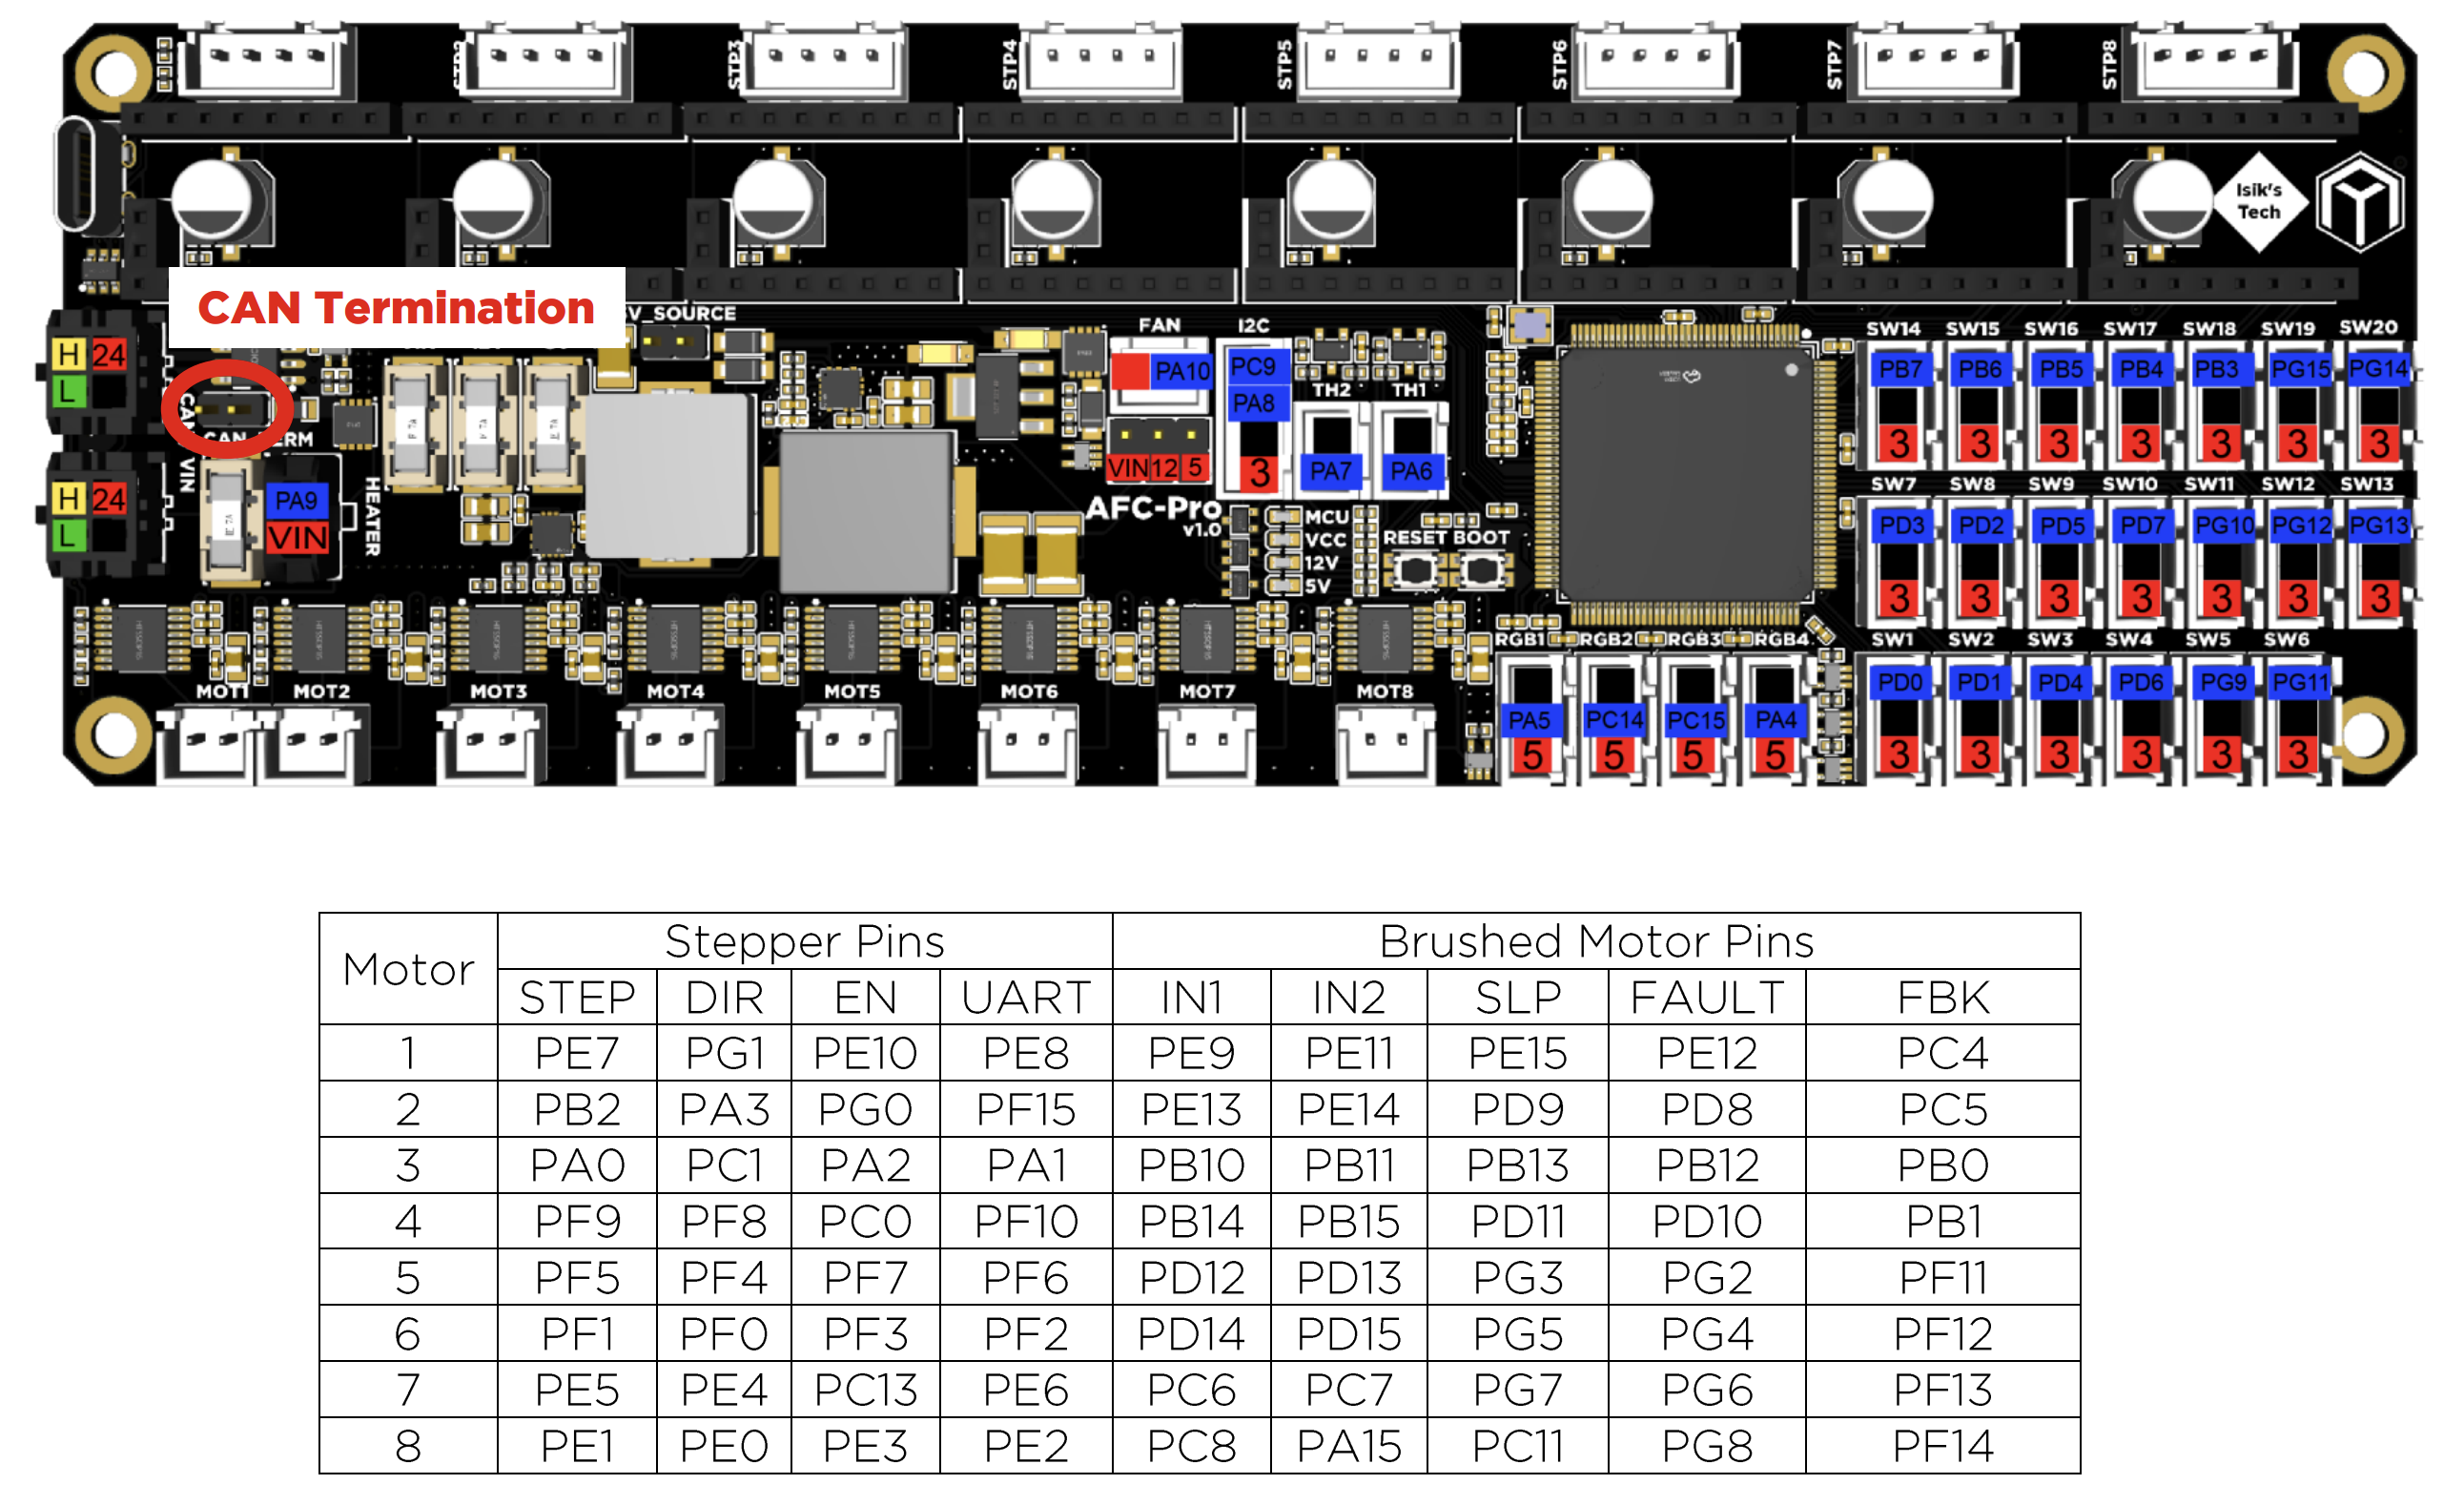
Firmware
Klipper make menuconfig settings for AFC Pro v1.0
<img src="Reference-Mcu/menuconfig_afc_pro.png" alt="Klipper make menuconfig settings for AFC Pro v1.0"">
See Flashing Firmware below for the full procedure.
AFC Lite v1.0
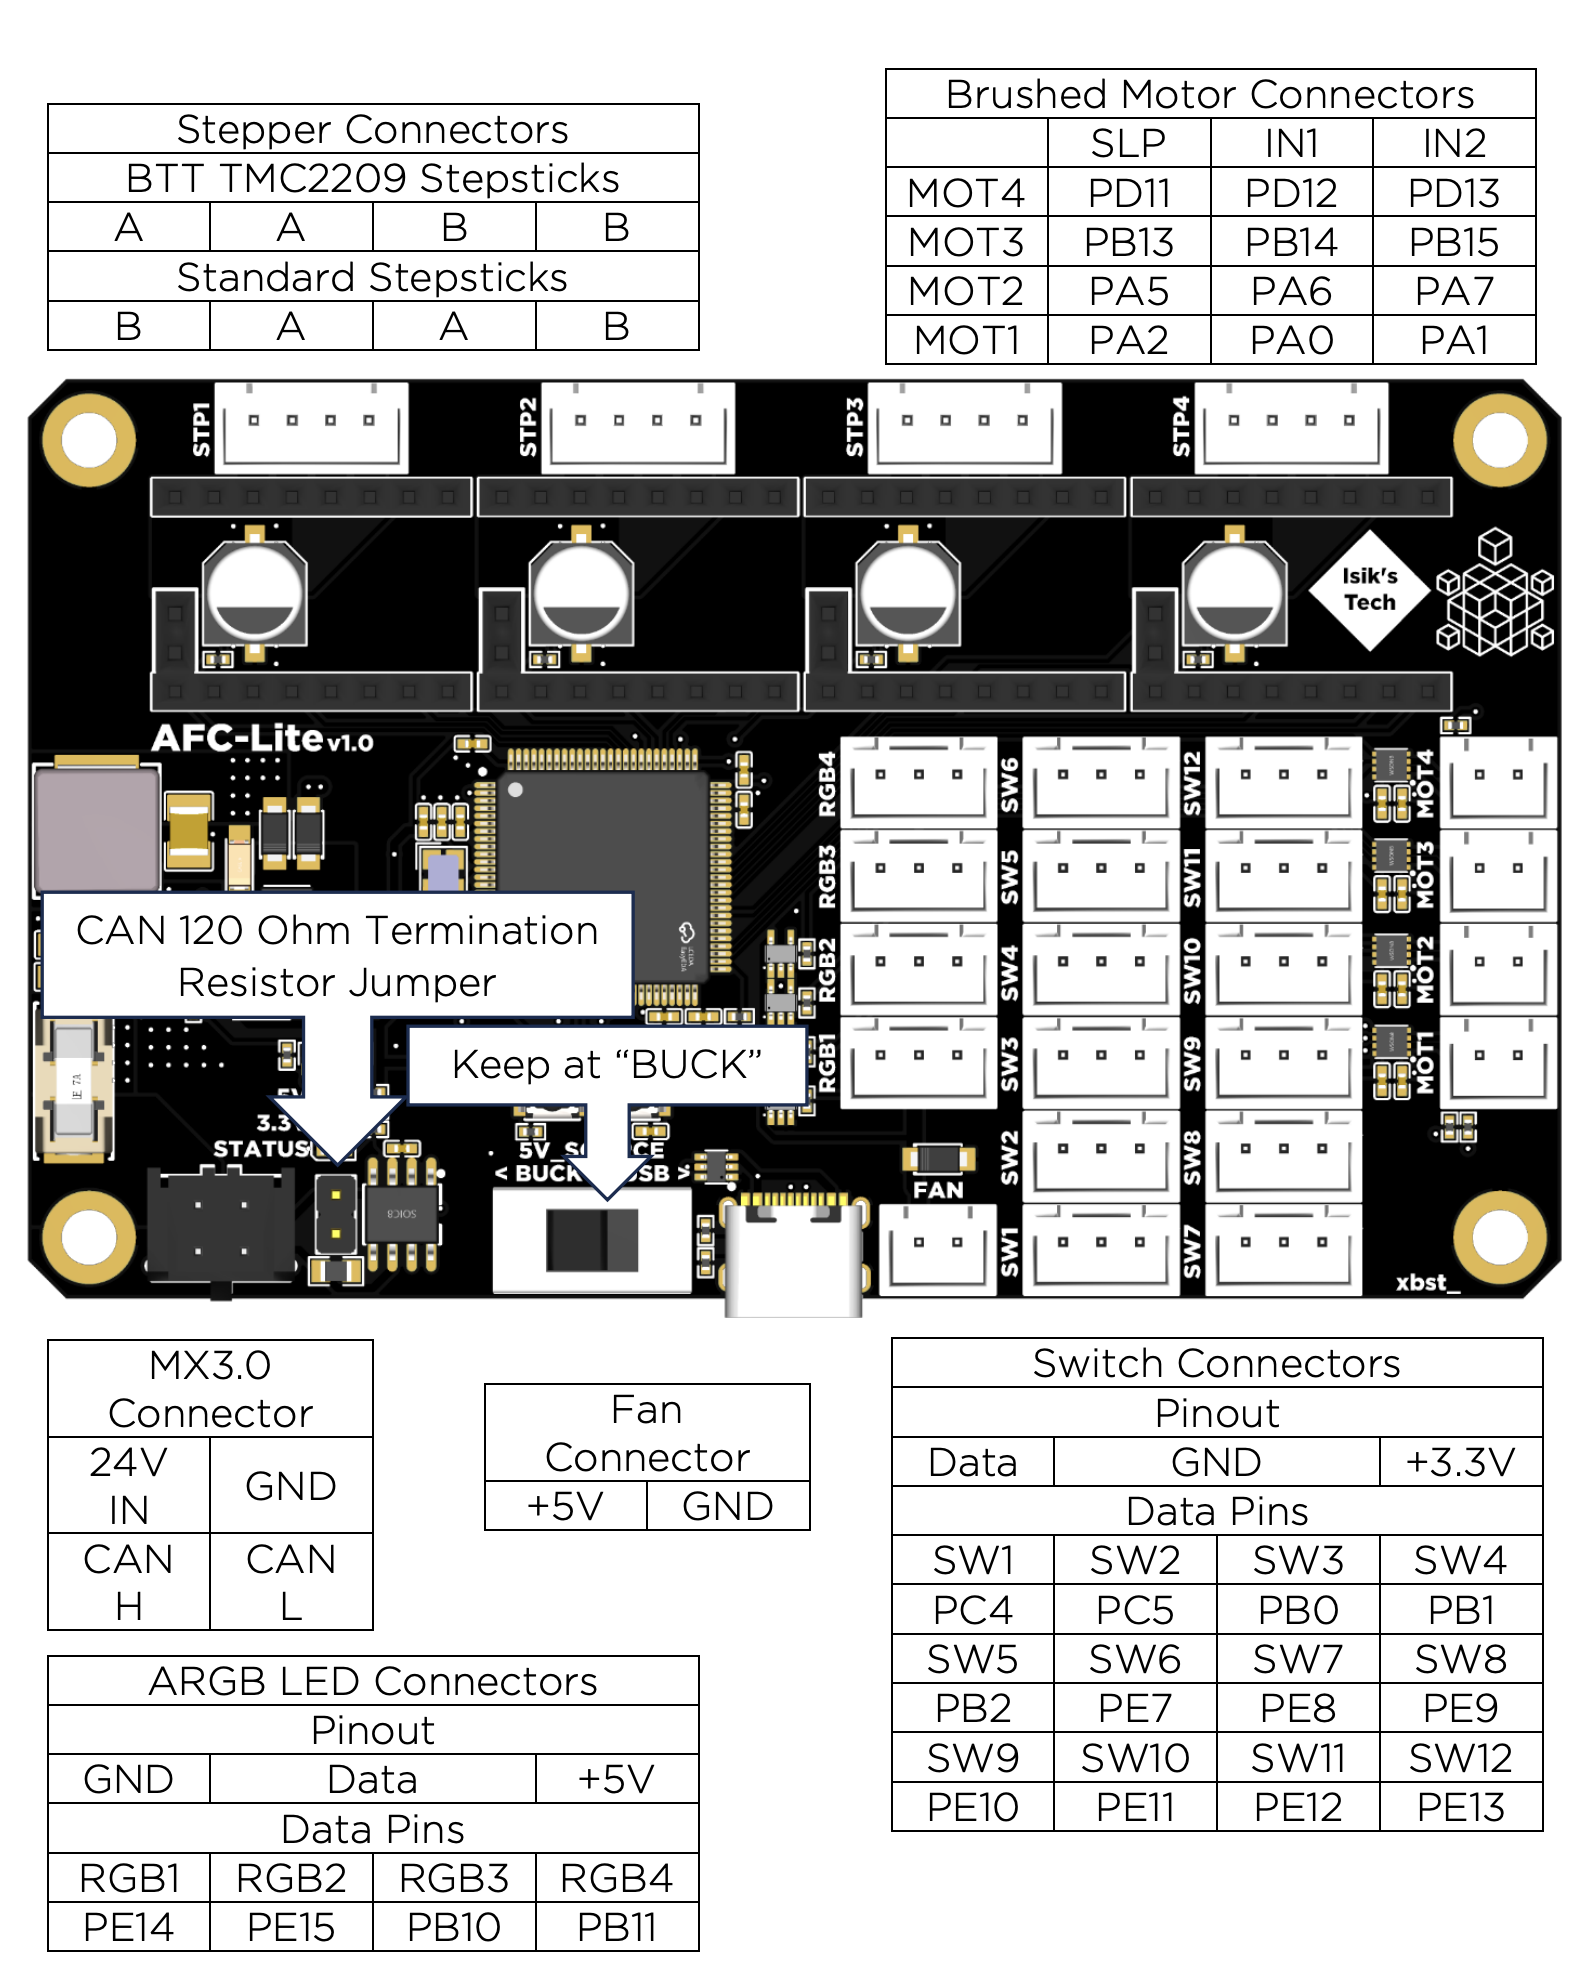
Firmware
Klipper make menuconfig settings for AFC Lite v1.0
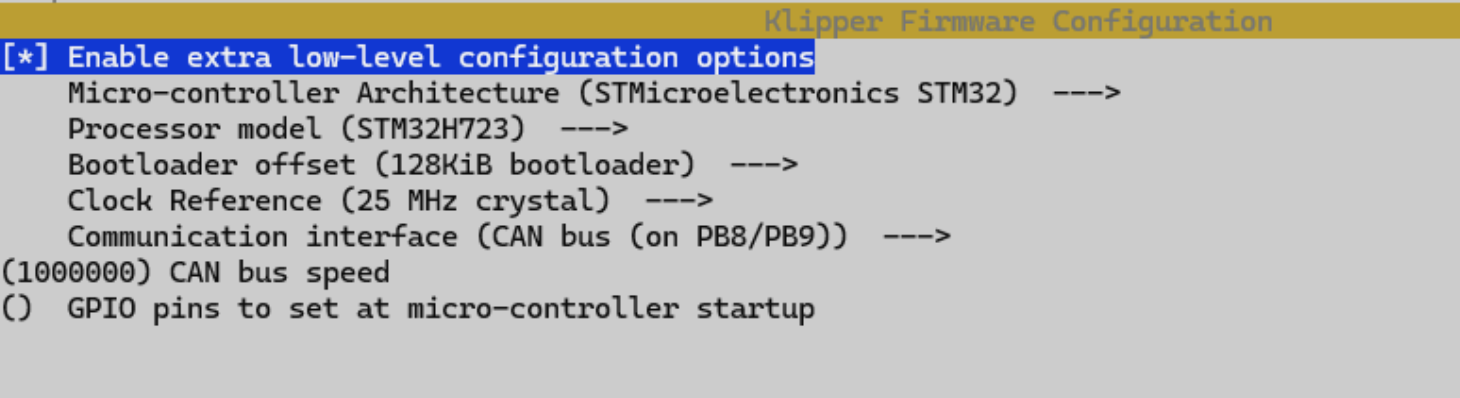
See Flashing Firmware below for the full procedure.
OwlFC Mini
Hover over or select a connector on the board to see its pinout and purpose.
All Supported Boards
Every board menuconfig's Board type screen offers, direct from the
installer's own Kconfig source - not just the ones with a pinout image
above. Most MMU types choose from the general list; per-gate MCU designs
(EMU) get their own list instead, and two MMU types (Box Turtle/KMS and BTT
ViViD) have a single fixed board rather than a choice at all.
General boards
Offered for any MMU type except a per-gate MCU design, Box Turtle/KMS, or BTT ViViD:
| Board | Pinout above? |
|---|---|
| Standard EASY-BRD with SAMD21 | ✅ |
| EASY-BRD with RP2040 | |
| Fysetc Burrows ERB v1 | |
| Fysetc Burrows ERB v2 | ✅ |
| BTT MMB v1.0 with CANbus | ✅ |
| BTT MMB v1.1 with CANbus | |
| BTT MMB v2.0 with CANbus | ✅ |
| BTT EBB 42 CANbus V1.2 | ✅ |
| BTT SKR Pico v1.0 | |
| Mellow EASY-BRD v1.x with CANbus | ✅ |
| Mellow EASY-BRD v2.x with CANbus | ✅ |
| Solo Lane Board v1.0 | ✅ |
| AFC Pro v1.0 / designed for Box Turtle | ✅ |
| AFC Lite v1.0 / designed for Box Turtle | ✅ |
| WGB v3.0 / designed for Box Turtle | |
| TZB v1.0 / designed for ERCF | |
| Chameleon X5 v1 / designed for Quatrobox v2 | |
| Not listed / Other | — (generic fallback, no fixed pinout) |
Per-gate boards (EMU multi-MCU designs)
A per-gate MCU setup (--emu/-e on the installer, see
Installation) picks one of these
per gate instead of a single board for the whole unit:
| Board | Pinout above? |
|---|---|
| EBB MCU | ✅ |
| Solo Lane Board (SLB) | ✅ |
Fixed boards
These two MMU types skip the board-choice screen entirely - the board is part of the design:
| MMU type | Fixed board | Pinout above? |
|---|---|---|
| Box Turtle/KMS | BIQU KMS MCU | |
| BTT ViViD | BTT ViViD MCU |
See Getting Started with BTT ViViD for that design's own MCU connection walkthrough.
Flashing Firmware
Klipper firmware needs flashing to the MCU before it'll talk to Klipper at all:
- SSH into your Raspberry Pi.
-
Open a shell there and run:
cd ~/klipper make menuconfig -
Configure your board's firmware settings (chip, bootloader, communication interface) - specific to the MCU chip on your board, not something this page can give one universal answer for.
- Save and exit (
Q). -
You will need the correct device name. You can use
lsusbto list all USB devices. E.gIDBus 002 Device 001: ID 1d6b:0003 Linux Foundation 3.0 root hub Bus 001 Device 007: ID 2e8a:0003 Raspberry Pi RP2 Boot Bus 001 Device 004: ID 1d50:614e OpenMoko, Inc. stm32f446xx2e8a:0003should match you new device. Then flash it:Alternatively you can find you device withmake flash FLASH_DEVICE=2e8a:0003ls -l /dev/serial/by-idand flash:make flash FLASH_DEVICE=/dev/serial/by-id/<your-mcu-id>
Important
CANbus boards flash differently - follow Esoterical's CANbus flashing guide instead of the steps above.
Tip
Not sure of your serial device path? Open a second SSH session, run ls
/dev/serial/by-id, unplug the board, run it again, and see which line
disappeared - that's the one that was yours.