Toolchange Movement
Happy Hare controls all toolhead parking and movement around a toolchange -
whether triggered by a normal Tx/MMU_CHANGE_TOOL, a runout, an MMU
error, or a regular Klipper pause/cancel. All of it is configured in
mmu_macro_vars.cfg, which also carries additional inline documentation
worth reading alongside this page.
Overview of Toolhead Parking
Happy Hare recognizes 7 operations that may need toolhead parking:
toolchange- a normal toolchange, viaTxorMMU_CHANGE_TOOLrunout- a forced toolchange triggered by runoutload/unload- a standaloneMMU_LOAD/MMU_UNLOADcomplete- print completion (with Happy Hare enabled)pause- a regular KlipperPAUSEcancel- a regular KlipperCANCEL_PRINT
Each can occur in one of three contexts: printing with Happy Hare enabled,
not printing with Happy Hare enabled, or with Happy Hare disabled
(MMU ENABLE=0). Three variables pick which operations park in which
context:
variable_enable_park_printing- operations that should park while printing. Two common starting points: if the slicer forms tips (parking over its own wipe tower), you likely don't want to park ontoolchangeitself, but you probably do onrunout(a forced toolchange the slicer never sees coming). Parking onpause(which includes every MMU error),cancel, andcompleteis typically wanted regardless.variable_enable_park_standalone- operations that should park when not printing (manual MMU operation, or via KlipperScreen). Entirely a workflow preference; set to an empty list for no parking at all outside a print.variable_enable_park_disabled- with Happy Hare disabled, onlypauseandcancelare meaningful (everything else needs Happy Hare active to begin with) - relevant only if you're using the client macros with Happy Hare turned off and the bypass in use.
| toolchange | runout | load | unload | complete | pause | cancel | |
|---|---|---|---|---|---|---|---|
| printing | ✅ | ✅ | ✅ | ✅ | ✅ | ✅ | ✅ |
| standalone | ✅ | ✅ | ✅ | ✅ | ✅ | ||
| disabled | ✅ | ✅ |
Each operation's actual parking move is a 5-value tuple: X, Y, z-hop, a horizontal ramp distance for the z-hop move (helps break stringing), and a retraction length. Negative X/Y is fine if your printer can handle it:
variable_park_pause: 50, 50, 5, 10, 2
Parks at (50, 50), lifting 5mm with a 10mm horizontal ramp on the way up,
retracting 2mm. -999, -999 for X/Y does a z-hop-only move (or nothing at
all, with -999, -999, 0, 0, 0).
Every parking move happens above a "toolhead movement plane" - normally the
current Z plus the z-hop, floored by variable_min_toolchange_z so it never
dips below a safety minimum:
variable_min_toolchange_z: 1.0 ; Absolute minimum safety floor
When printing sequentially, the plane also rises to clear the tallest object - see Z-Hop Moves below. Travel speed is set separately for horizontal and pure-vertical moves:
variable_park_travel_speed: 200       ; XY(Z) travel speed, mm/s
variable_park_lift_speed: 15          ; Z-only travel speed, mm/s
So a 20mm z-hop-only park with 5mm retraction on cancel would minimally be:
variable_enable_park_printing: cancel
variable_park_cancel: -999, -999, 20, 0, 5
Important
Define a parking position for pause - it's what runs on every MMU
error, and having the toolhead move somewhere convenient to work at
makes a real difference. Any MMU operation invoked directly while
already paused (MMU_LOAD, MMU_UNLOAD, Tx) parks exactly as it
would outside a print, following the standalone settings above.
Toolhead Movement During Toolchange
Toolchange parking usually needs more nuance than the other operations.
You'll often want toolchange and runout to behave differently even
though both are "a toolchange" - see the tip-forming discussion above - and
a more elaborate setup (tip cutting, custom purging, nozzle cleaning) may
need parking moves at points other than just the start and end. Three
extra hook positions cover this:
variable_pre_unload_position    : -999, -999, 0     ; Before unload starts
variable_post_form_tip_position : -999, -999, 0     ; After tip forming/cutting, on unload
variable_pre_load_position      : -999, -999, 0     ; Before load starts
Each takes X, Y, and an optional z-hop (z-hops don't stack - the largest one requested sets the movement plane). The default does nothing at any of these points.
Note
Parking logic can also be called directly from your own macros:
_MMU_PARK FORCE_PARK=1 X=10 Y=10 Z_HOP=5
No matter how many of these hooks fire, the toolhead is always correctly restored before the print continues - see Return to Print Movement.
Which of these you actually need depends on your tip-forming strategy. Tip
forming is the one piece of logic that can be done by either Happy Hare or
the slicer - deciding which is mostly the force_form_tip_standalone
setting (mmu.cfg's shared parameters) together with matching slicer
configuration (see Slicer Setup). A few common setups,
as a starting point for both tip-forming and tip-cutting configurations:
Tip Forming Options
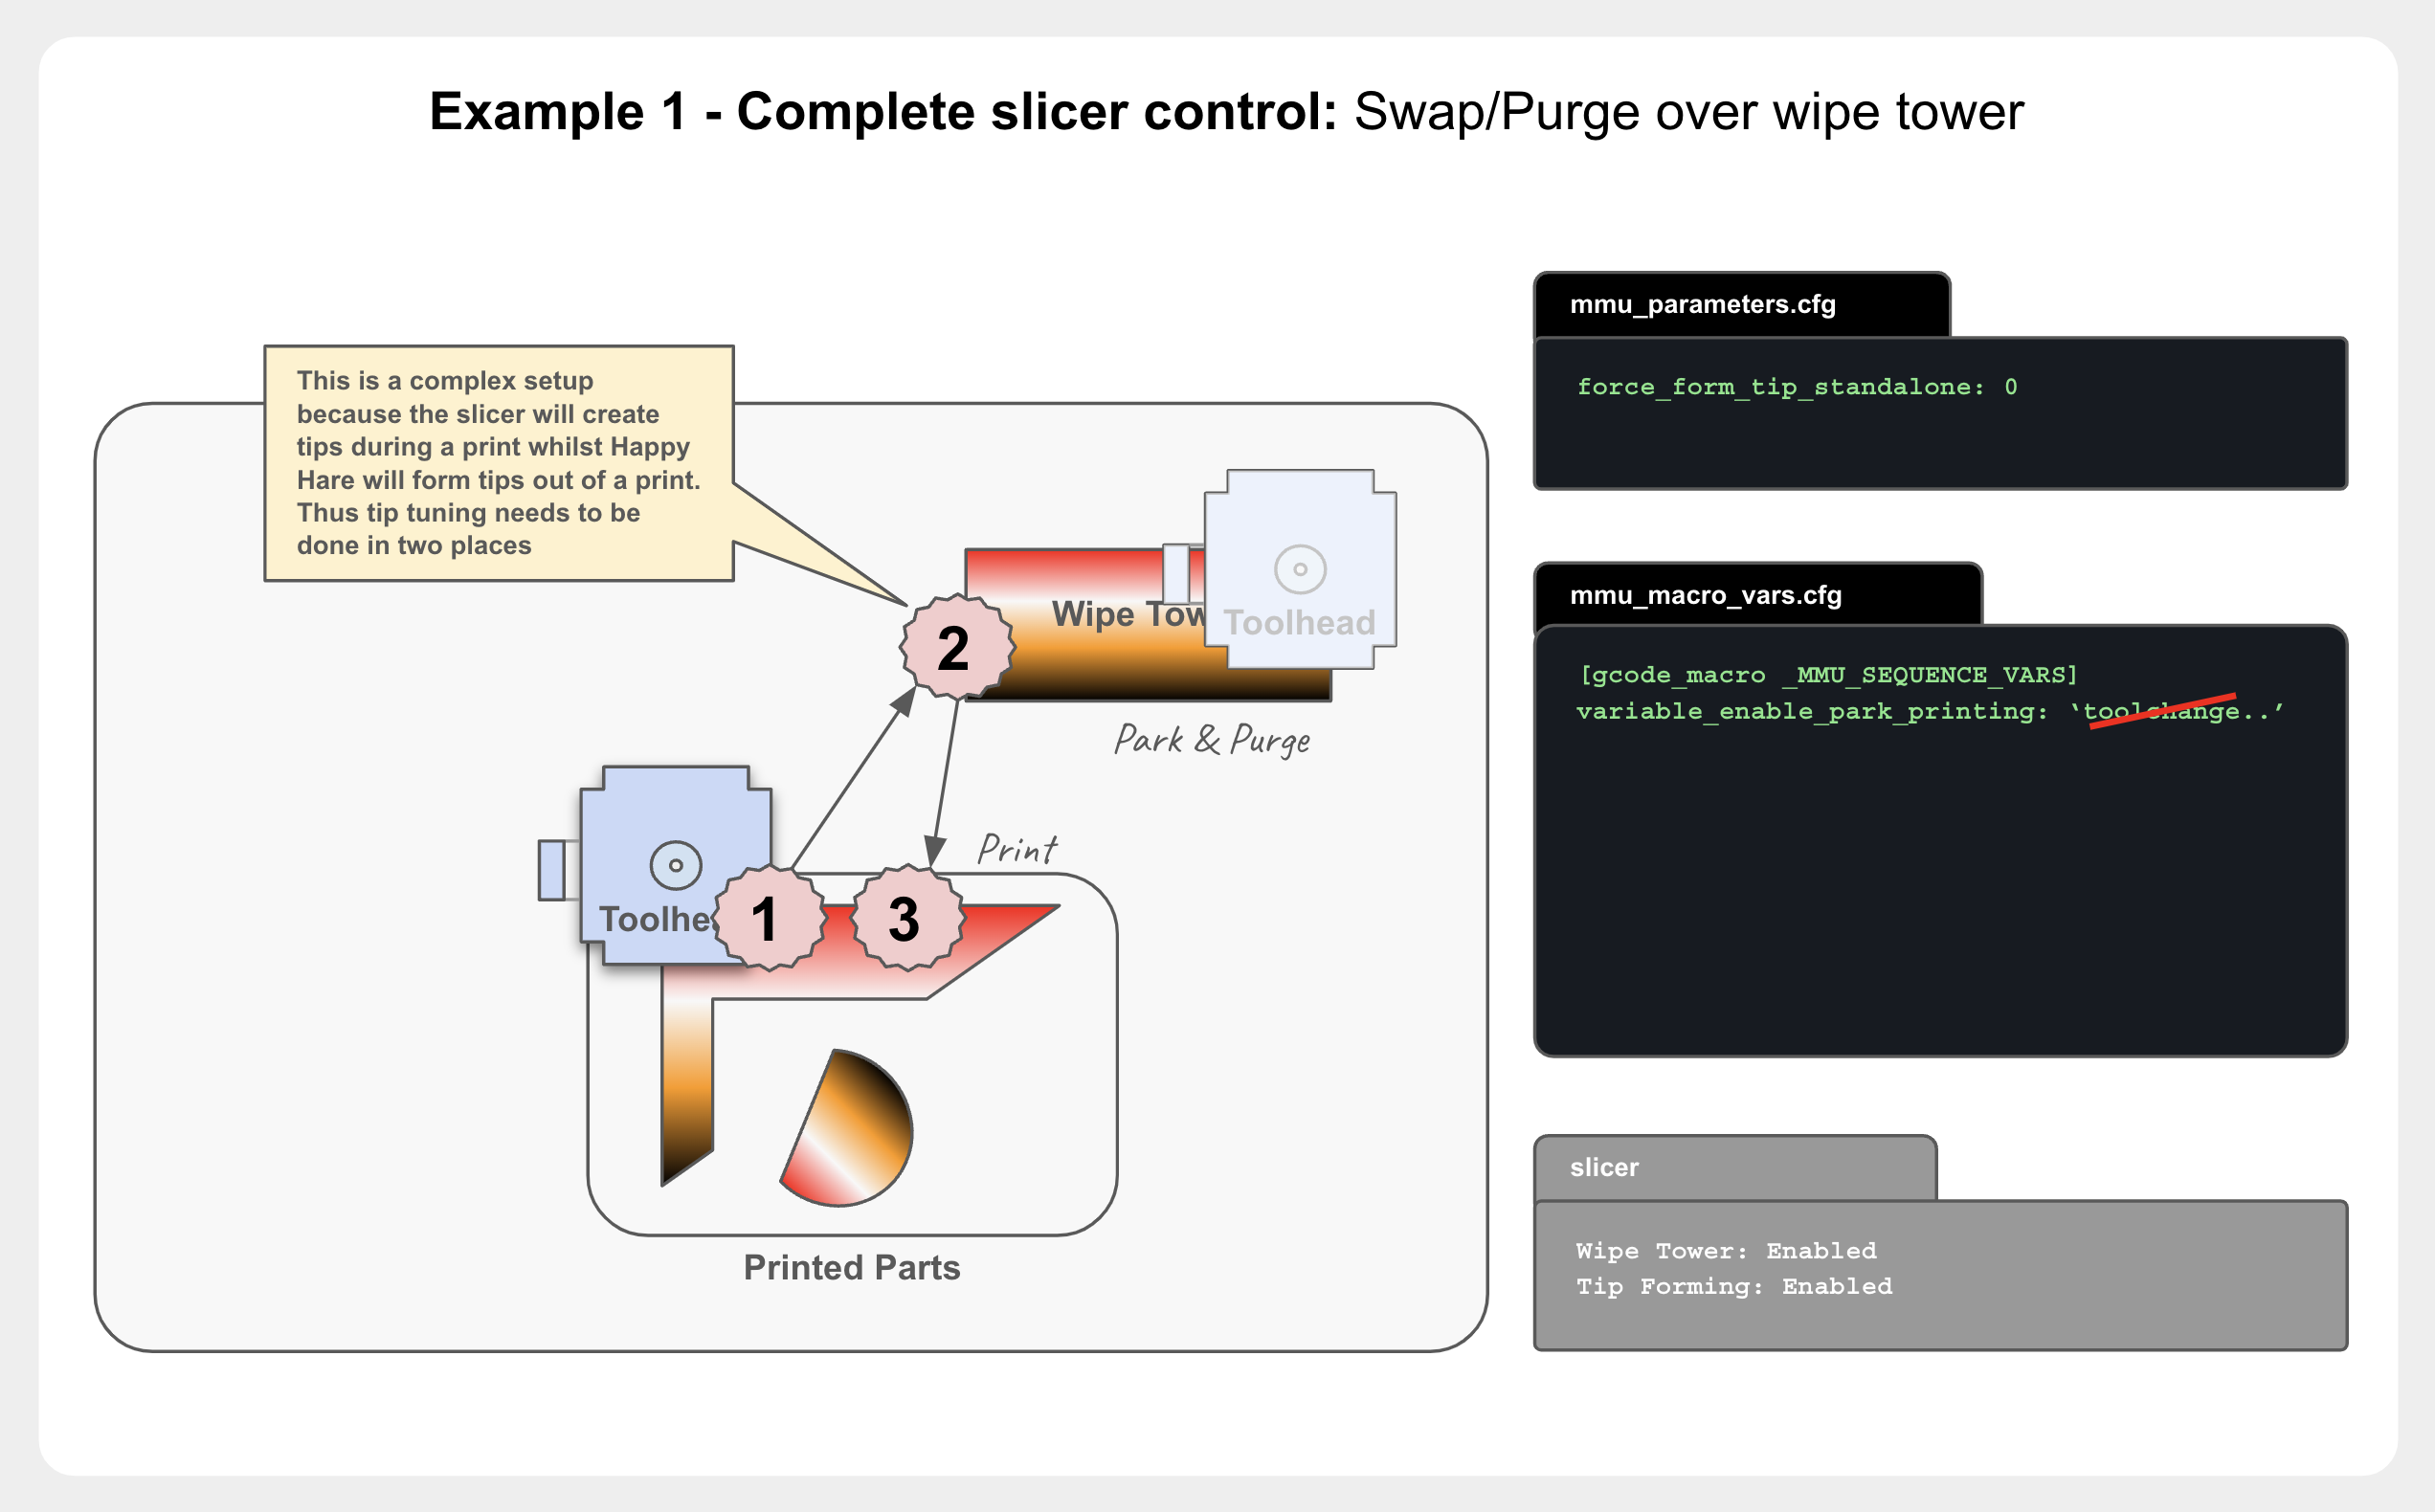
Complete slicer control, parking and purging on the wipe tower -
minimizes movement, but the wipe tower occupies part of the build plate and
rules out sequential printing. Don't define parking for toolchange while
printing here - it's effectively disabled; you'll likely still want it for
pause/cancel/complete, and for runout even though normal toolchanges have
no parking.
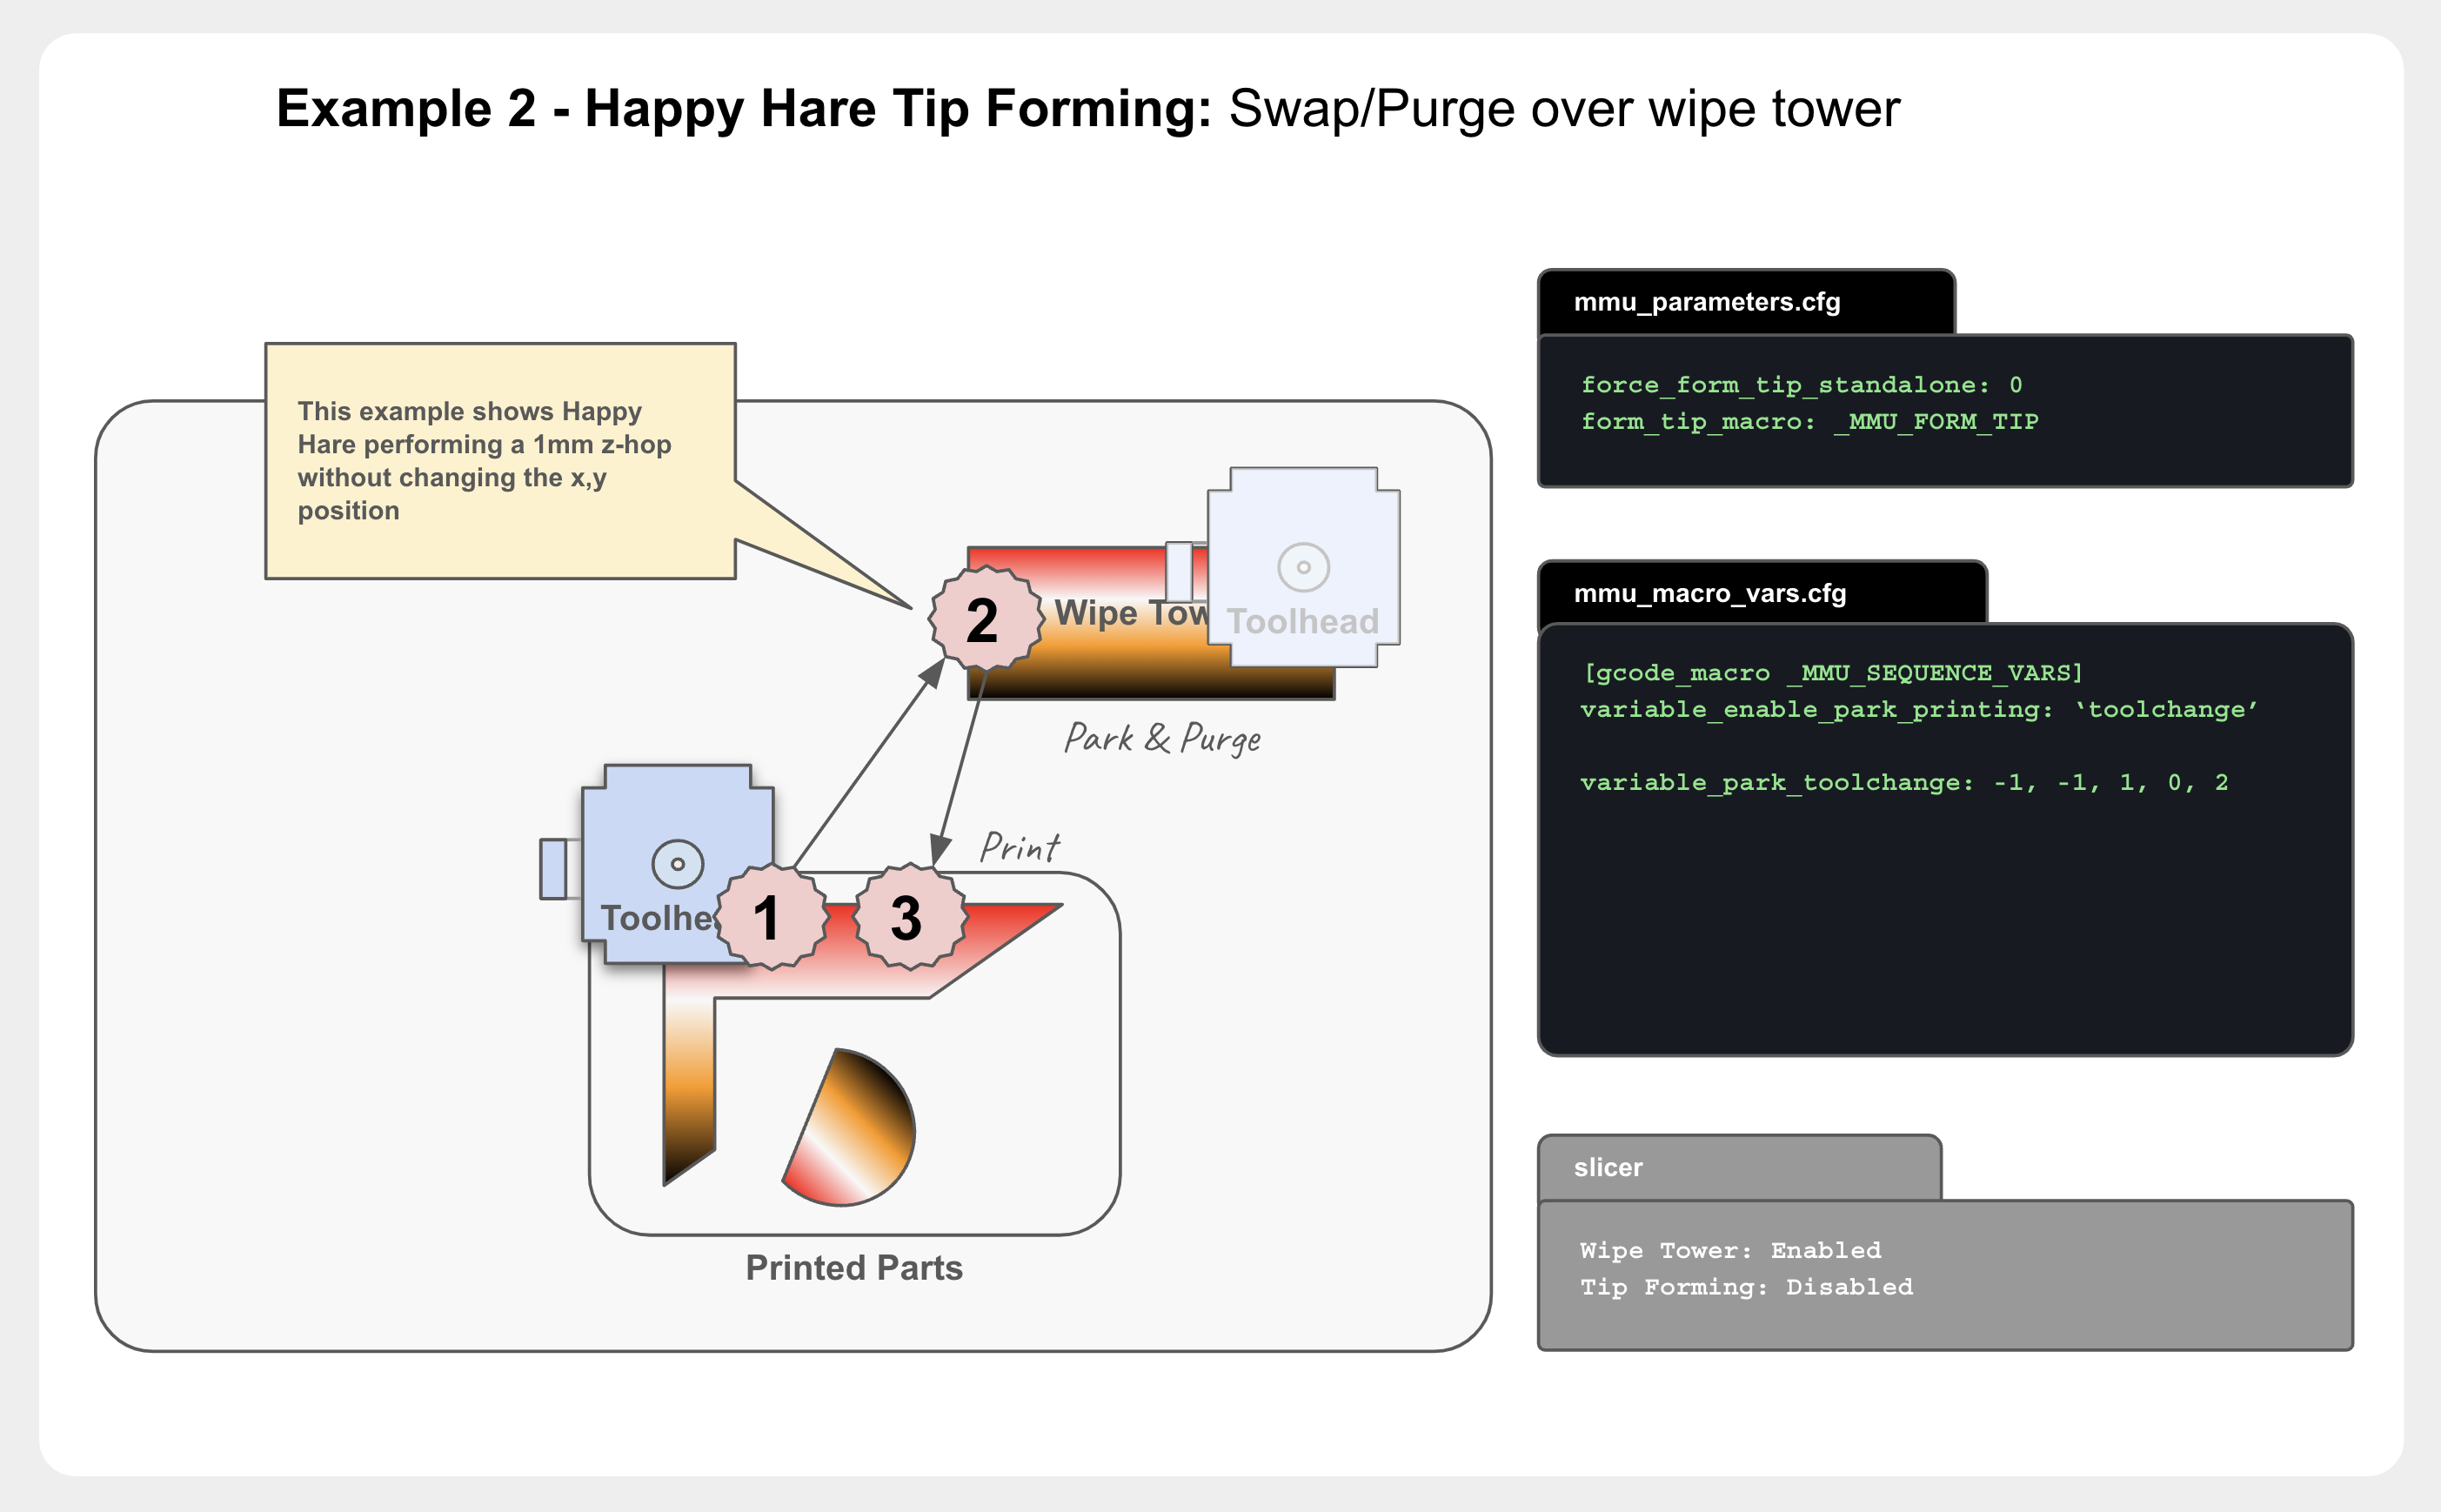
Happy Hare tip forming, parking and purging on the wipe tower - similar trade-offs, but tip forming only needs tuning in one place. A simple z-hop parks the toolhead while Happy Hare forms the tip, then it's lowered onto the wipe tower for the slicer's own purge.
Tip Cutting Options
Filament movement is the default way to form a tip, but cutting it off
outright is simpler in some ways - either at the MMU itself (via the
_MMU_POST_UNLOAD callback), or more commonly with a toolhead-mounted
cutter (a blade on a servo, or the toolhead pressing filament against a pin,
itself sometimes servo-actuated). See
Feature: Tip Forming and Purging for the
cutter hardware itself.
Cutting the tip, parking over a dedicated area (often a purge bucket)
for the whole toolchange - allows a brush-cleaning move after the new
filament loads, before returning to the wipe tower
(variable_restore_xy_pos); supports sequential printing.
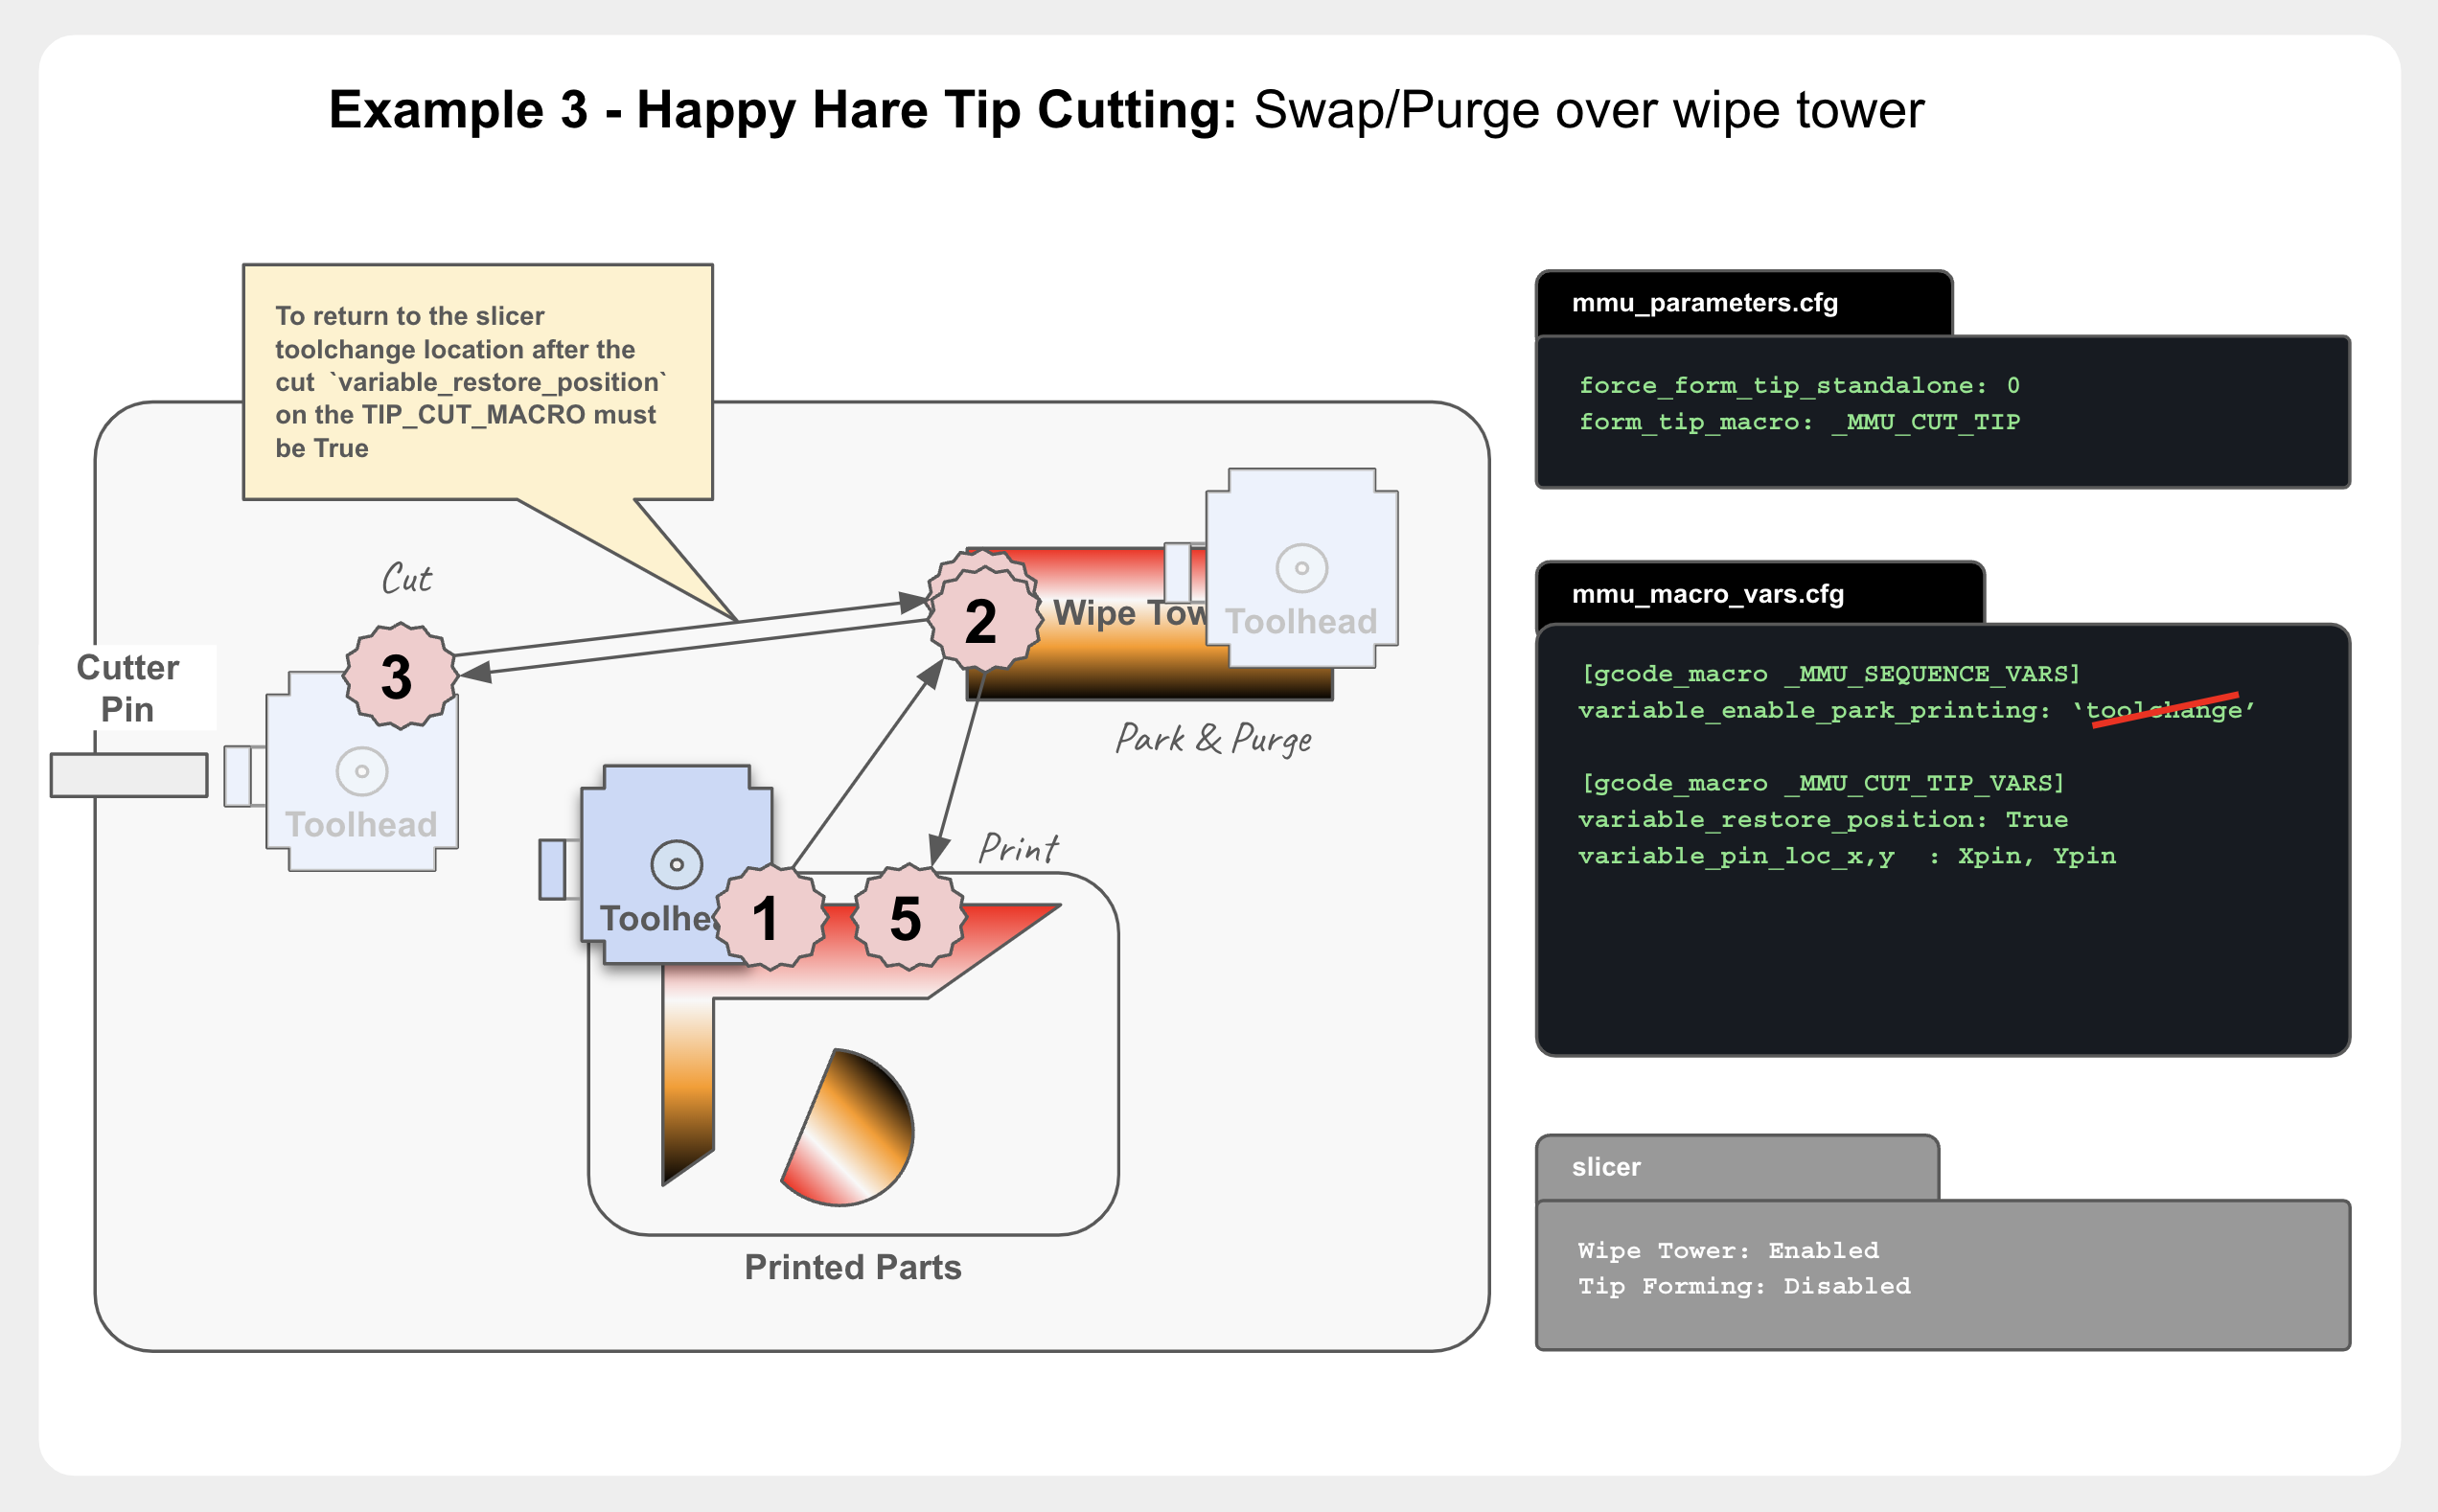
Cutting the tip, with a separate initial park at the cutter and a
second park at the purge bucket - the initial toolchange park is a 1mm
z-hop to the cutter pin; after cutting, post_form_tip_position moves to
the purge bucket for the rest of the toolchange (a
variable_user_post_load_extension hook would typically purge/wipe here).
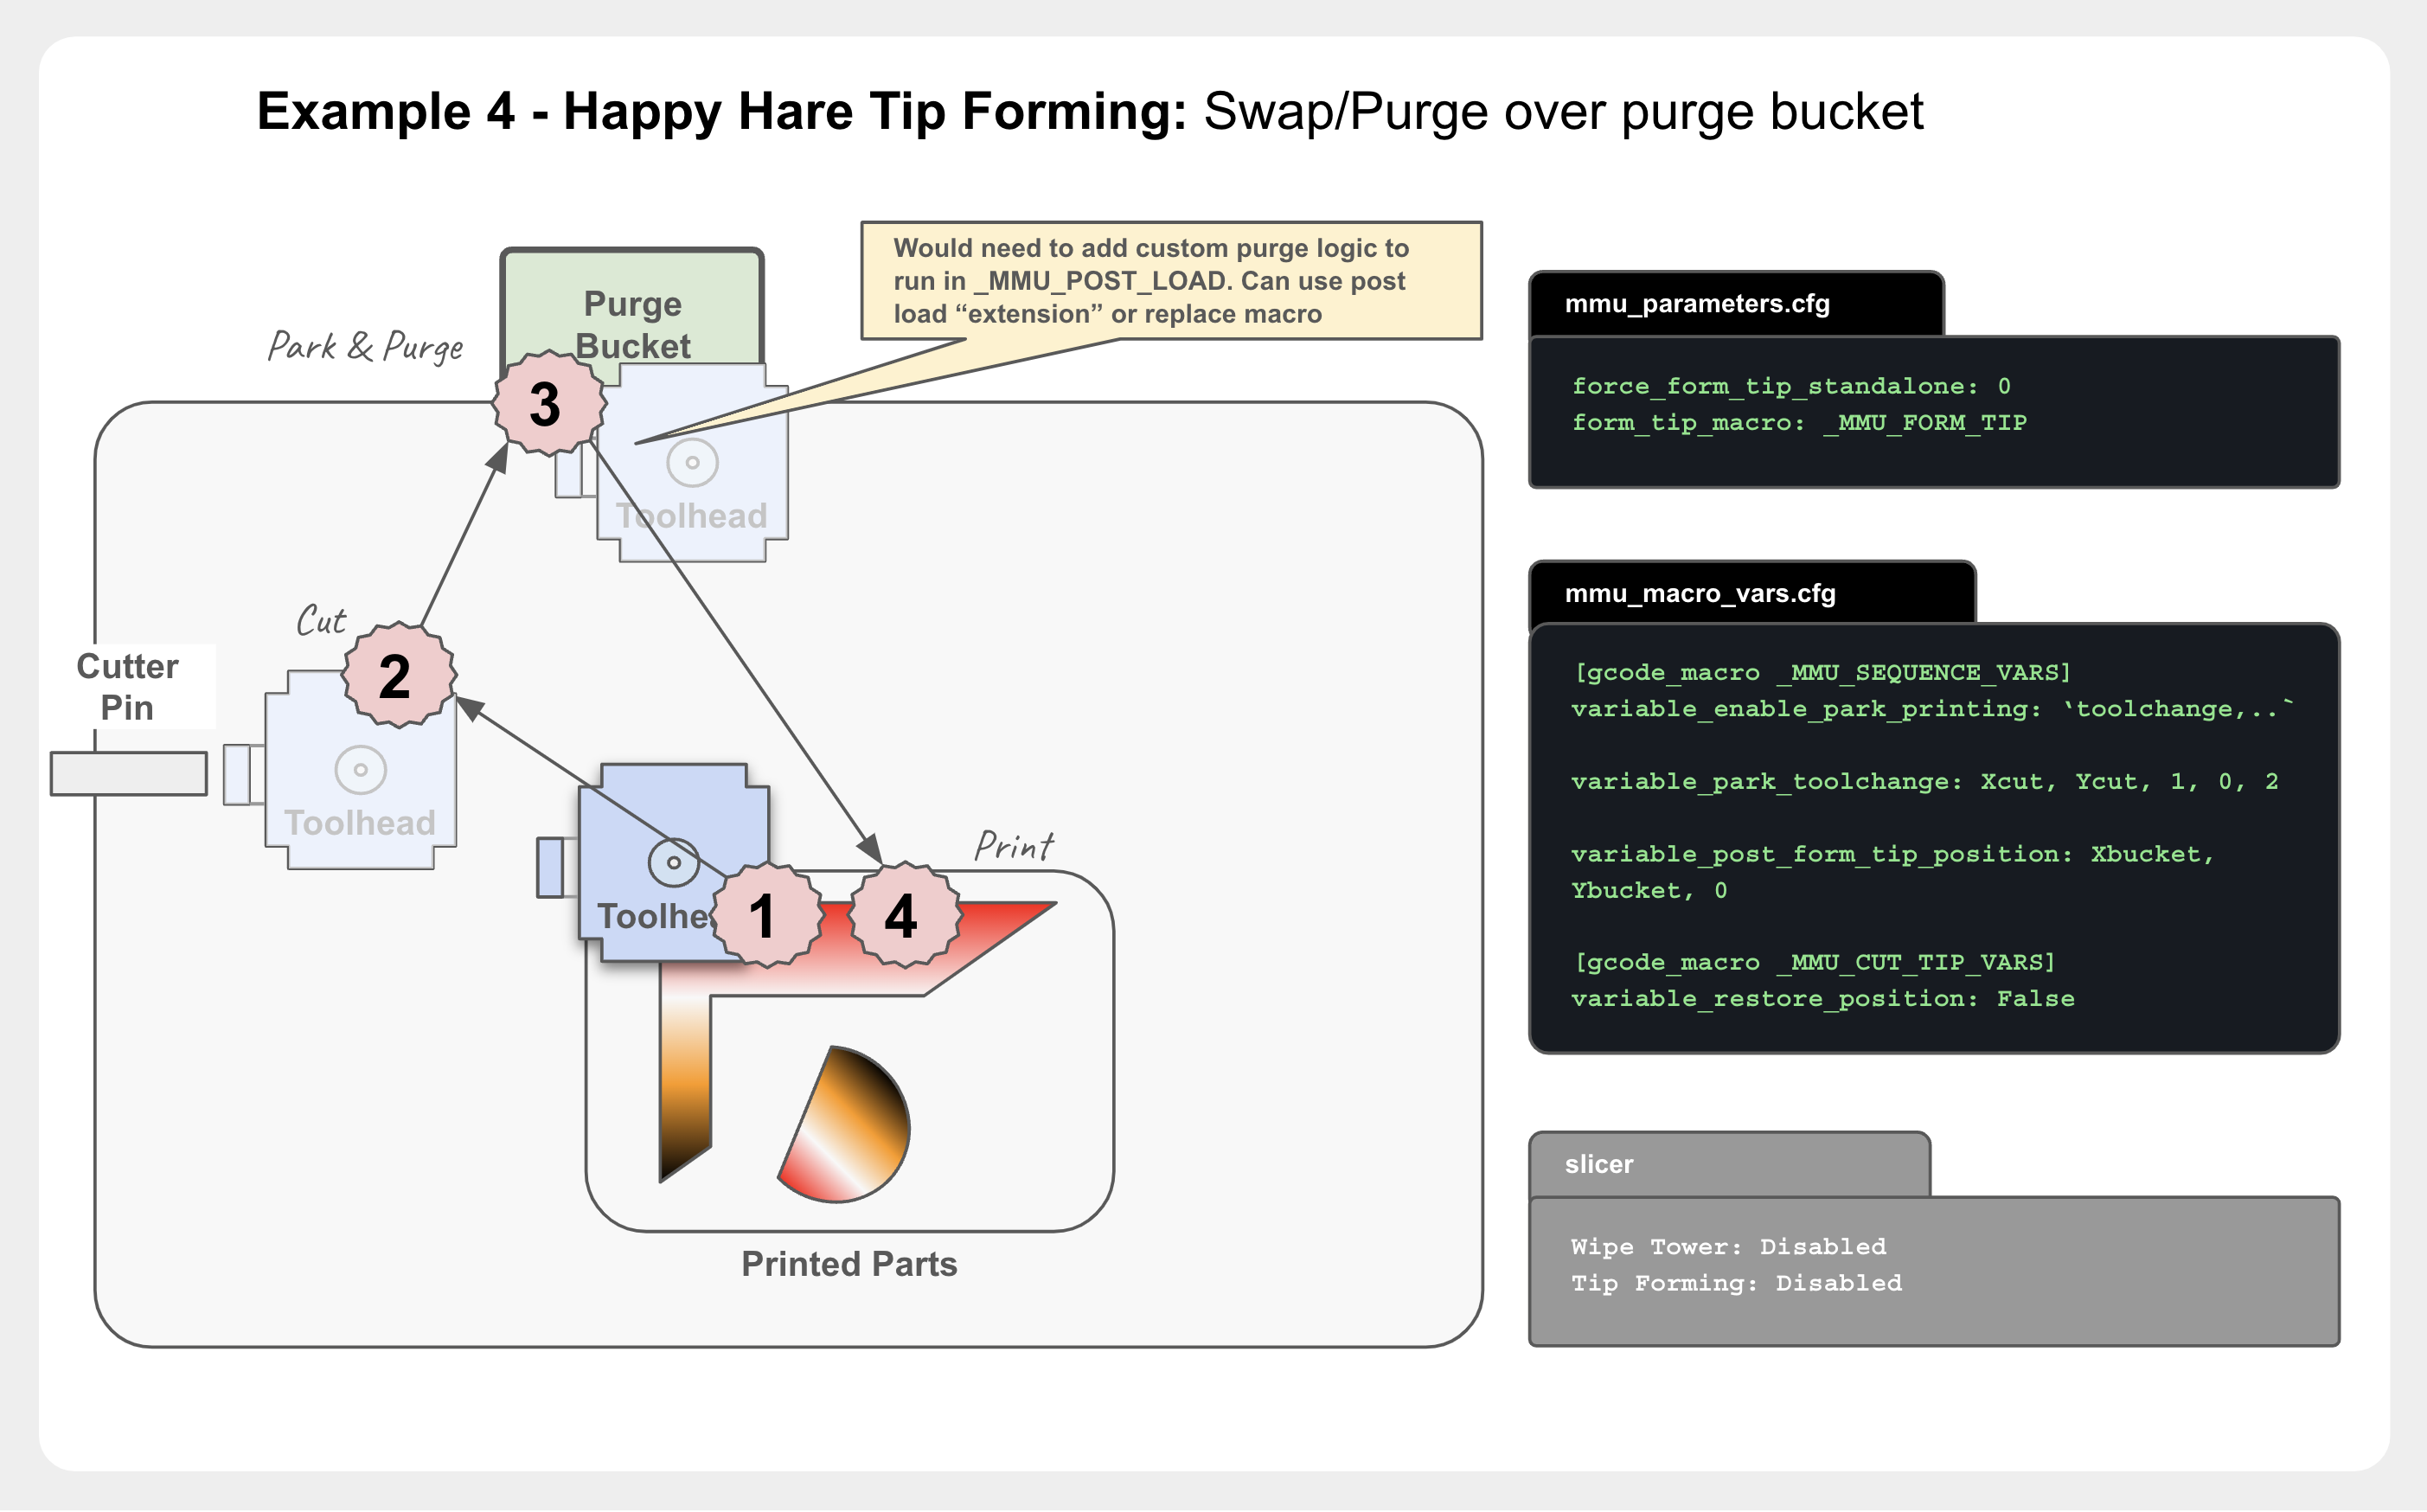
Cutting the tip with a fully custom park and purge, no wipe tower at all - the full build plate is available since the wipe tower is disabled, tip forming needs no tuning, a dedicated purge system (e.g. Purge: Blobifier) optimizes purge speed/waste, and a custom park location can reduce ooze; supports sequential printing. More setup, more steps - there's more than one way to build this, and this is just one example.
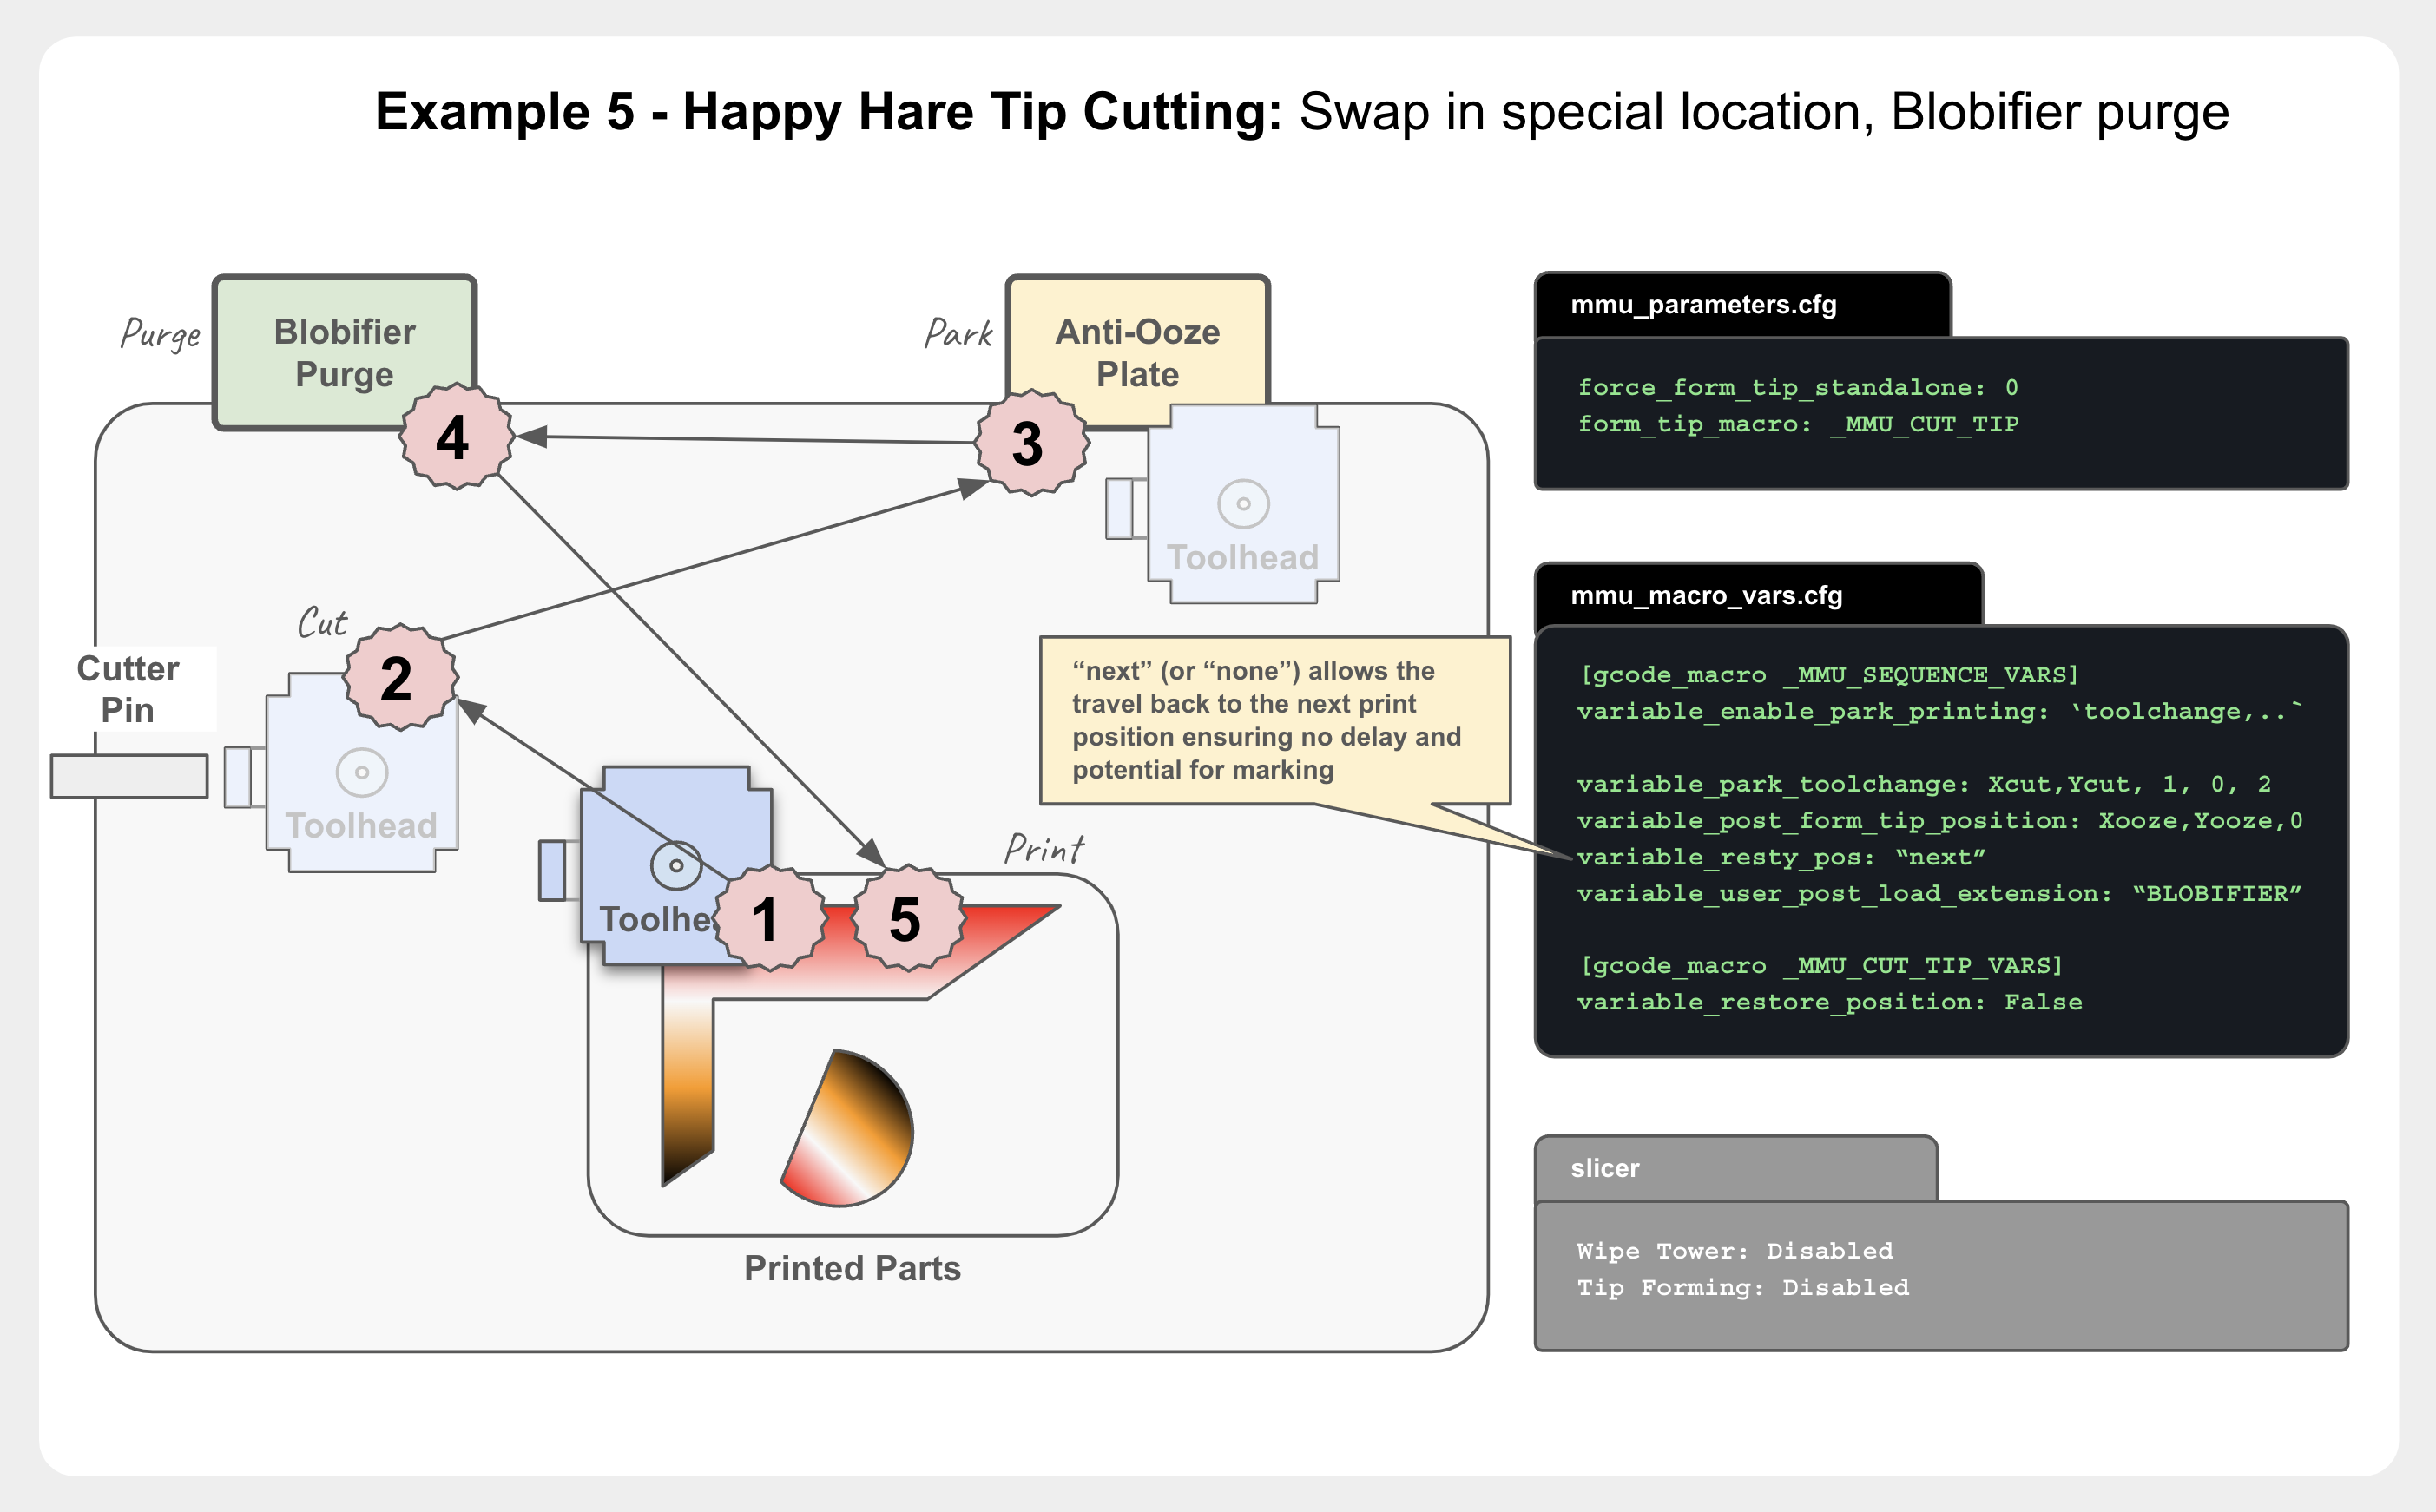
Return to Print Movement
How the toolhead returns to the print after a toolchange is controlled by
variable_restore_xy_pos in mmu_macro_vars.cfg:
last (default)
Returns to the last X/Y position the toolhead was at when the toolchange started, before handing control back to the slicer's own gcode:
- Z is restored to the toolchange plane first if needed (a safety step, tolerant of a user extension leaving Z somewhere unexpected).
- Travels to the last X/Y at
variable_park_travel_speed. - Z is restored onto the print (un-retracting), either by Happy Hare internally (undoing any toolchange z-hop) or by the slicer's own gcode.
none
Restores Z to the print height only - no X/Y movement. The slicer's own
next travel move (G0/G1) brings the toolhead back over the print.
Without a toolchange z-hop configured somewhere (slicer or Happy Hare),
this risks the toolhead grazing the top of the print.
next
Returns to the next print position instead of the last one - lets the
travel height be controlled precisely, and avoids marking the print the
way last sometimes can. Otherwise the same movement shape as last.
Outside a print there's no "next" position, so this behaves identically to
last there.
Note
next needs enable_toolchange_next_pos: True under [mmu_server] in
moonraker.conf - this makes Happy Hare's Moonraker extension extract
the next-position information from the uploaded gcode file.
Z-Hop Moves
Two independent sources of z-hop can be in play during a toolchange, worth knowing apart when debugging unexpected movement:
- The slicer's own toolchange z-hop, if it has one enabled - normally disabled once you've configured tip forming to happen on Happy Hare's side.
- Happy Hare's own park move, per operation as configured above
(
variable_park_toolchange,variable_park_pause, and so on) - this is the single mechanism for all toolchange/pause/cancel/complete z-hop now; there's no separate always-on lift distinct from the configured park move itself.
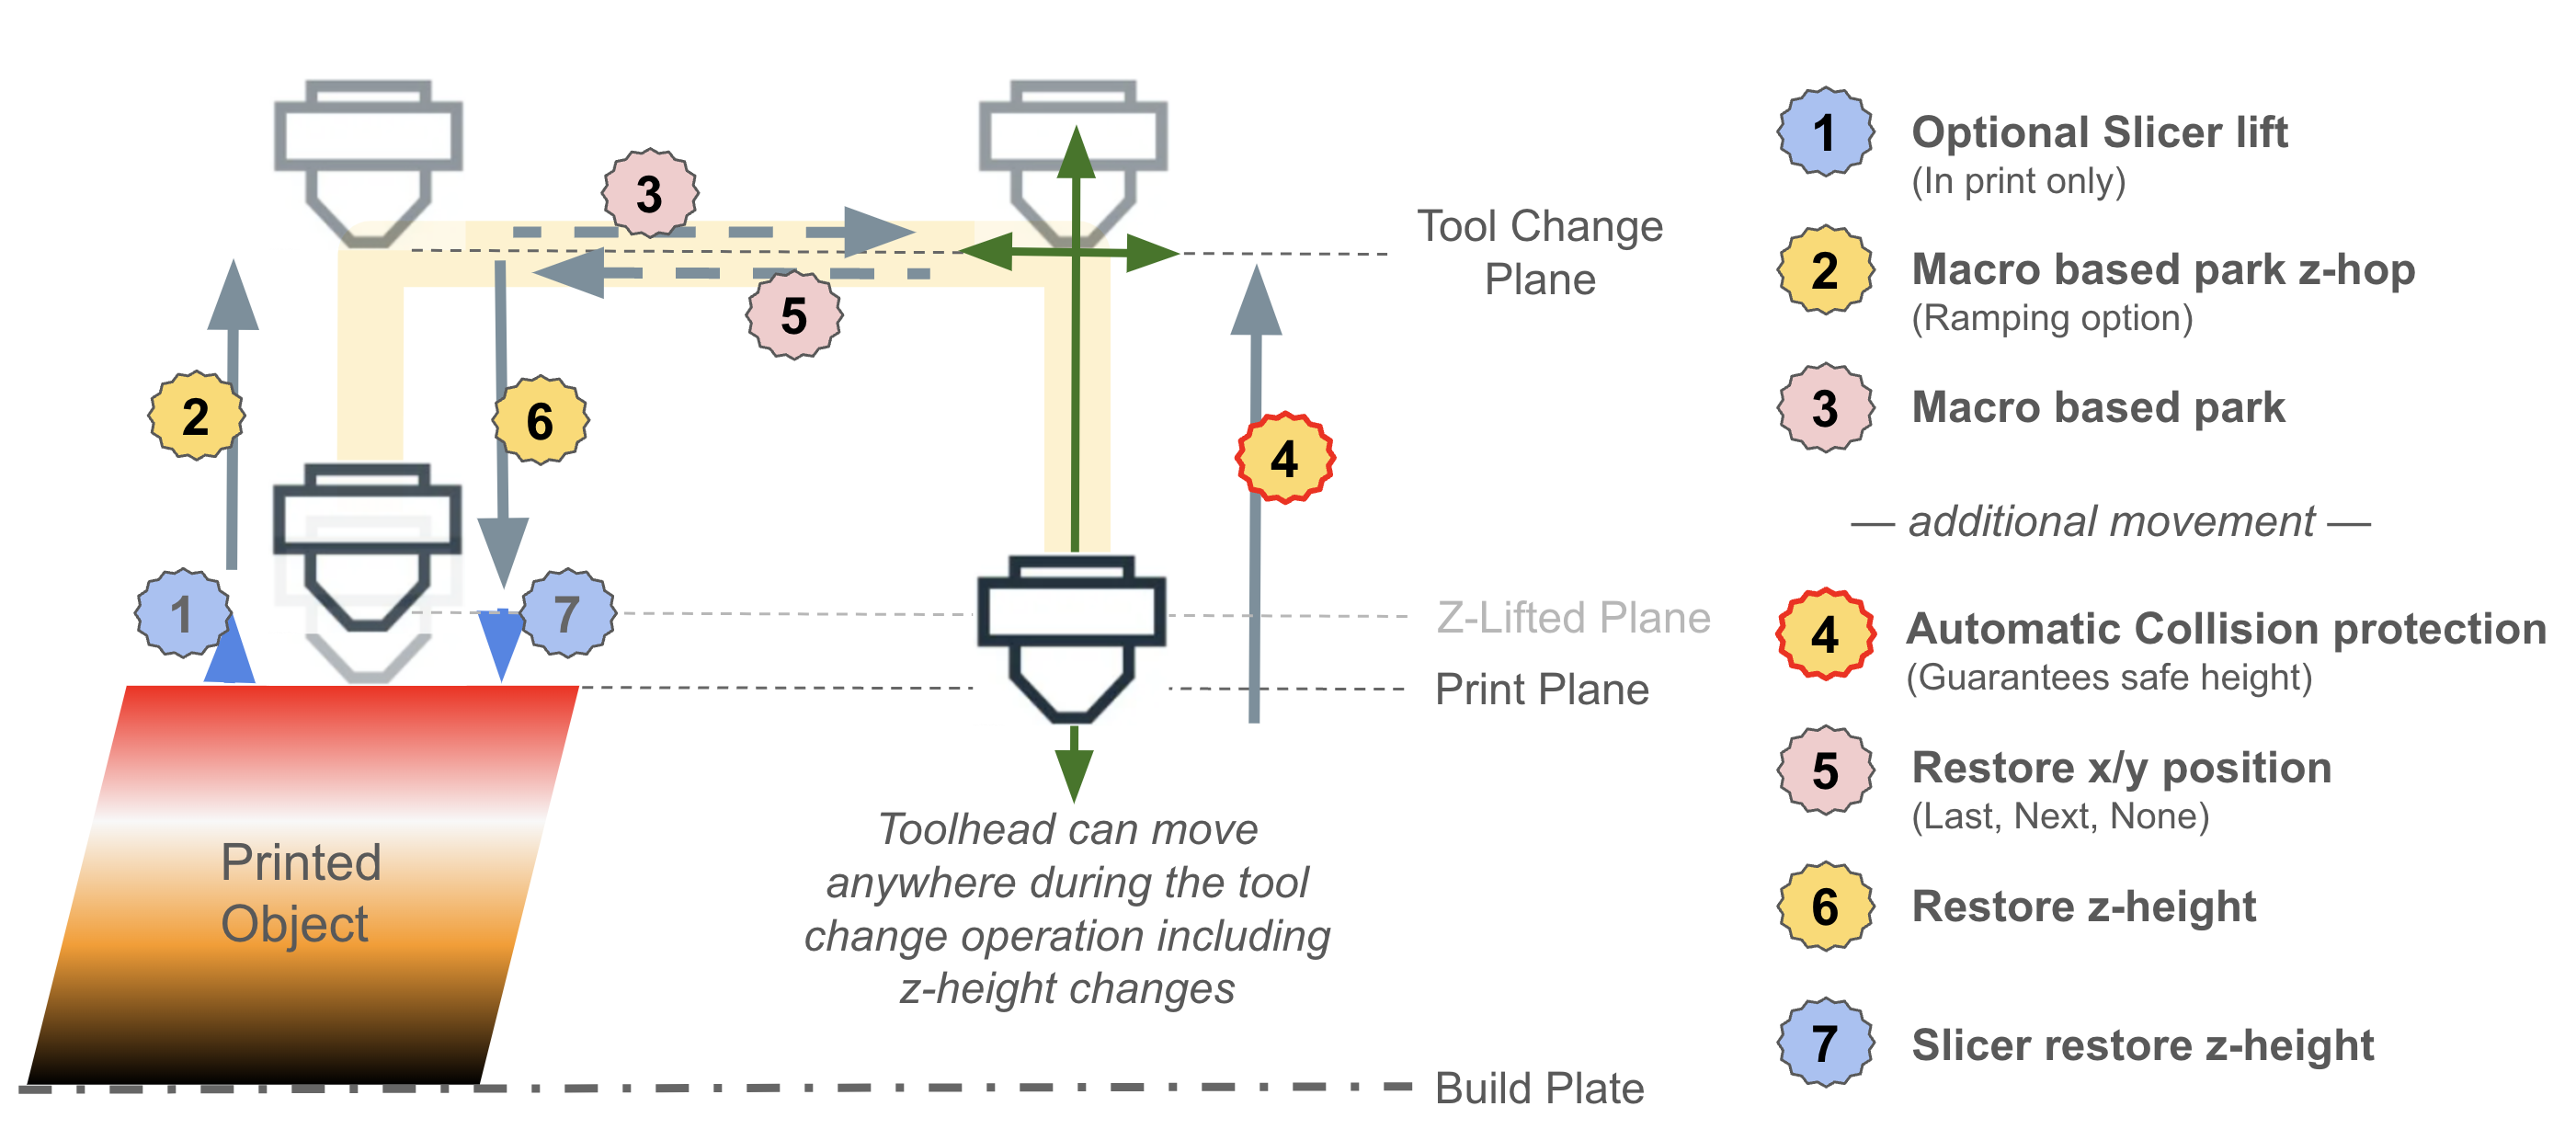
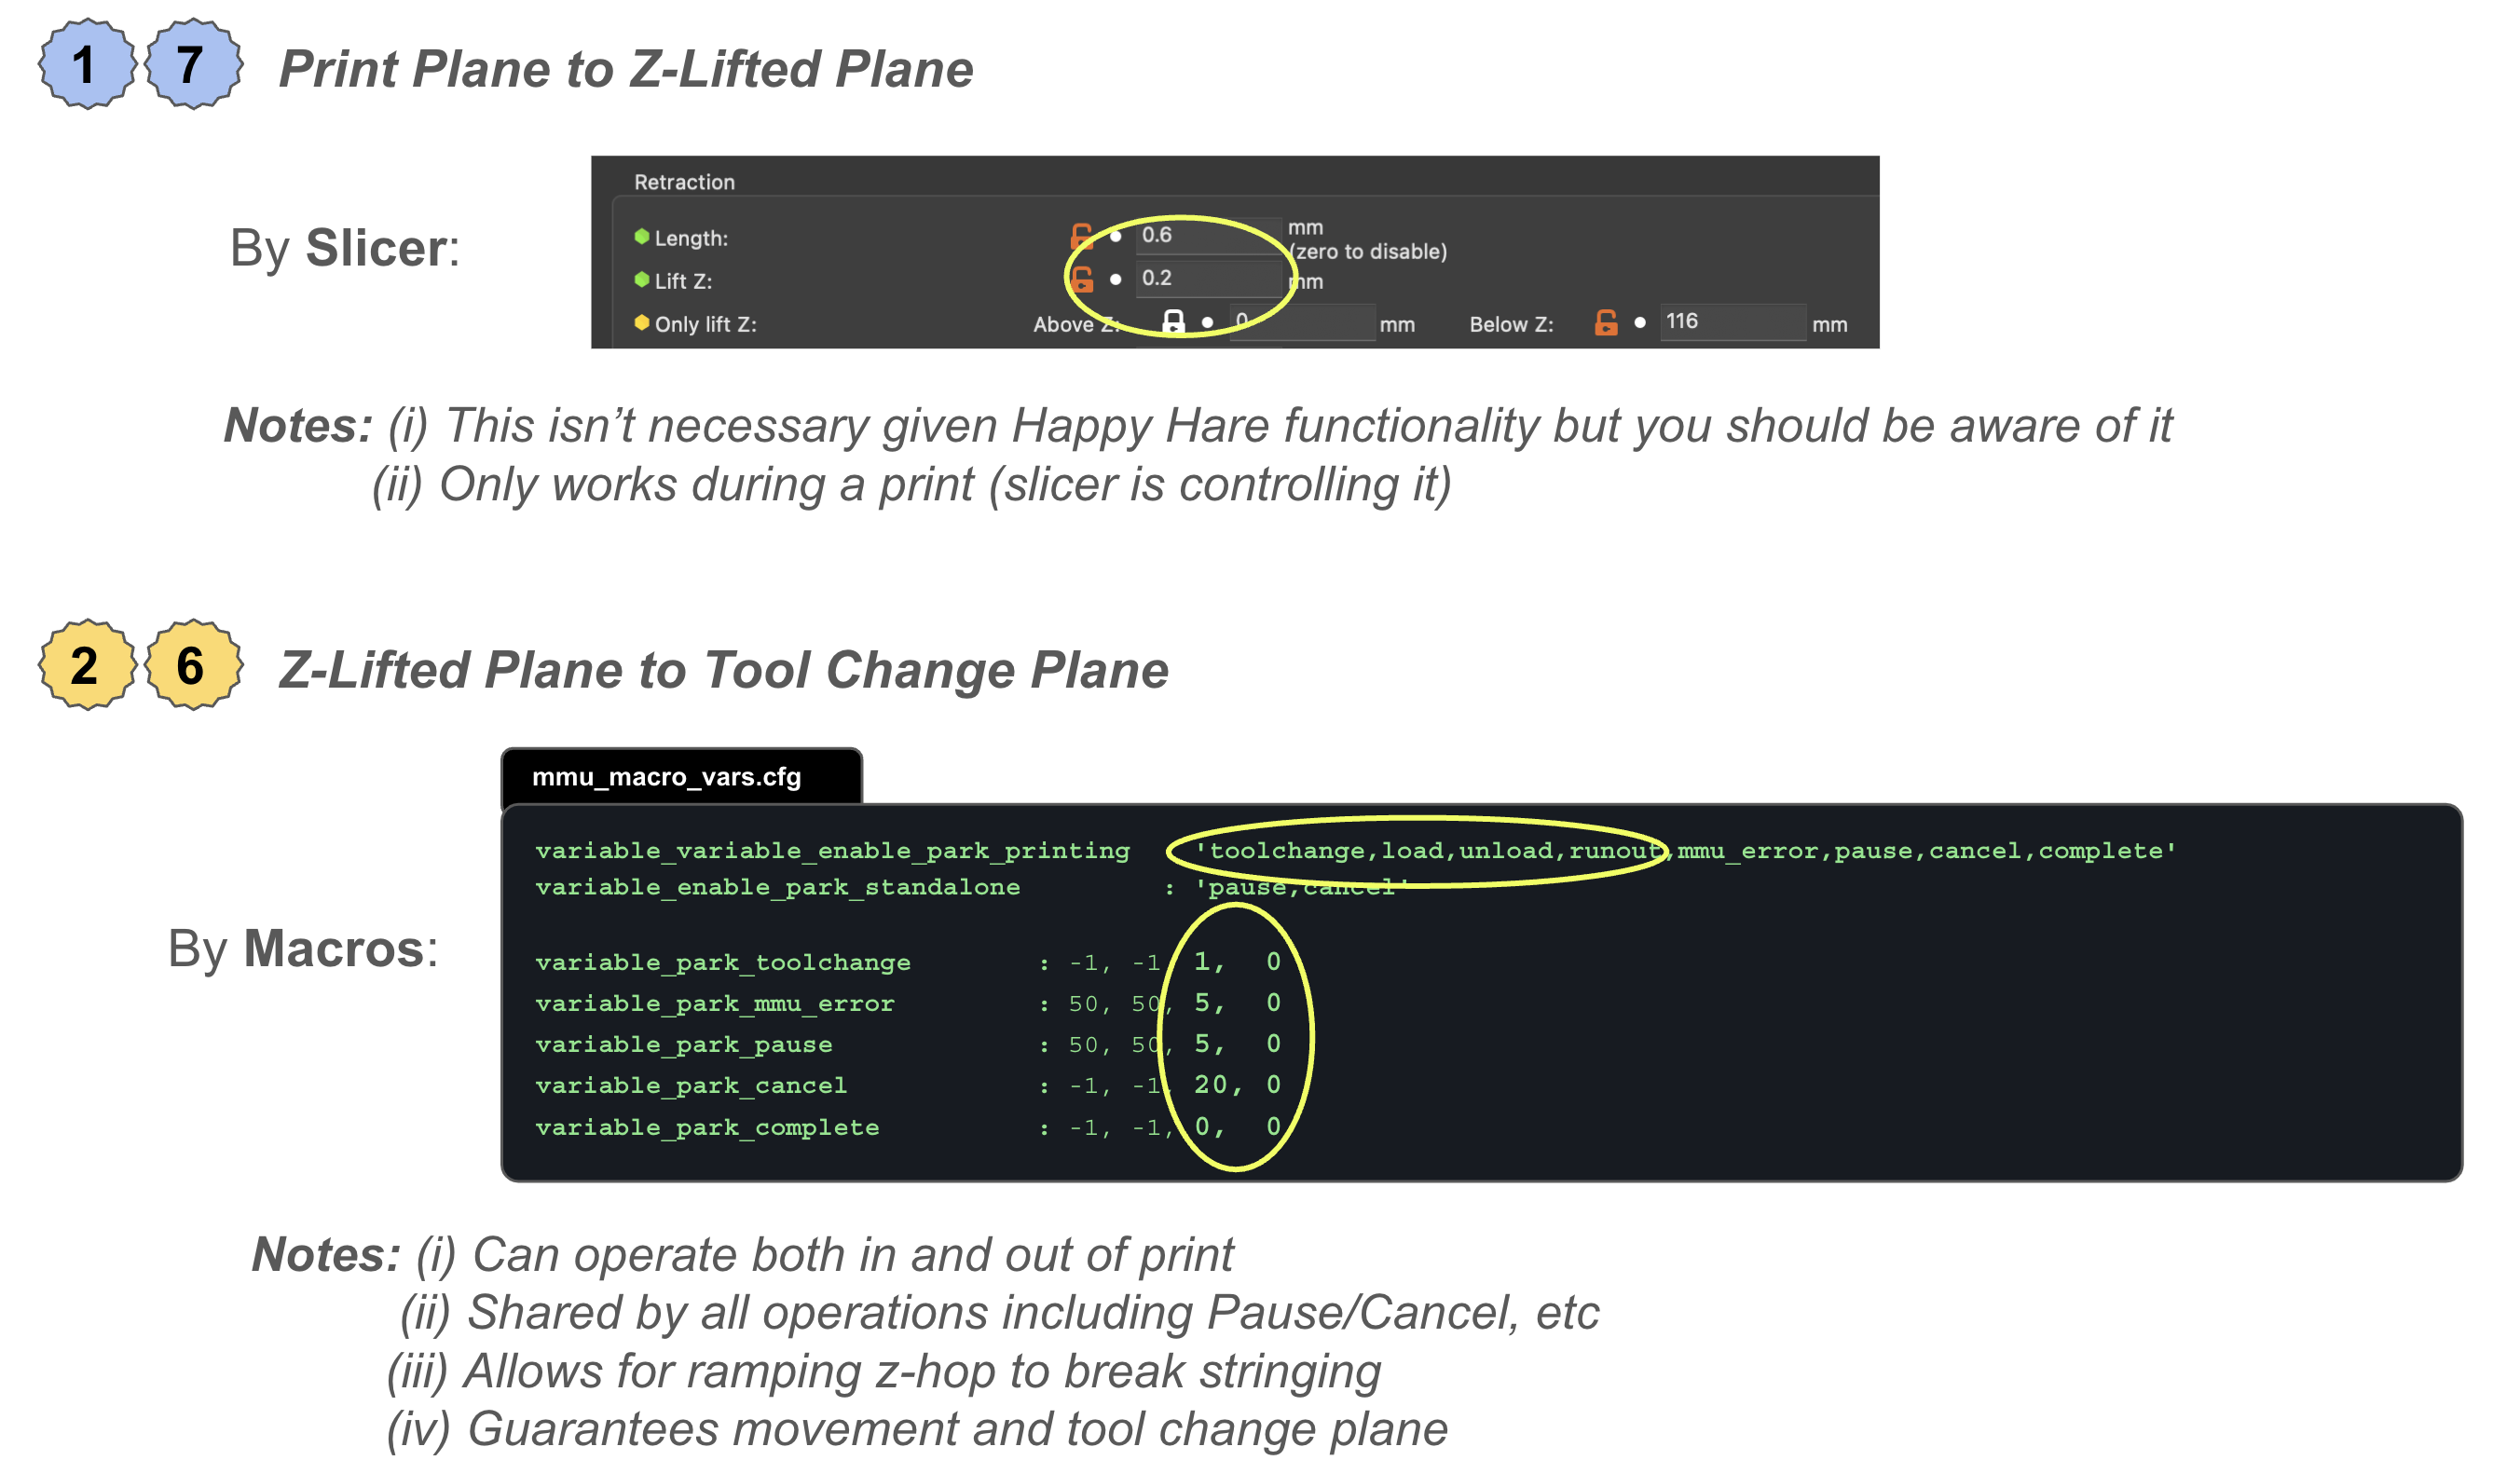
A reasonable starting point: 1mm toolchange z-hop with a 10mm ramp, slicer z-hop at 0.2mm, and a larger 5-10mm z-hop for pause/complete/cancel.
Sequential Printing
Sequential printing needs one extra step, since the usual toolchange movement path may not clear already-completed objects: the z-lifted plane needs to be at least as tall as the tallest printed object. Add this to your slicer's after layer change custom gcode:
MMU_UPDATE_HEIGHT
That's it - harmless during normal printing, but during sequential printing it raises the minimum z-lifted plane to the current tallest object's height. Every z-hop defined in the parking moves above then works relative to that plane rather than the toolhead's current position, so it always ends up the intended height above any printed object.
Note
If you need to call this from before layer change gcode instead,
pass the height explicitly: MMU_UPDATE_HEIGHT HEIGHT=[layer_z] (or
whatever your slicer's own next-layer-height placeholder is). The
after-layer-change version needs no parameters, which is why it's
recommended.
See also
- Slicer Setup
- Feature: Tip Forming and Purging
- Custom Load/Unload Sequences
- Macro: Sequence - the menuconfig view of these same settings, plus the load/unload extension hooks this page only mentions in passing