KlipperScreen
KlipperScreen - Happy Hare Edition is a fork of KlipperScreen maintained alongside Happy Hare itself, adding a dedicated MMU panel on top of everything stock KlipperScreen already does. It's the most complete touchscreen UI for day-to-day MMU operation - gate/tool selection, state recovery, and editing the gate map, all without needing a console.
Getting the fork
The fork replaces your existing KlipperScreen install rather than running alongside it, so get a stock KlipperScreen working first - see KlipperScreen's own docs if you haven't already. Make sure Happy Hare itself is fully up to date too, since the fork tracks features added there.
Once both are in place, from your Raspberry Pi:
cd ~
mv KlipperScreen KlipperScreen.orig
git clone https://github.com/moggieuk/KlipperScreen-Happy-Hare-Edition.git KlipperScreen

cd ~/KlipperScreen/happy_hare
./install_ks.sh -g <num_gates>
<num_gates> is the number of gates/lanes your MMU has (e.g. 9 for a
9-gate Box Turtle). This installs the Happy Hare-specific images and menus,
registers the fork with Moonraker's update manager (pointed at the fork's own
repository instead of upstream KlipperScreen), and restarts KlipperScreen.
Tip
Re-run the same ./install_ks.sh -g <num_gates> command any time after
updating KlipperScreen - it refreshes the Happy Hare-specific images and
menus, which a plain update doesn't touch. It's always safe to run again.
install_ks.sh also takes:
-c <klipper_config_dir>  override the Klipper config directory (needed on a
                          headless setup with no printer attached yet)
-z  skip the GitHub update check
-j  force-reinstall the JetBrains Mono font
The fork tracks upstream KlipperScreen closely - the maintainer re-merges from the original project roughly every two weeks, so it keeps pace with stock KlipperScreen's own updates and features rather than drifting into its own thing.
Important
Only tested on a single 640x480 landscape display so far (a BTT TFT5.0). Vertical mounting is untested and unlikely to lay out well.
If KlipperScreen shows a version-mismatch popup after updating either Happy Hare or the fork, follow whatever the popup itself recommends - it's a live check against the actually-running Happy Hare version, not a static message.
Main Panel
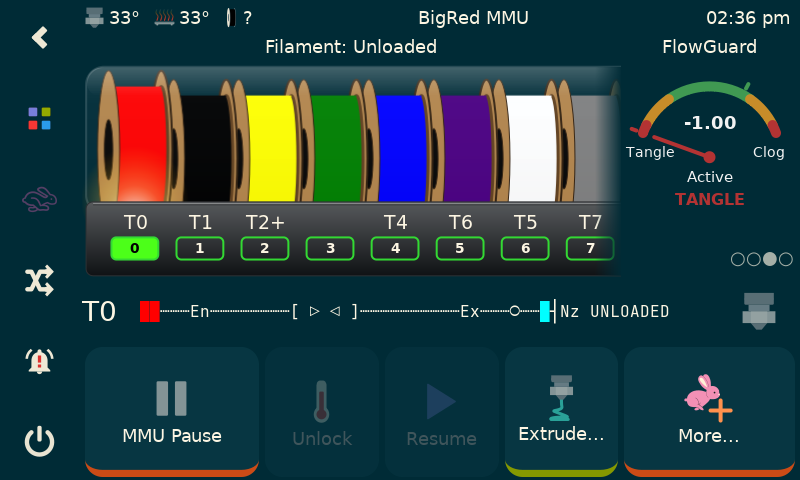
Accessed via the carrot icon on the left navbar (or from buttons on the
KlipperScreen home/print pages instead, if you turn the carrot off in
settings). Each gate's loaded spool renders as an actual colored spool
graphic - color and material come from the gate map's
gate_material/gate_color, set either as defaults in mmu.cfg or live
with MMU_GATE_MAP. Below the spool
row, one button per gate shows its number with the tool(s) mapped to it
labelled above (T2+ when more than one tool maps there); the currently
selected gate's button is outlined.
Tapping a gate opens a quick-action popup for it, rather than a separate row of buttons for each action:
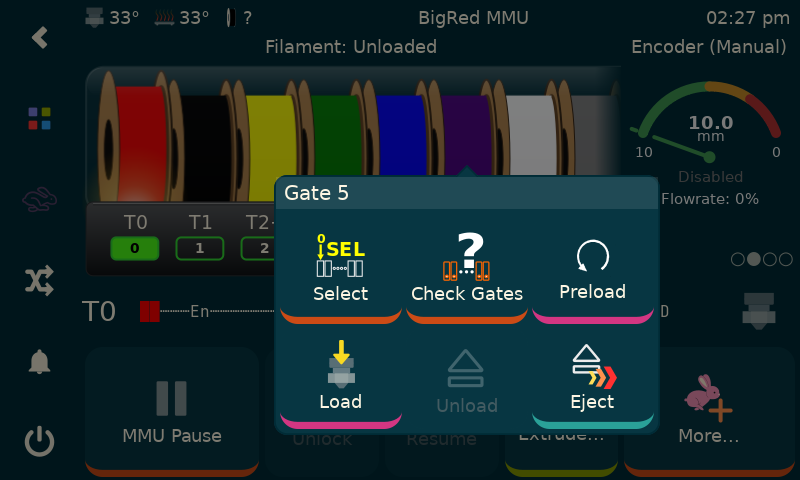
Select switches to that gate/tool; Check Gates, Preload,
Load, Unload, and Eject run the matching MMU operation
directly on it (greyed out if not applicable right now - e.g. Unload on
an already-empty gate). The same screenshot also shows a second gauge in
the top-right panel - an encoder-based manual flow gauge, reporting
distance and flow-rate percentage - one of several gauges that panel
cycles through (tap the dots below it to page through them). FlowGuard's
tangle/clog gauge (shown further up - desired_headroom is the safe zone
it tracks against; see Feature: FlowGuard) is
another.
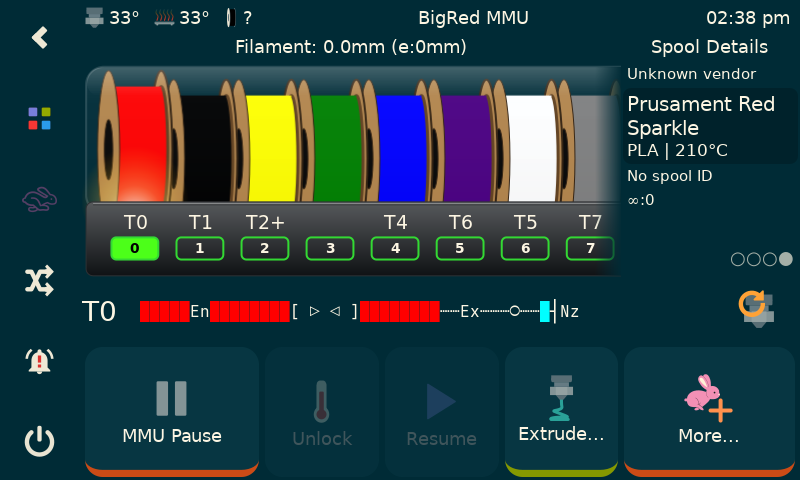
Spoolman/tag details for the selected gate's spool - vendor, filament name, material/temperature, and spool ID - are a third:
Note
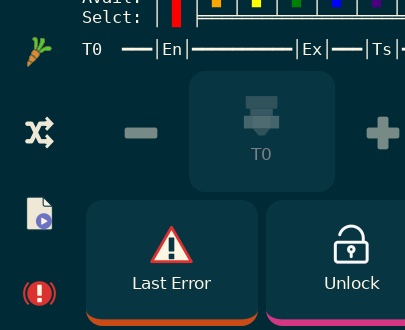
When an MMU error pauses the print, the Pause button (which can also
manually force a pause) changes to Last Error - a quick way to recall
what went wrong, and which toolchange was in progress, without checking
the console.
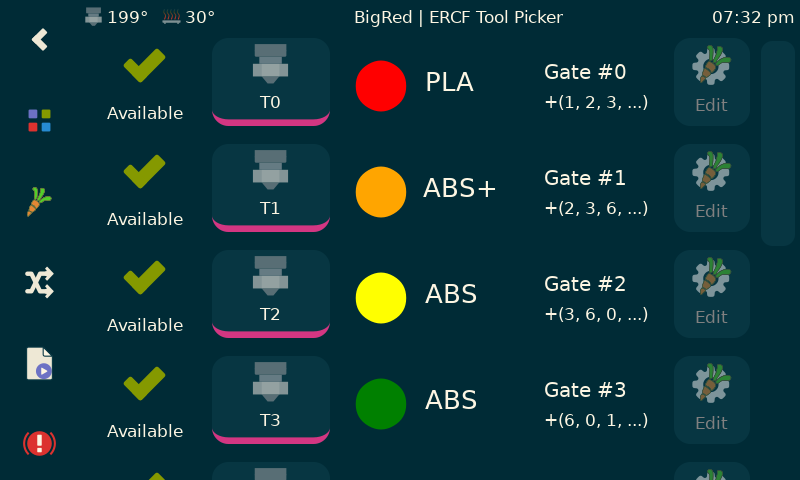
Tool Picker Panel
An alternative way to pick a tool, showing which gate it maps to and that gate's filament type/color at a glance:
Bypass
If a filament bypass is fitted (see
Feature: Filament Bypass), it shows as its own
Byp button at the end of the gate row:
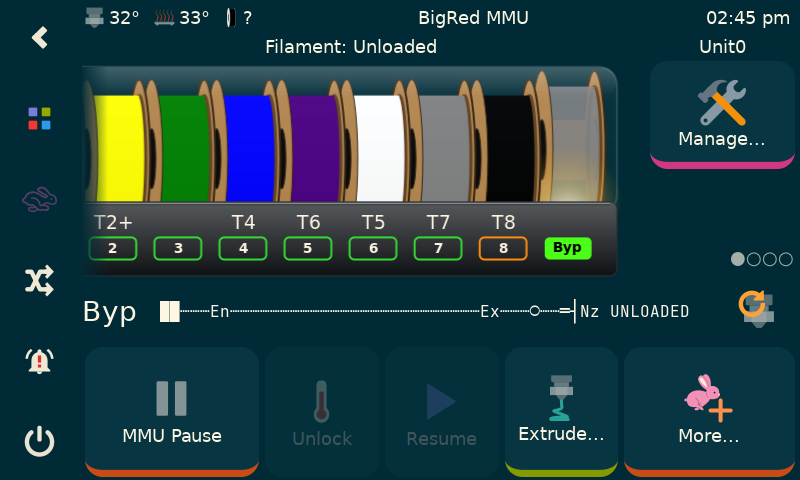
With bypass selected, the same gate popup offers Load/Unload for the
bypass path directly instead of the normal per-gate actions.
State Management & Recovery
Accessed via the Manage... button (top right) when not printing. Working
in physical Gate terms rather than Tool, this is one shared panel
layout across every MMU design - controls that don't apply to your
particular selector (e.g. Servo Up/Servo Move/Servo Down on a
gear-per-gate design with no selector servo at all) simply grey out rather
than being a different panel per design:
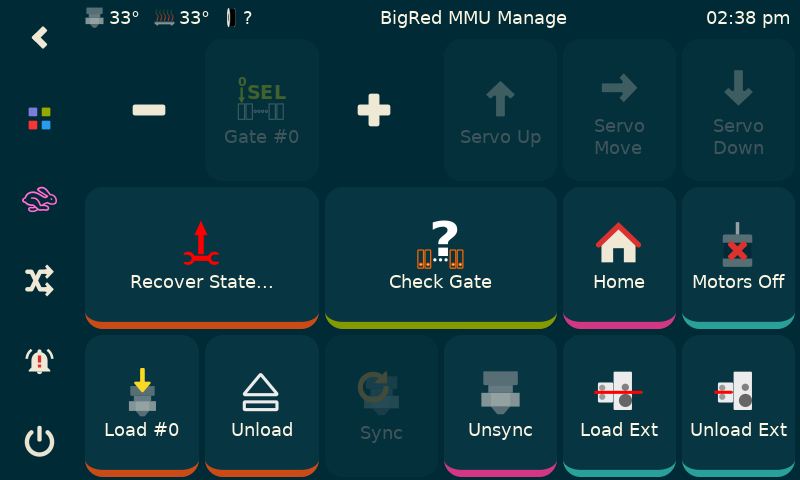
Most functions are self-explanatory; Load Ext/Unload Ext act on the
extruder only, exactly as named.
Recovering State
The Recover State... button on the Manage panel is the one to know: since
Happy Hare tracks its own state and refuses actions it thinks are unsafe, an
error or manual intervention can occasionally leave that tracked state out of
sync with reality.
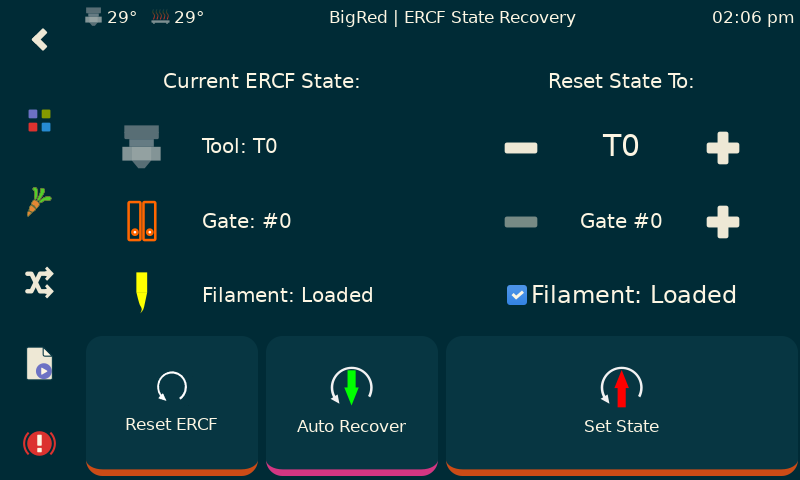
It shows what Happy Hare currently believes, lets you correct it manually, or
run Auto Recover to have Happy Hare re-check just the loaded/unloaded
filament state itself. See Operation for what
state recovery actually does and when it's needed.
Note
Moving the selector from the Manage panel changes the gate state directly - a real physical move. Because of Tool-to-Gate mapping, the tool resets to unknown afterward: a tool can map to more than one gate (EndlessSpool), so which tool that gate now serves isn't automatically knowable.
Filament Editor
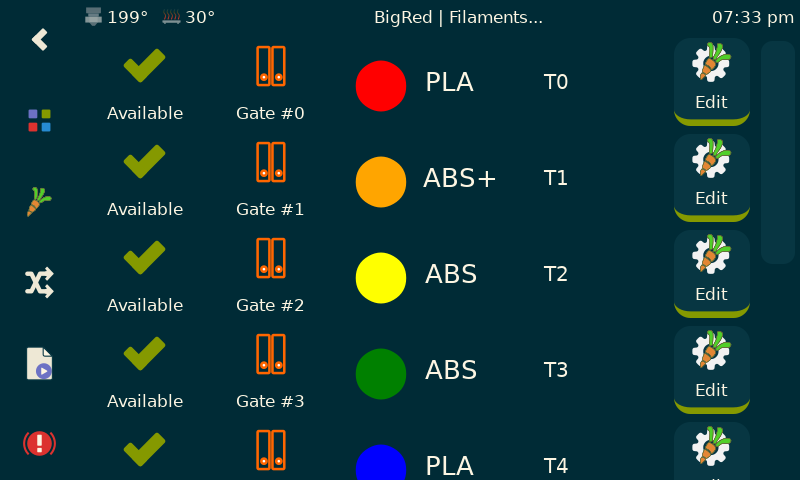
Lists filaments by gate, alongside the tool each currently maps to (usually,
but not always, the same number - a gate can back more than one tool).
Edit... opens per-gate detail:
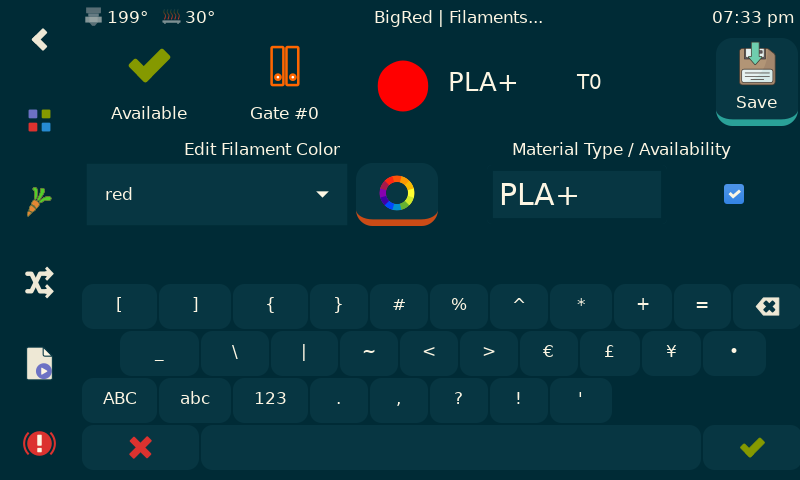
Color is set by name or an RGB picker; material accepts capital letters,
digits, and +/-/_ (no spaces). Filament availability can also be set
here directly, skipping an automatic gate check if you're confident it's
correct.
TTG (Tool-to-Gate) Map and EndlessSpool Editor
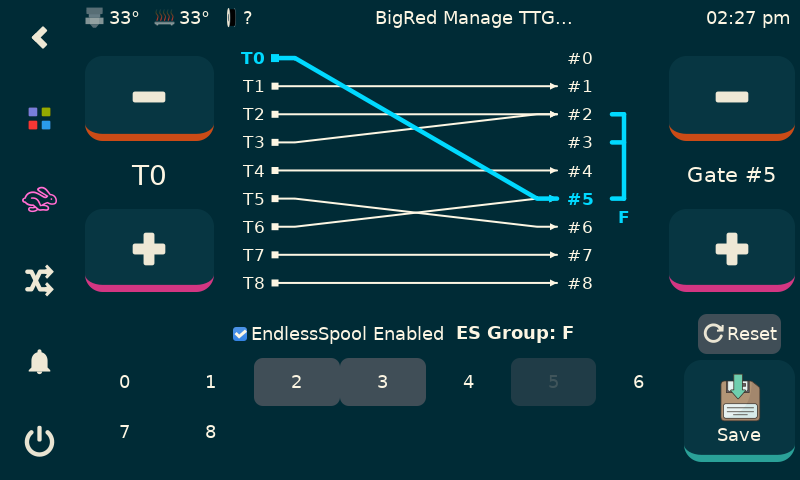
The centre diagram plots the entire Tool-to-Gate map at once - a line from
every tool (T0-T8, left) to whichever gate (#0-#8, right) it
currently maps to. Step through tools with -/+ on the left and gates
with -/+ on the right; the connection between whichever tool and gate
you land on highlights so it's clear which line you're currently editing
(multiple tools can still map to the same gate, same as before).
Below the diagram, EndlessSpool Enabled toggles the feature for the
selected gate's group, labelled ES Group: with a letter (A, B, C,
...); the number pad underneath is that group's actual membership - tap a
gate's number to add or remove it from the current group. Save commits
the whole map at once; Reset restores your configured defaults.
See Feature: Gate/TTG Maps for the underlying mechanics.
Spoolman "filaments" panel
If Spoolman is enabled, this can be more useful than the plain Filament
Editor above (though a spool ID can still be edited from either that panel
or with MMU_GATE_MAP):
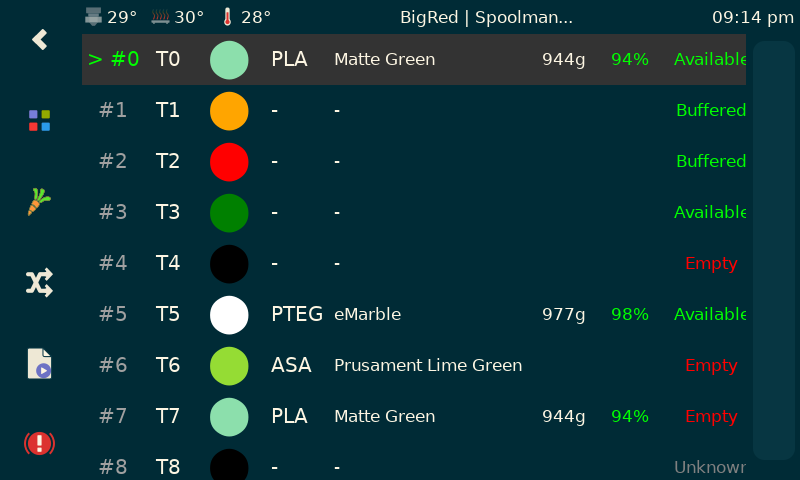
See Feature: Spoolman / Filament Hub for the underlying sync behavior this panel is editing.
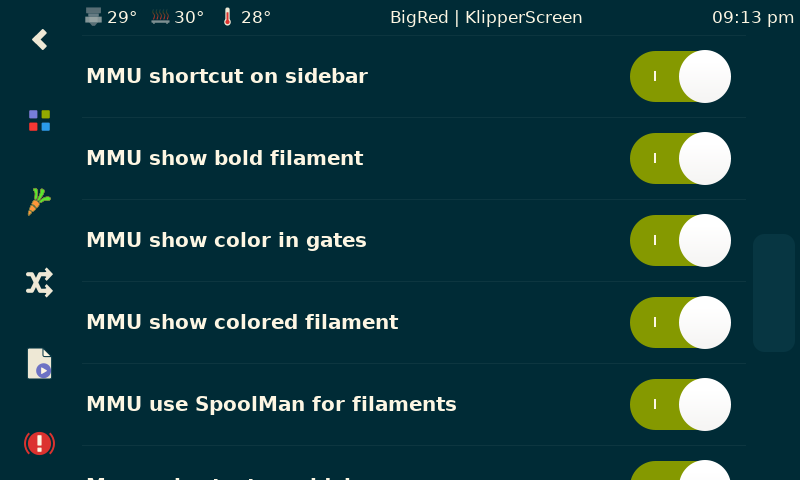
MMU Options
A handful of settings in KlipperScreen's own configuration menu adjust MMU behavior on the display side:
See also
- Mainsail / Fluidd - the equivalent web-UI panels
- Command Reference:
MMU_GATE_MAP - Feature: Gate/TTG Maps
- Feature: Spoolman / Filament Hub